English
vSphere OVF Template Batch Deployment in Practice: From Content Library to Production Virtual Machines

Based on the uploaded Ubuntu 22.04 OVF template, rapidly deploy K8s nodes in batches; only the IP needs to be modified before they are ready for use.
In the previous article, we explained in detail how to clone a virtual machine into an OVF template and upload it to R2 object storage. Today, we will Hands-on demonstration of how to deploy a virtual machine from the content library, implement Deliver a fully configured Ubuntu server in 6-12 minutes.
This article will Import OVF into Content Library→Deploy virtual machine→Modify IP address→Verify SSH login Full-process demonstration, ultimately in kubernetes Successfully created in the resource pool k8s-infra-221 Node.
1. Import the OVF template into the content library
First, import the downloaded OVF template file into the vSphere content library for subsequent batch deployment.
1. Enter the content library import interface.
In the vSphere Client, go to the content library template, click Operation→Import Project:
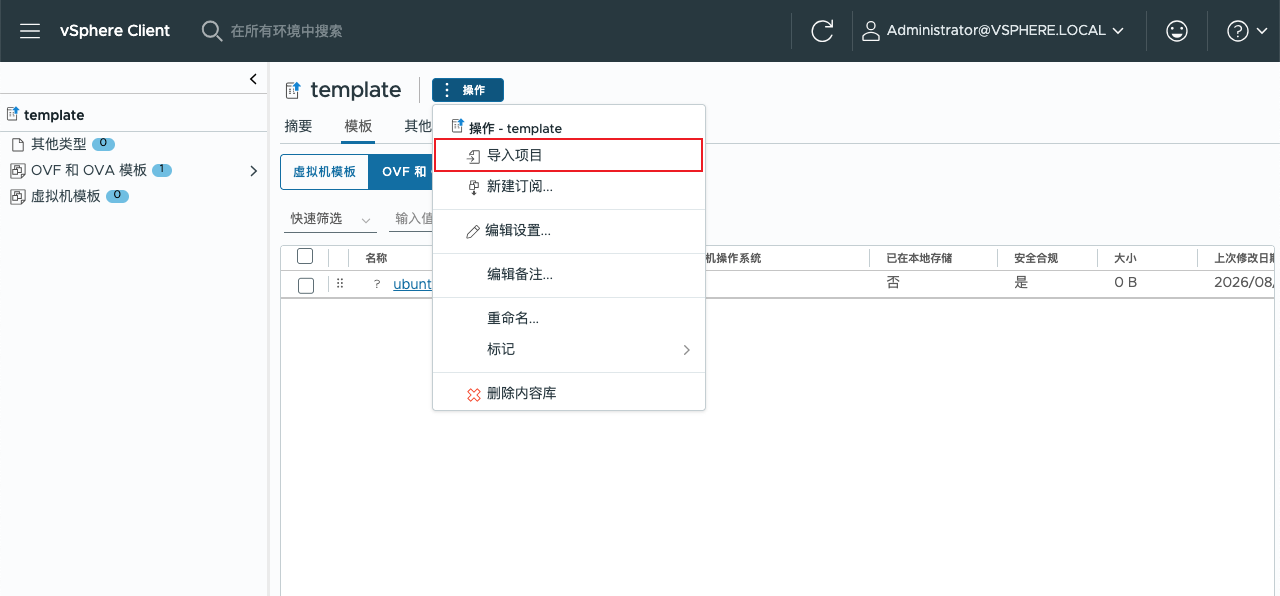
2. Select a local OVF file
In the pop-up "Import Library Project" window:
Select source: Click Local file → Upload file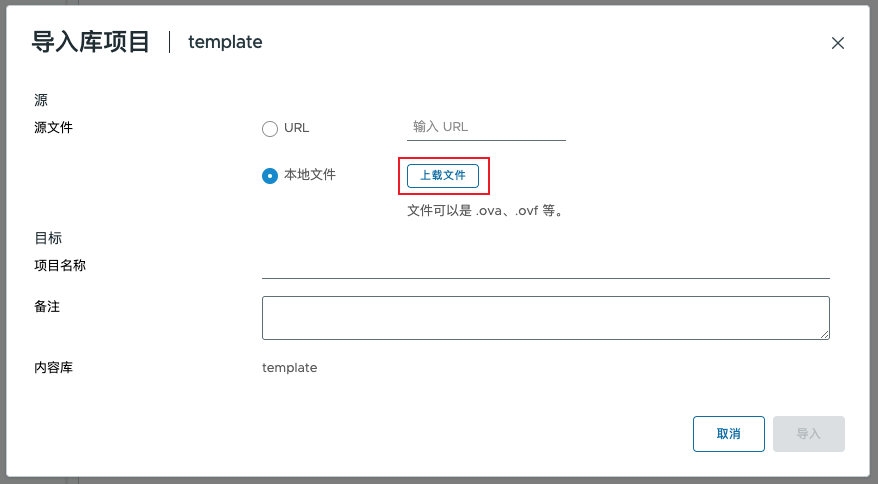
Select local .ovf,.vmdk and .nvram File 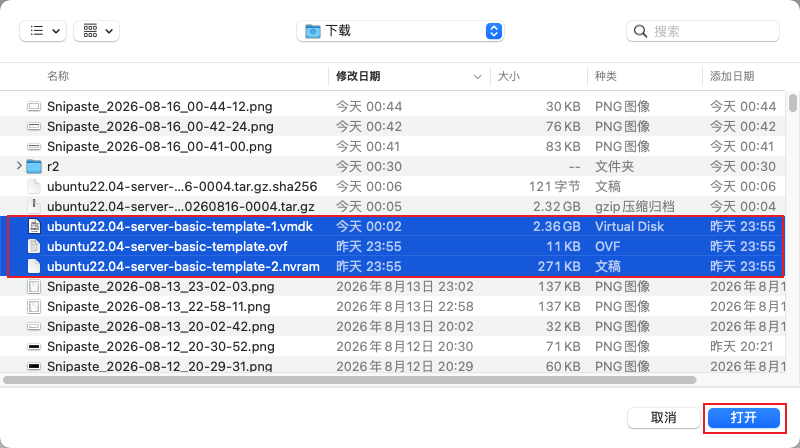
3. Confirm import file list
After the upload is complete, the system will display the 3 files to be imported:
| filename | Description |
|---|---|
ubuntu22.04-server-basic-template.ovf | VM hardware configuration profile |
ubuntu22.04-server-basic-template-1.vmdk | Virtual disk file (2.36 GB) |
ubuntu22.04-server-basic-template-2.nvram | UEFI Firmware Settings |
The project name is automatically identified as ubuntu22.04-server-basic-template, the target database is template:
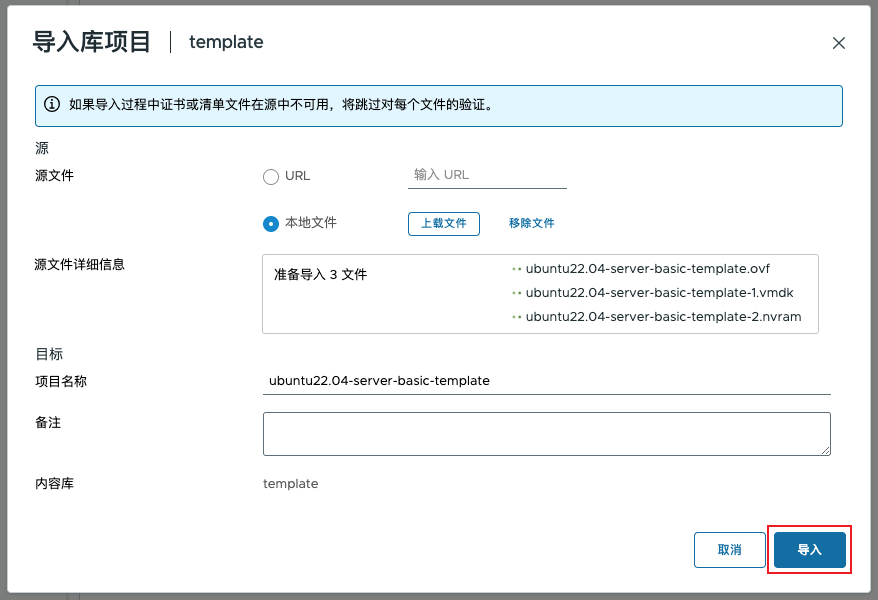
4. Monitor Import Tasks
After clicking “Import”, vCenter will perform file upload and project creation tasks in the background. In Task Console can be seen in:
| Task Name | Status | Description |
|---|---|---|
| Upload the file to the library project | Completed | Upload OVF file to content library storage |
| Create library project | Completed | Create a template project in the content library |
The entire import process takes about 2-3 minutes(Depending on network bandwidth):
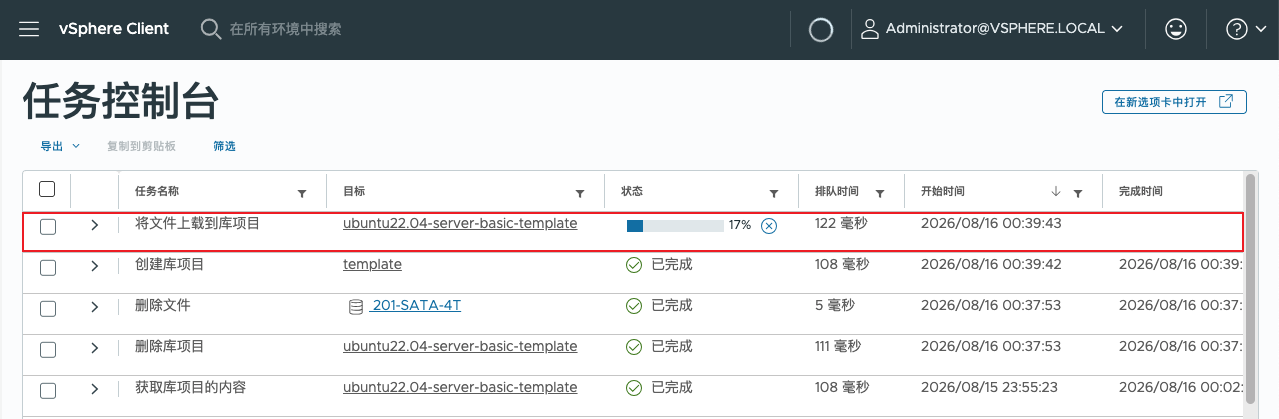
5. Verify the import result
After the import is complete, go to the content library.template of OVF and OVA templates Tab, you can see the newly imported template:
Name:
ubuntu22.04-server-basic-templateType: OVF template
Size: 5.53 GB (thin provisioning format)
guest operating system: Ubuntu Linux (64-bit)
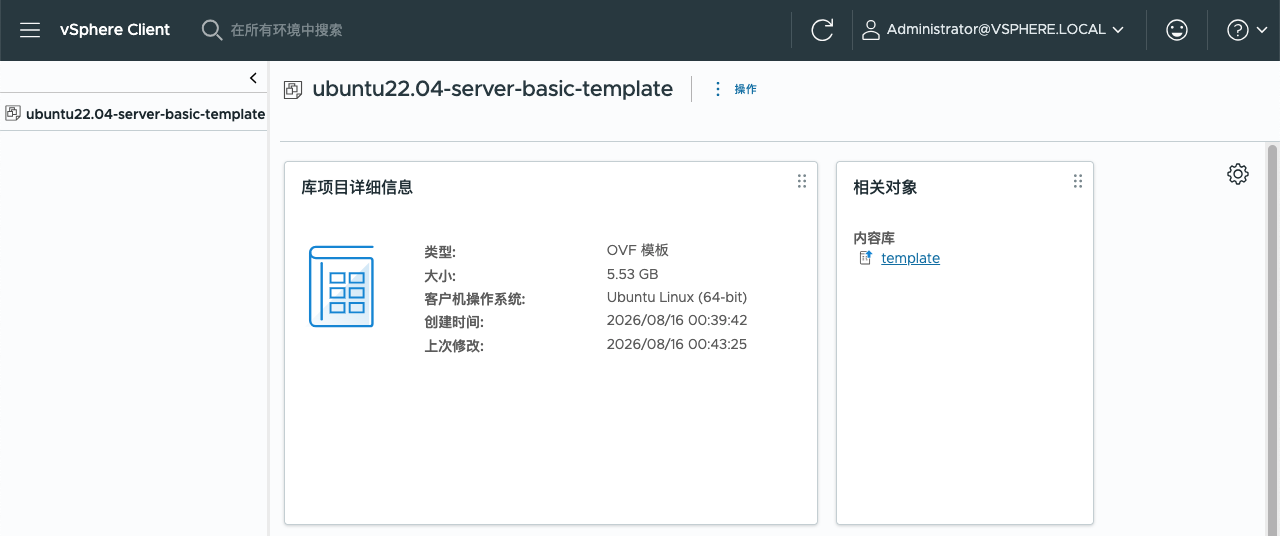
II. Create a Virtual Machine from a Content Library
After the template is imported successfully, you can deploy virtual machines from the content library. This demonstration will kubernetes Create in resource pool k8s-infra-221.
1. Enter the deployment entry point
at Hosts and clusters In the view, right-click the target resource pool (here is kubernetes), select Deploy OVF Template:
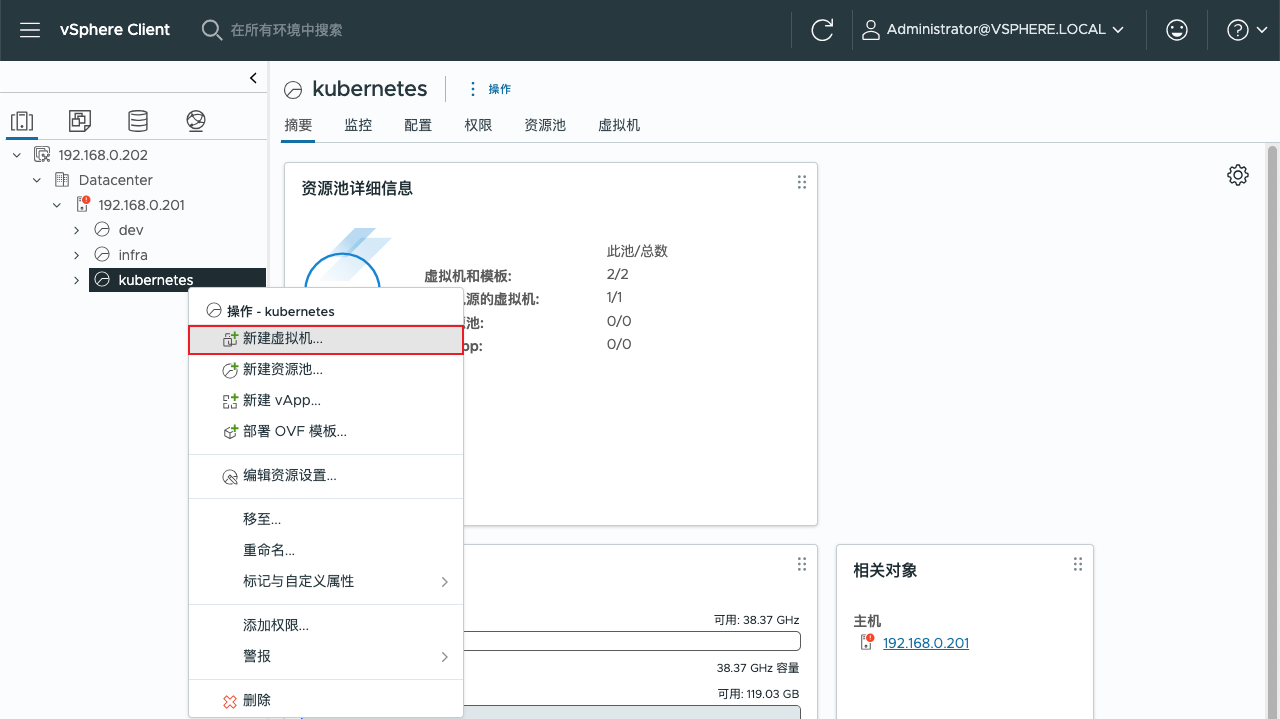
2. Select the creation type
Select Deploy from template, then click “Next Page”:
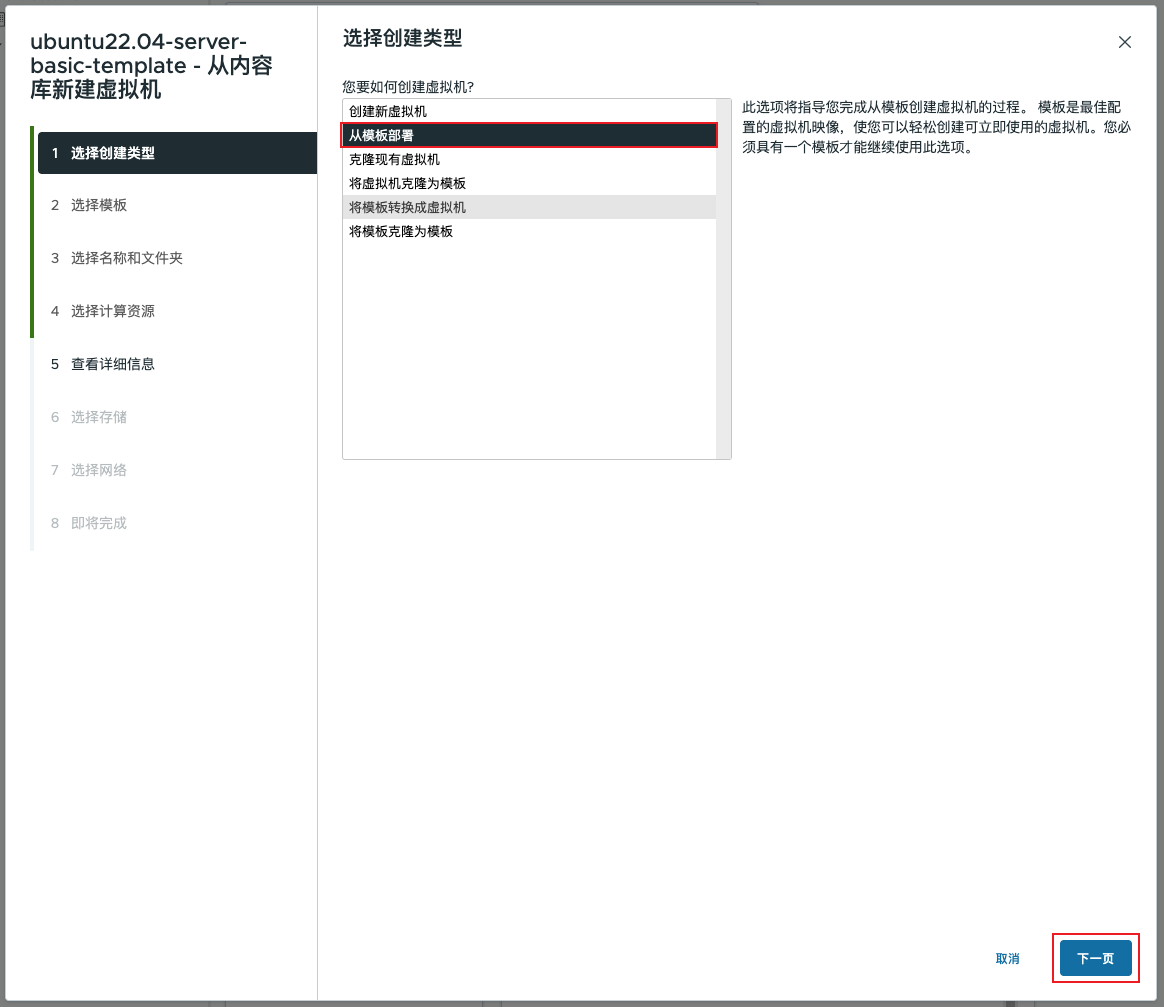
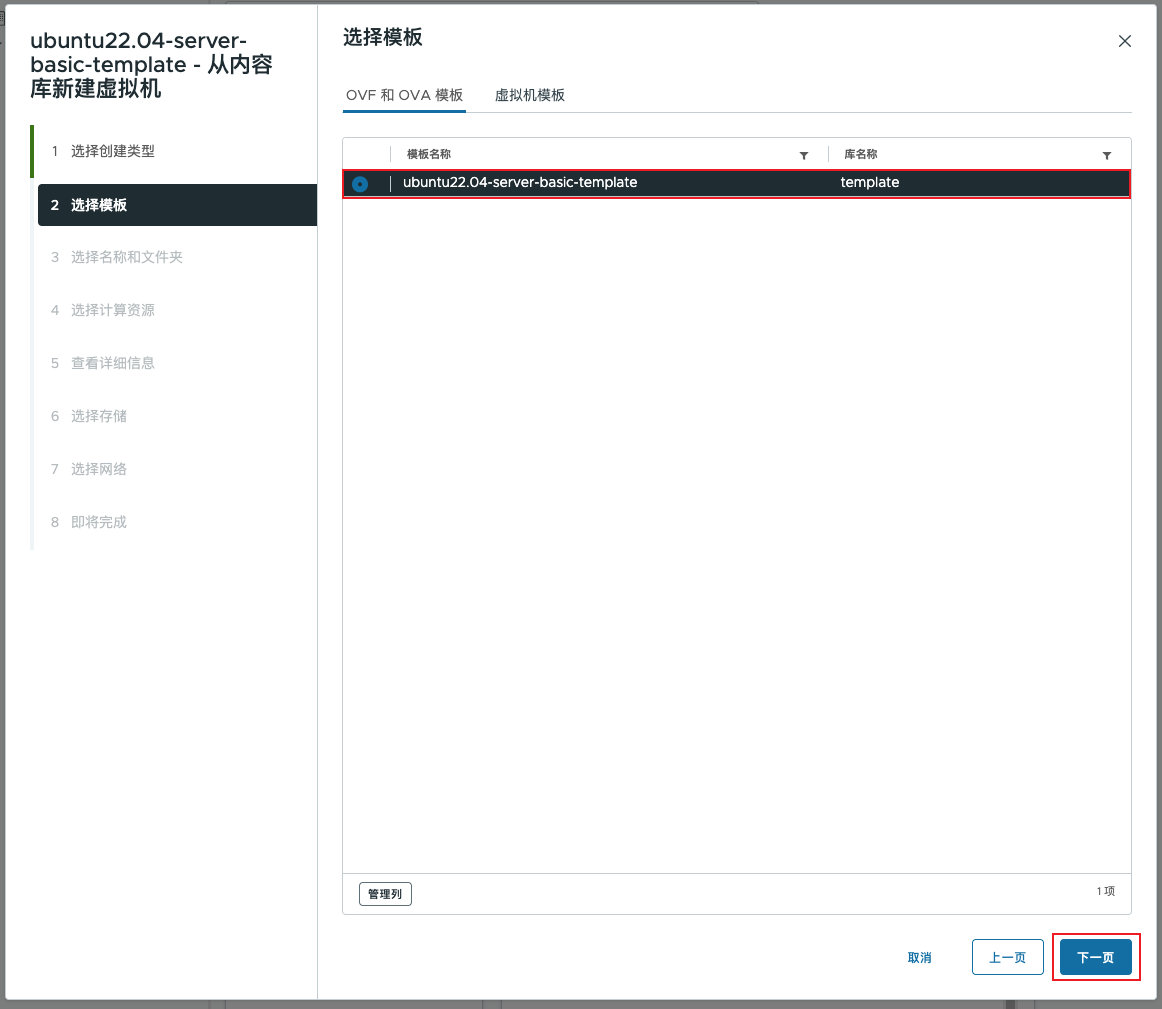
3. Select Template
In the template list, select the one we just imported ubuntu22.04-server-basic-template(located in the library template Middle):
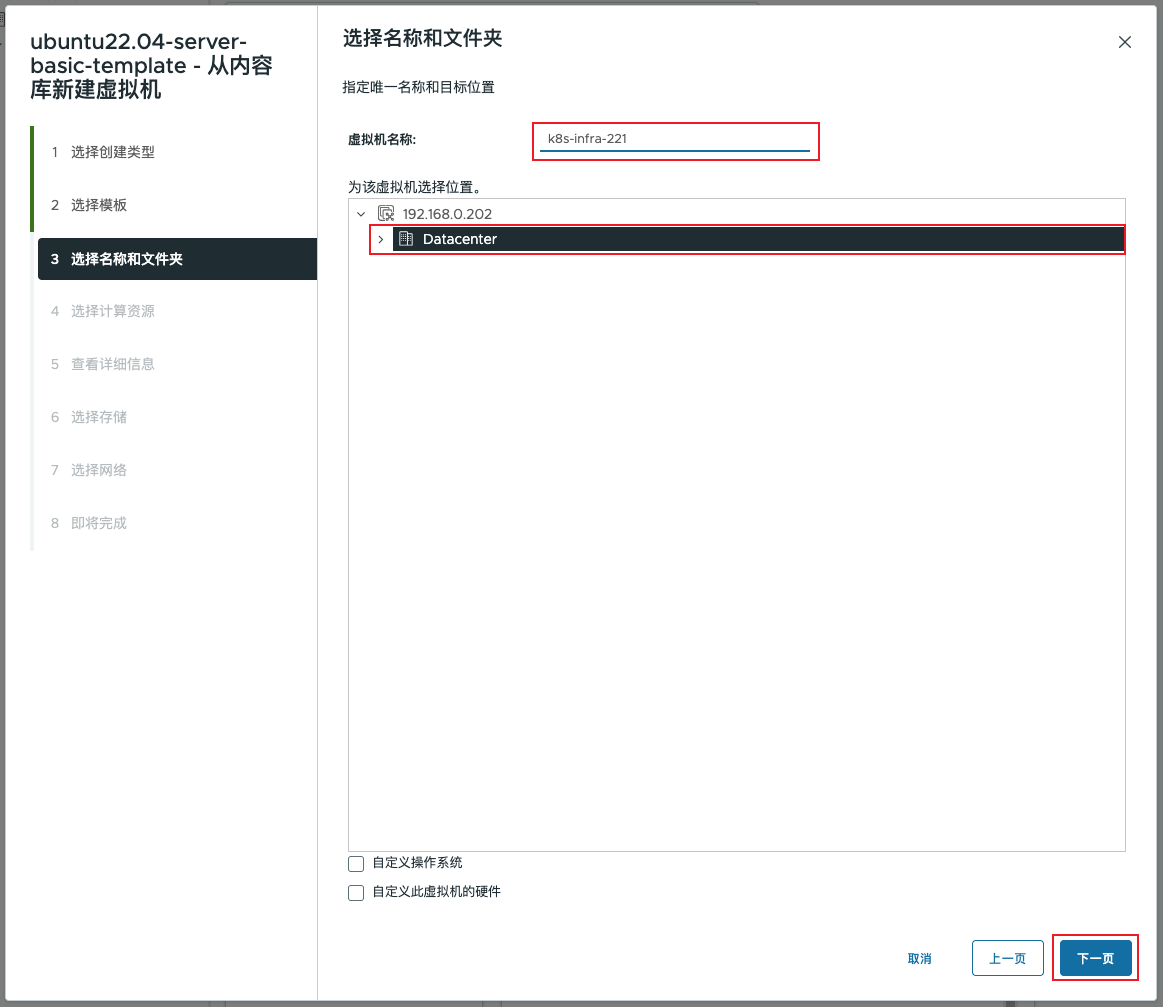
4. Set name and location
Specify the virtual machine name and folder location:
Virtual machine name:
k8s-infra-221(according to the cluster naming convention)Location: Select
DatacenterRoot directory
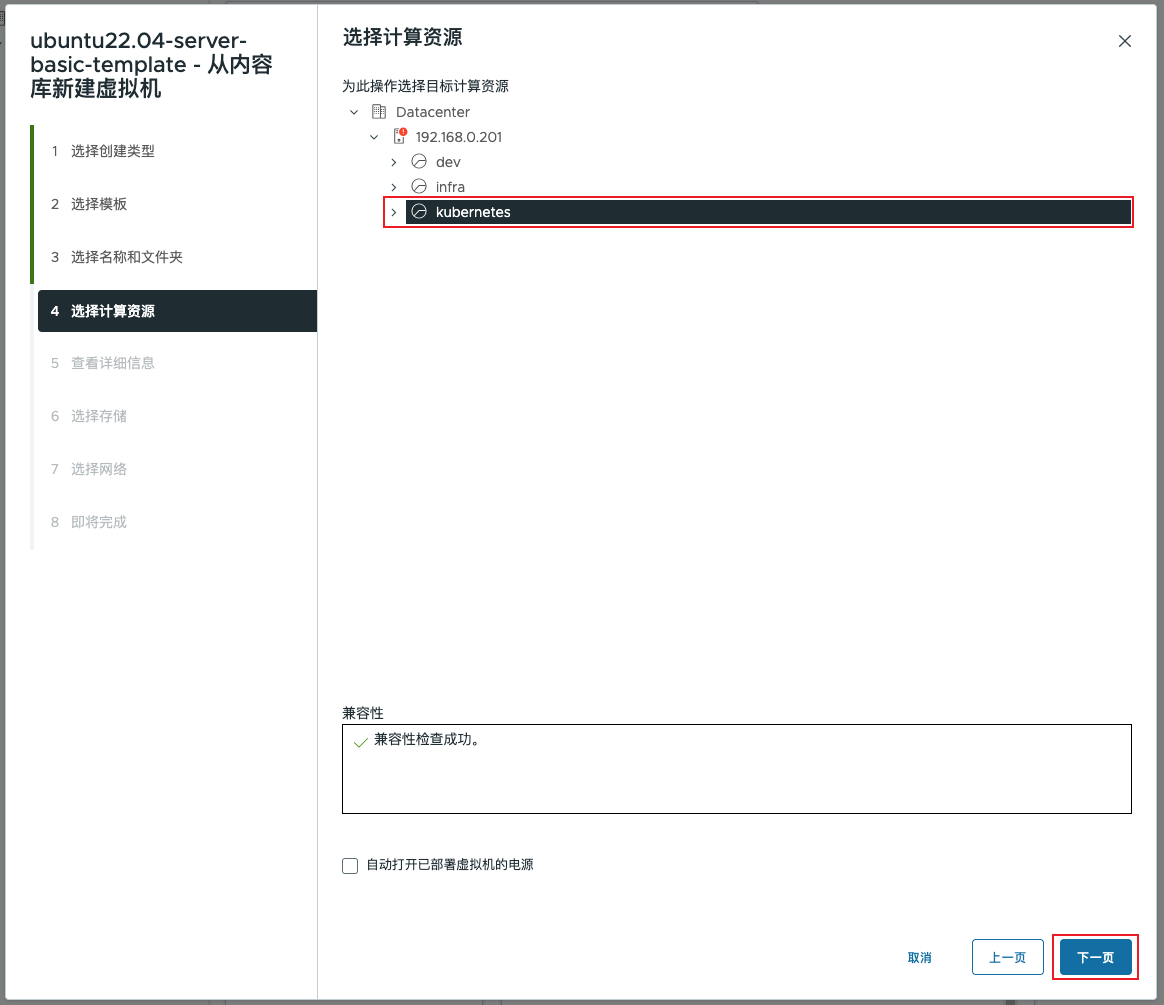
5. Choose computing resources
Select the target resource pool or host. This selection kubernetes Resource pool, compatibility check passed:
6. View detailed information
This step displays the advanced configuration information of the OVF package:
| Configuration item | value |
|---|---|
| Publisher | Certificate does not exist (internal template, no signature) |
| Description | Installation is based on the Ubuntu Server method. |
| Disk size | 60.0 GB (Thick Provision Lazy Zeroed) |
Click "Next" to accept the advanced configuration options:
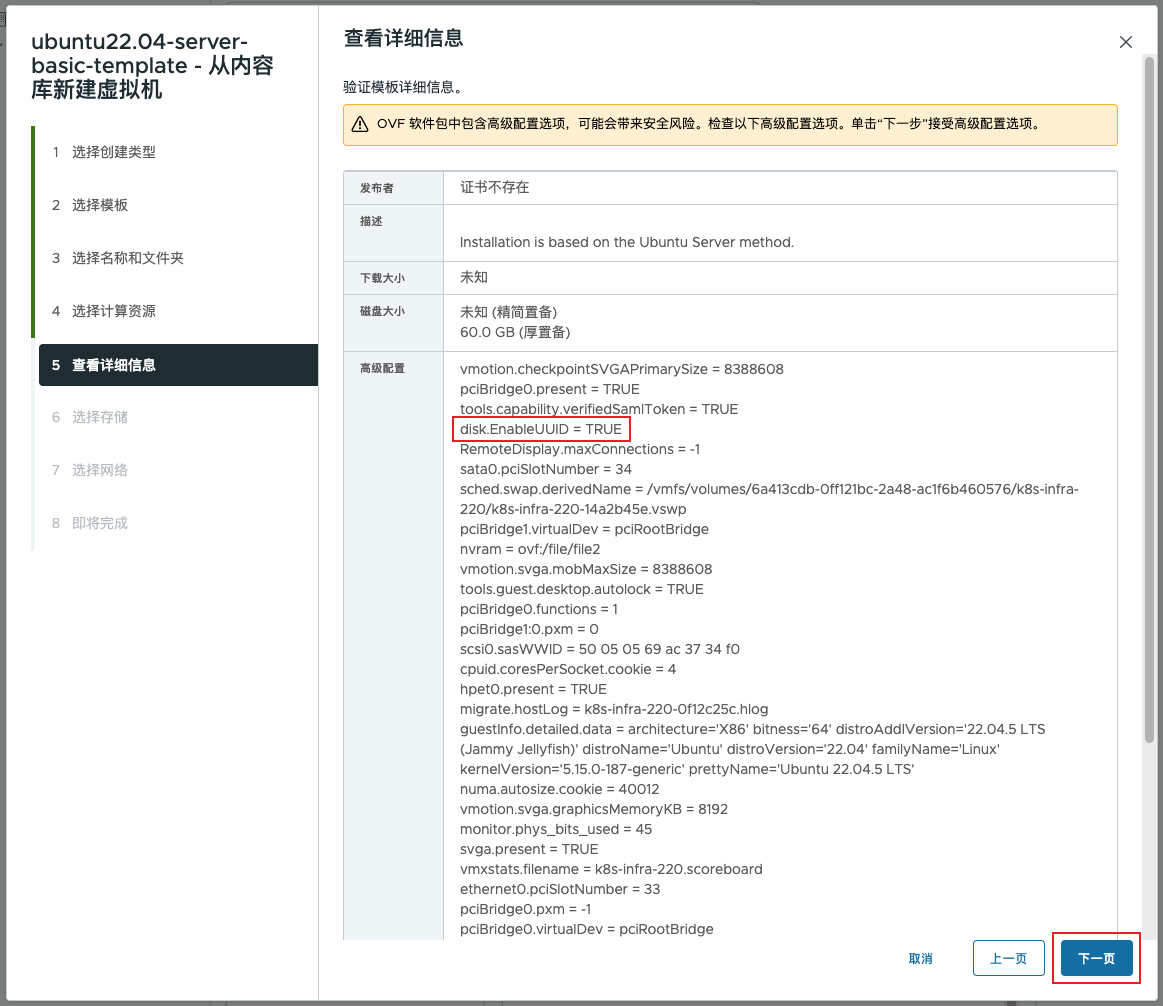
Attention If the prompt “Publisher certificate does not exist” appears, simply ignore it because this is an internally built template.
7. Key configuration: disk.EnableUUID = TRUE
In the OVF deployment wizard's View details In the steps, there is one that is easily overlooked but Extremely important advanced parameters of —disk.EnableUUID = TRUE.
What is this parameter for?
| dimension | Description |
|---|---|
| effect | Enable the operating system in the virtual machine to Directly access the UUID of the physical disk, rather than the virtual identifier generated by the virtualization layer |
| default value | FALSE(vSphere is not enabled by default) |
| Scope of impact | Disk identification, persistent storage, cluster failover |
Why must it be set to TRUE?
在以下场景中,must Enable disk.EnableUUID = TRUE, otherwise it will cause serious problems:
| Scene | Consequences of not enabling it |
|---|---|
| K8s cluster + vSphere CSI | PersistentVolume (PV) cannot be mounted correctly, and the Pod cannot use the vSphere storage class. |
| Physical to virtual (P2V) migration | The migrated system may fail to correctly recognize the disk, causing boot failure. |
| Cross-host vMotion | Inconsistent disk identifiers may cause abnormal data access. |
| Applications that depend on disk UUIDs | For example, Oracle ASM and some database clusters will report errors due to UUID changes. |
Configuration of this template
In this deployment,disk.EnableUUID = TRUE It has been included in the OVF template as an advanced configuration option and will be automatically applied during deployment:
disk.EnableUUID = TRUEYou can in the OVF deployment wizard's View details On the page, scroll through the advanced configuration list to confirm that this parameter is included:
Verification method: After the virtual machine deployment is complete, log in to the system via SSH and execute ls -l /dev/disk/by-id/, if you can see something similar scsi-36000c29... disk identifier, it indicates that the UUID feature is in effect.
Best practice recommendations
| Suggestion | Description |
|---|---|
| Preconfigured during template creation | Before creating an OVF template, add in the "Advanced Parameters" of the source virtual machine disk.EnableUUID = TRUE, all VMs subsequently deployed based on this template will automatically inherit |
| Manually add deployed VM | Edit Virtual Machine Settings → Virtual Machine Options → Advanced → Configuration Parameters → Add Parameter disk.EnableUUID = TRUE, requires restarting the VM to take effect |
8. Select Storage
Select the storage location and format of the virtual disk:
| configuration item | This selection |
|---|---|
| Data storage | NVMe_2TB_Storage(High-performance storage) |
| Virtual disk format | Thick Provision Lazy Zeroed(Recommended for production environments) |
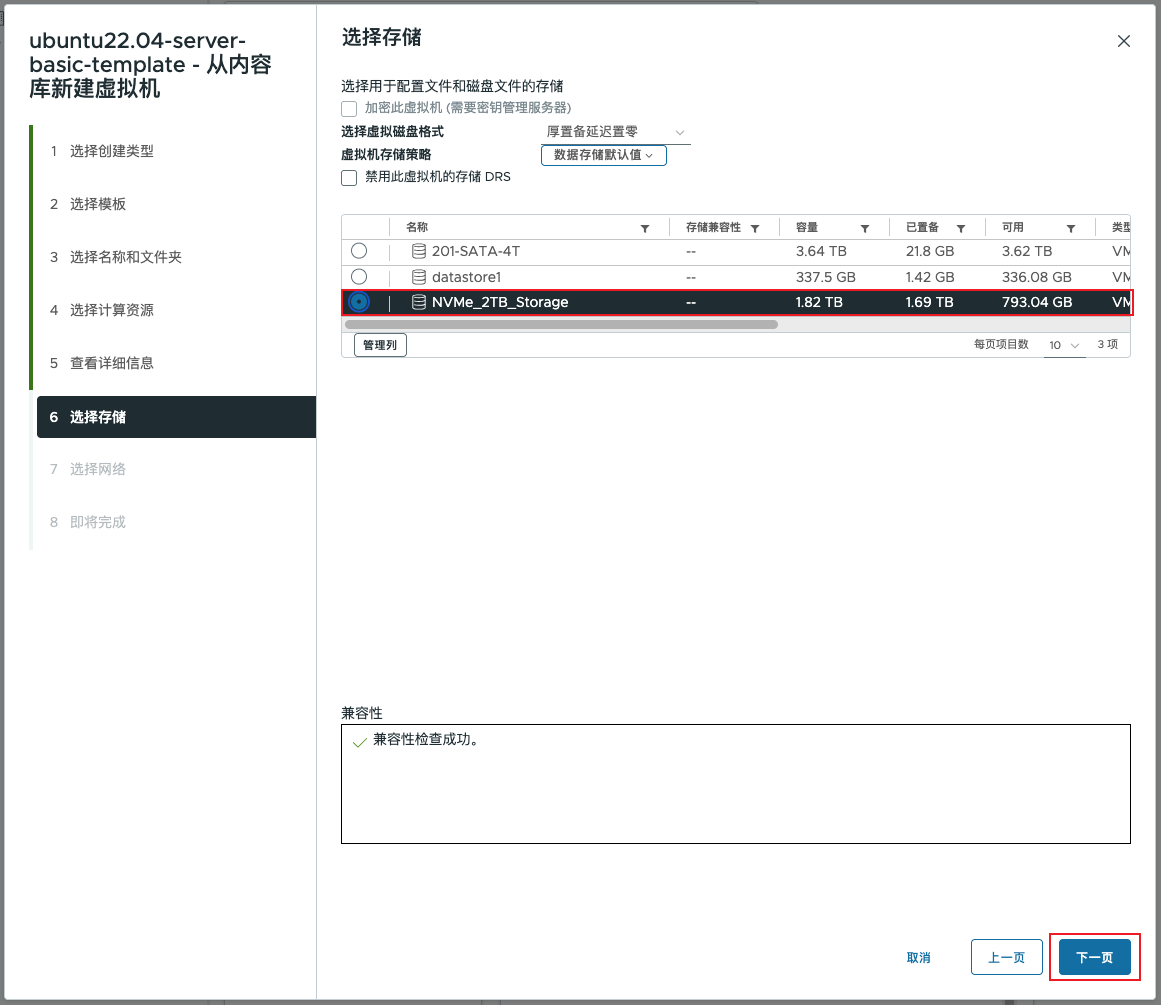
About disk format selection:
Thick Provision Lazy Zeroed: Preallocate all space, best performance, suitable for production environments
Thin provisioning: On-demand allocation, saves storage space, suitable for Homelab
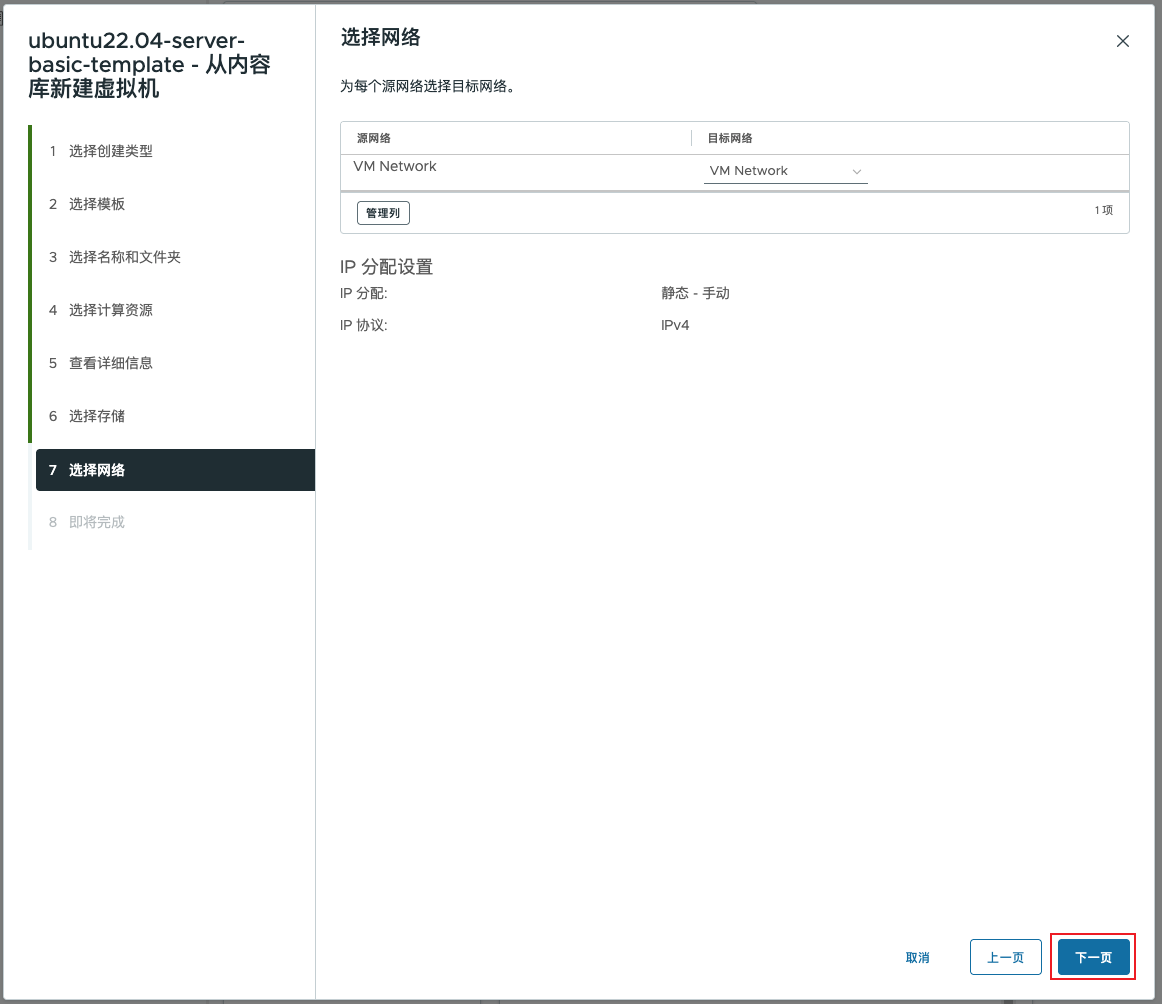
9. Select Network
Configure network mapping, source network VM Network Map to the target network VM Network:
IP allocation: Static - Manual (configure later inside the VM)
IP protocol: IPv4
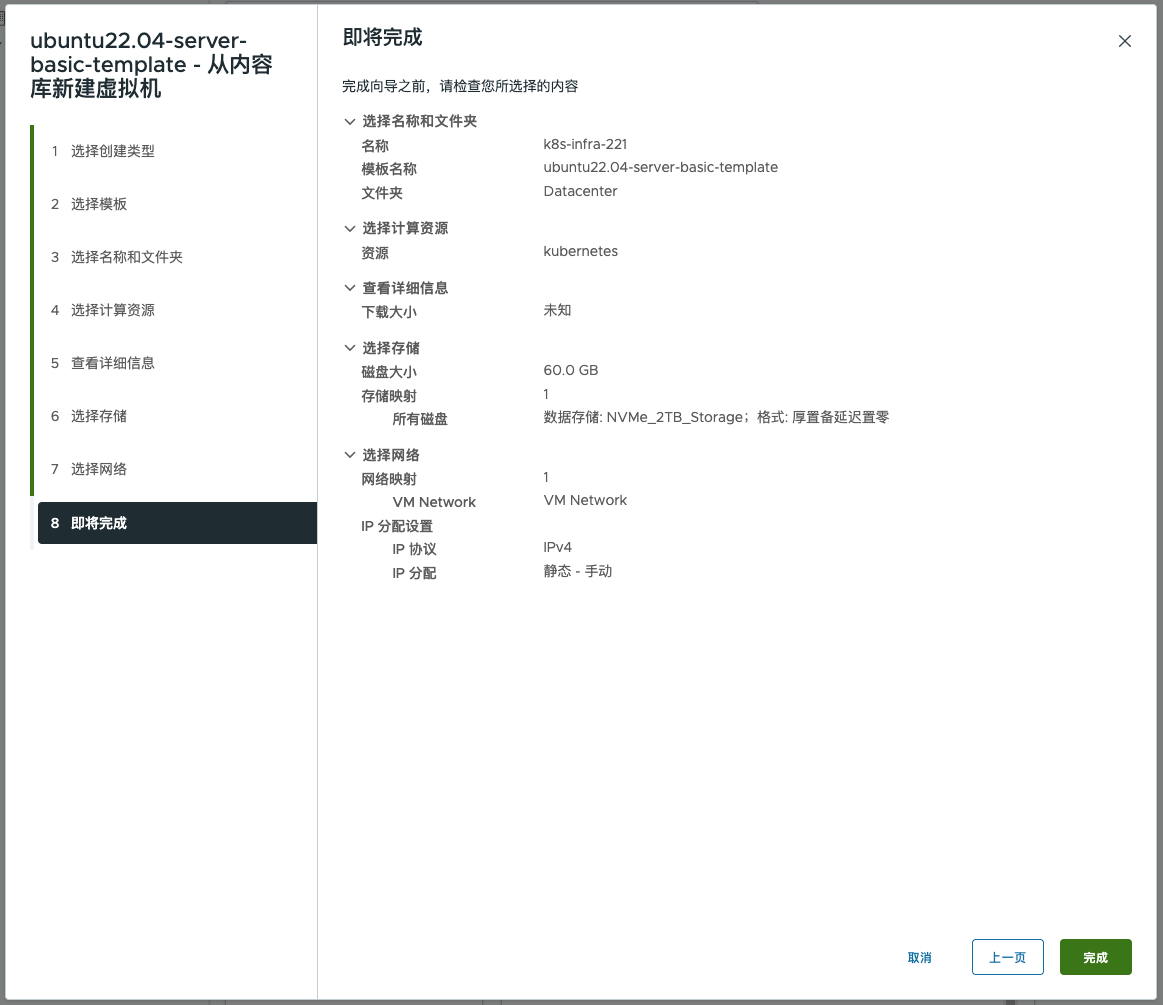
10. Confirm configuration and complete
Last step: check all configuration items, and after confirming everything is correct, click Complete:
| Configuration item | value |
|---|---|
| Name | k8s-infra-221 |
| template | ubuntu22.04-server-basic-template |
| computing resources | kubernetes |
| storage | NVMe_2TB_Storage(Thick Provision Lazy Zeroed) |
| network | VM Network |
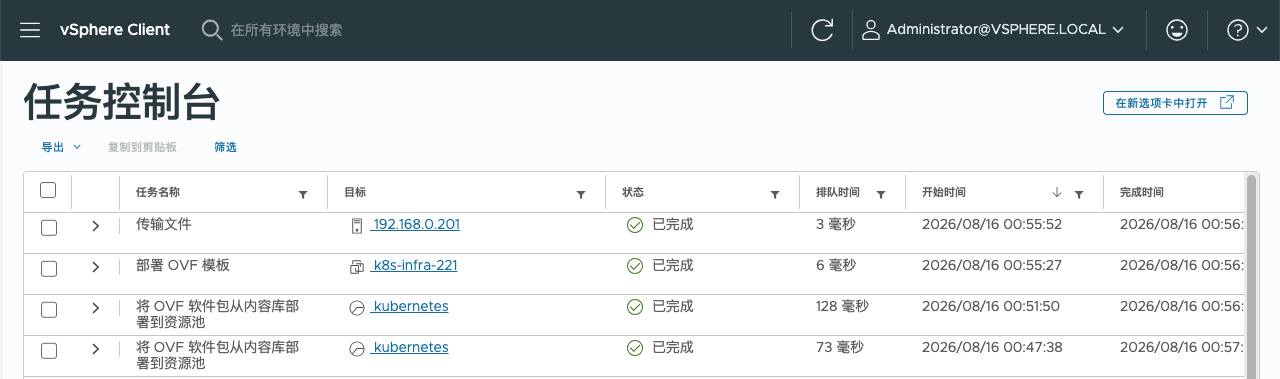
11. Monitoring deployment task
After clicking "Finish", vCenter will run the deployment task in the background. In Mission Console can be seen in:
| Task Name | Status | Description |
|---|---|---|
| Deploy an OVF software package from a content library to a resource pool | Completed | Main deployment task |
| Deploy OVF template | Completed | OVF instantiation |
| Transfer files | Completed | Transfer disk files to the target storage |
The entire deployment process takes approximately 2-3 minutes:
III. Verify deployment results
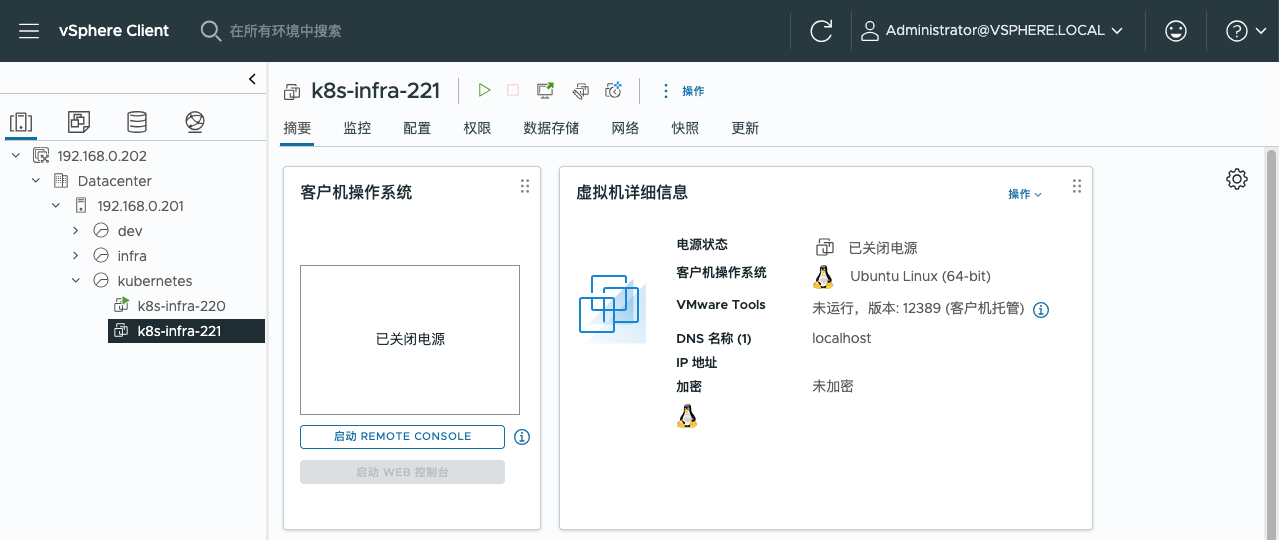
After deployment is complete, you can see the newly created virtual machine in the resource pool.k8s-infra-221, status is Power has been turned off:
1. Start the virtual machine
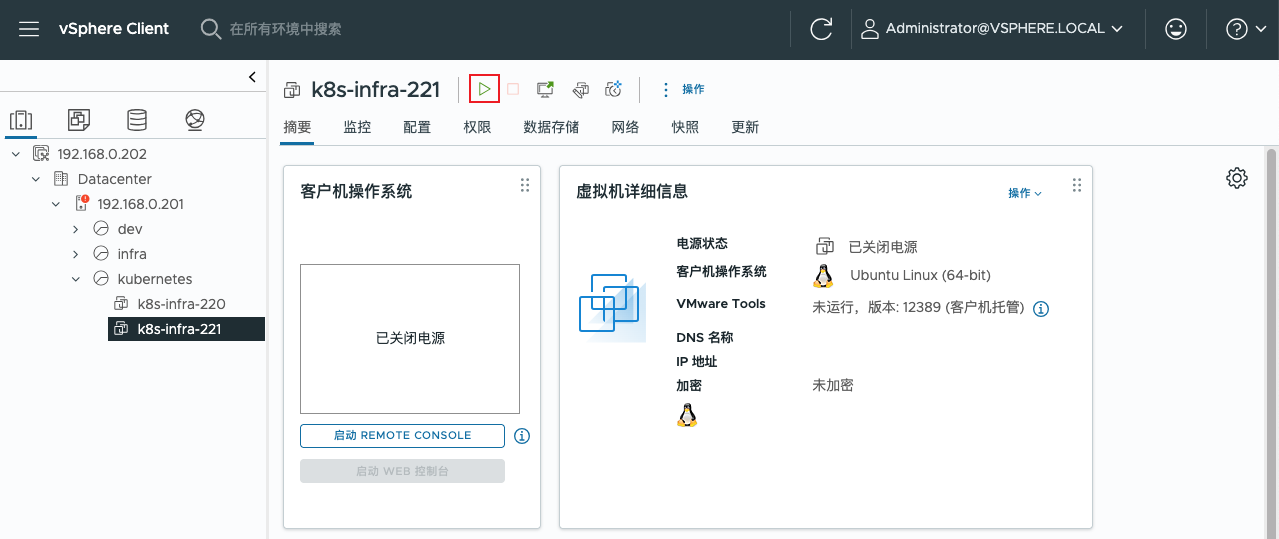
Right-click k8s-infra-221 You are an expert technical translator. Translate the following text into en. IMPORTANT: Translate ALL Chinese characters to English. If the text contains Chinese, you MUST translate it. If the text is already in en, output it EXACTLY as it is. Output ONLY the translated text, no quotes, no explanations.Power supply→Turn on the power or click Turn on the power button. After startup, the status changes to Power has been turned on:
2. Log in to the console to confirm
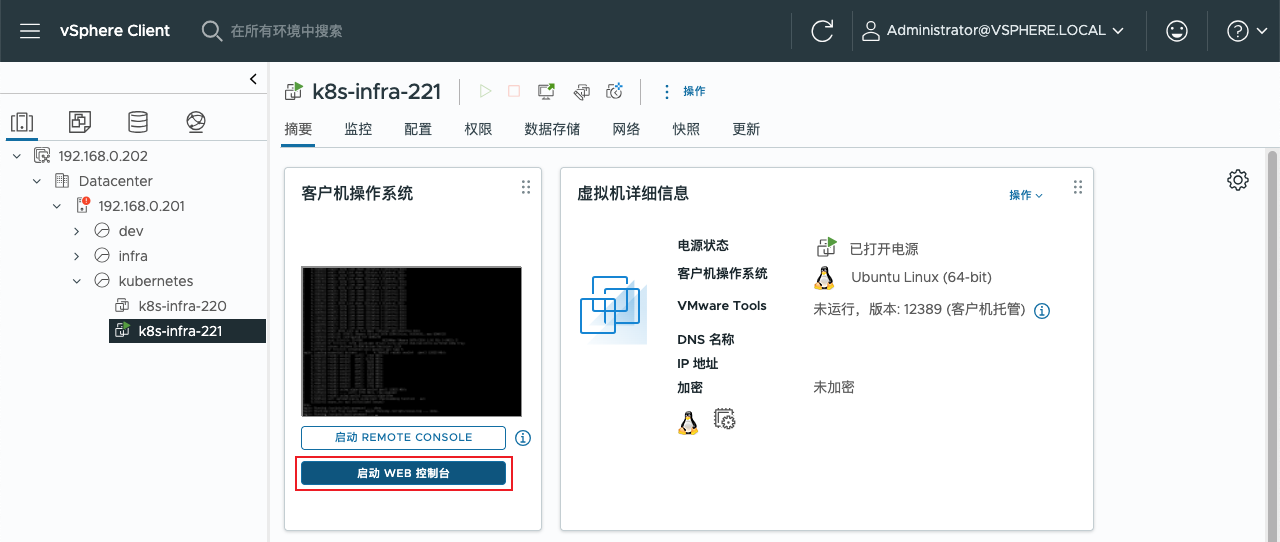
On the virtual machine details page, click Start WEB Console
Use default credentials root/fishfinal Log in to the system
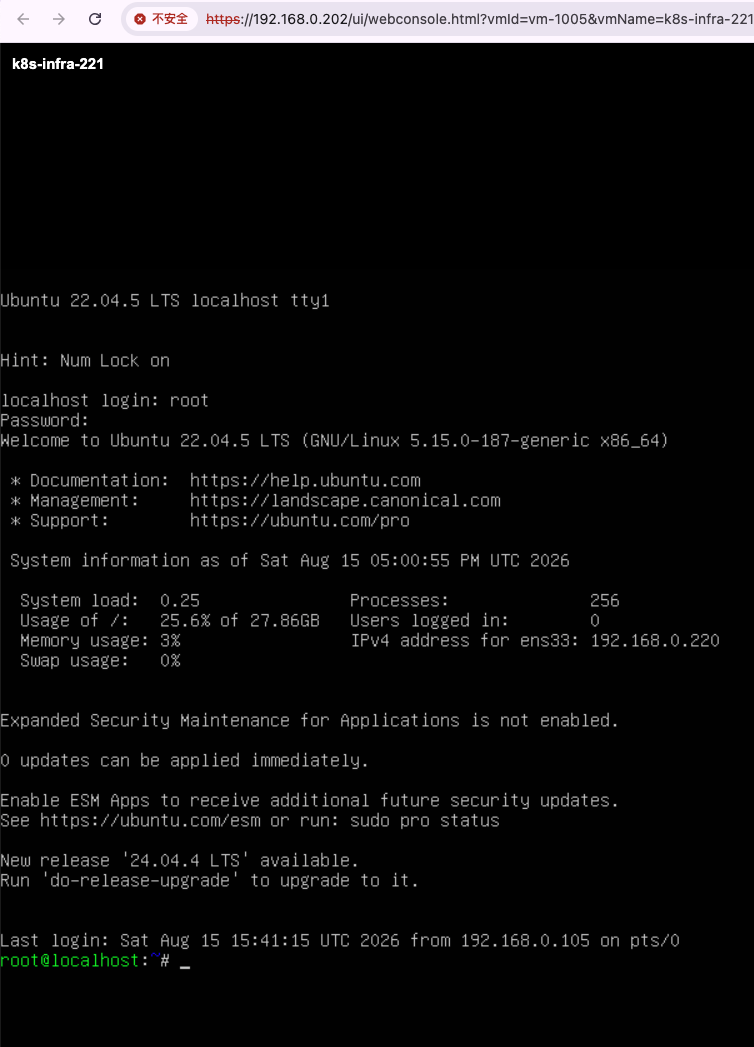
After logging in, you can see:
System version: Ubuntu 22.04.5 LTS
Kernel version: 5.15.0-187-generic
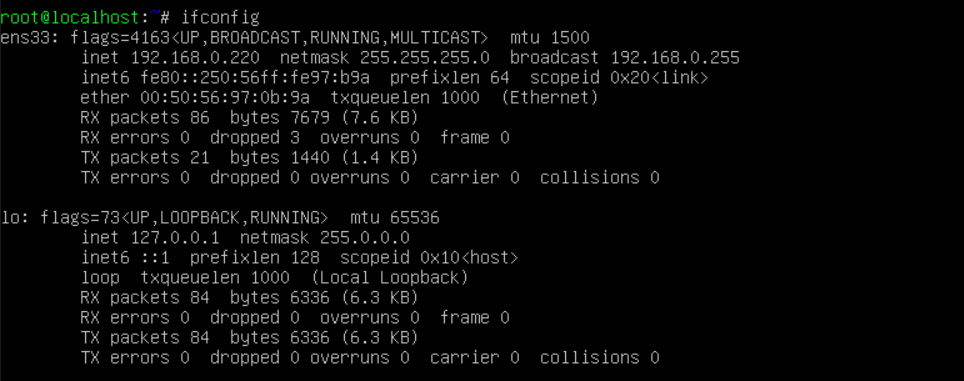
IPv4 address: 192.168.0.220 (template default IP)
3. Verify preconfiguration
Execute ifconfig Confirm network configuration:
IV. Modify the Static IP Address
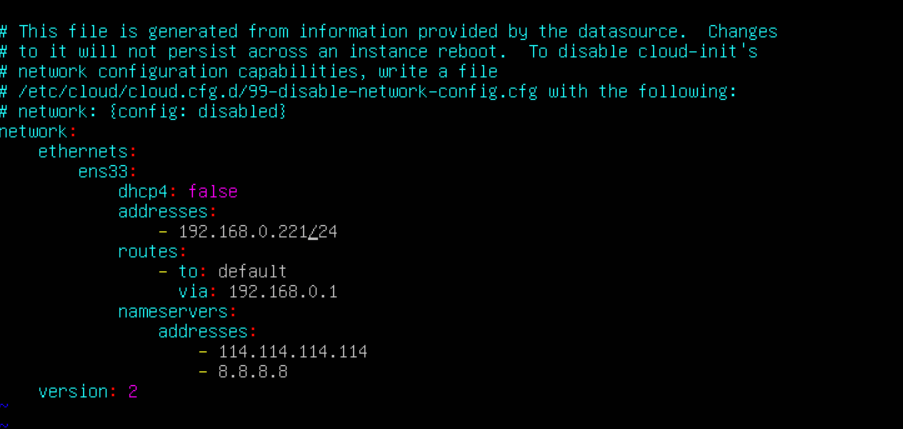
The default IP of the template is 192.168.0.220, If multiple virtual machines are to be deployed on the same network, the IP must be changed to avoid conflicts.
1. Edit the netplan configuration file
bash
vim /etc/netplan/00-installer-config.yamlwill addresses the IP in from 192.168.0.220/24 Change to 192.168.0.221/24:
2. Apply network configuration
bash
netplan apply
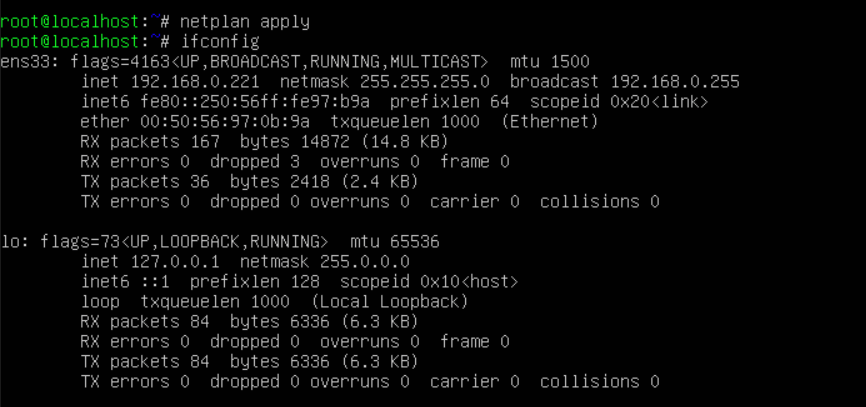
3. Verify the new IP
Execute ifconfig Confirm that the IP has been changed to 192.168.0.221:
5. Verify SSH remote login
SSH from the local machine to the new virtual machine to verify that remote access is working:
bash
ssh [email protected]Enter password fishfinal Successfully logged in:
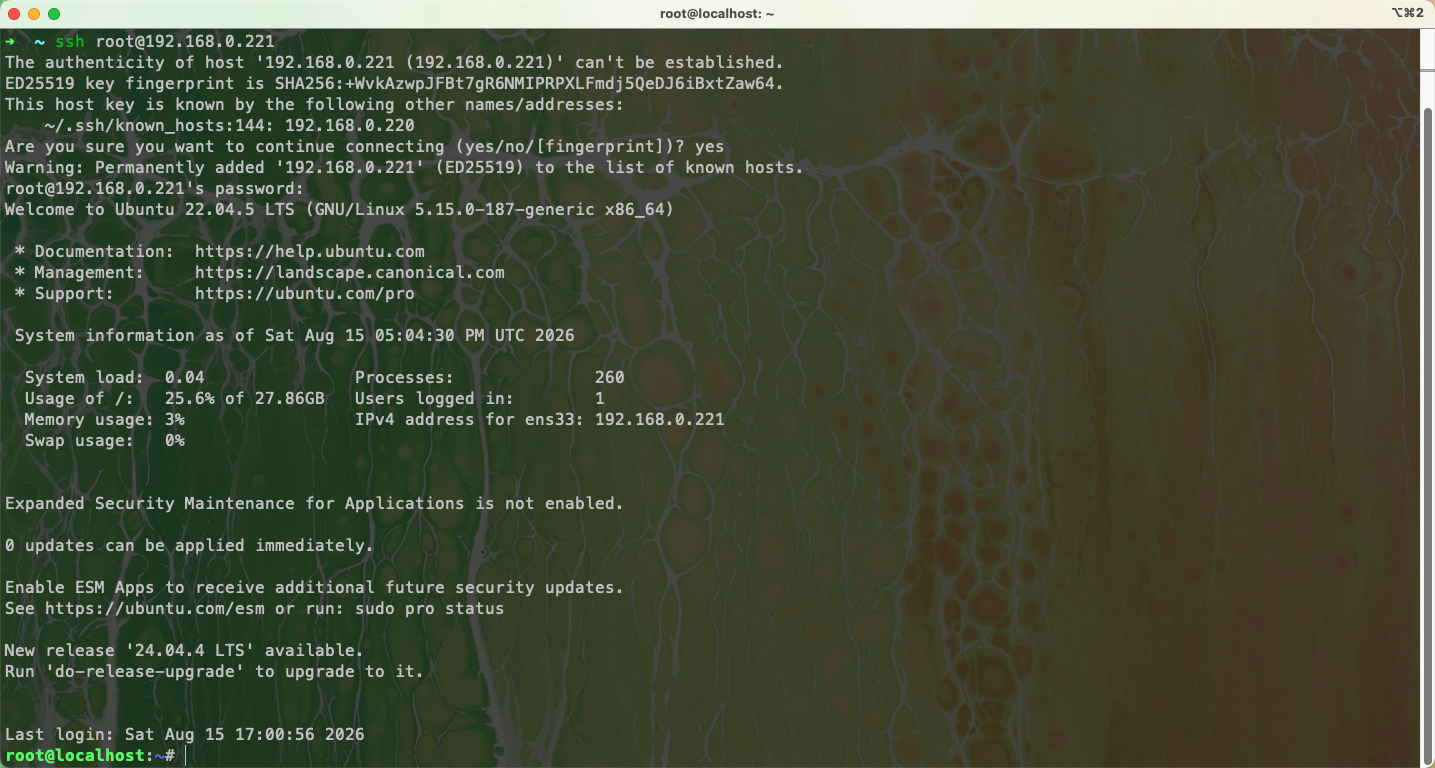
At this point,The complete process for batch deploying Ubuntu 22.04 virtual machines from an OVF template has been fully verified and passed.!🎉
VI. Summary of the Advantages of Batch Deployment
| Comparison dimensions | Clean install | OVF template deployment |
|---|---|---|
| Time-consuming | 50-70 minutes | 6-12 minutes |
| Manual intervention | A large amount of manual configuration | Only need to modify IP |
| Consistency | Easily leads to environmental differences | 100% consistent |
| Batch capability | Install one by one | Parallel batch deployment |
| Preconfiguration | None | root/SSH/software packages/aliases all pre-installed |
VII. Recommendations for Next Steps
| Serial number | Suggested actions | Description |
|---|---|---|
| 1 | Change the default password | passwd root Change the default password |
| 2 | Create a regular user | For production environments, it is recommended to use a non-root user for operations. |
| 3 | Configure SSH key | Disable password login and switch to key authentication to improve security. |
| 4 | Create snapshot | Create a snapshot after deployment is complete as the new baseline. |
| 5 | Join the K8s cluster | Execute according to cluster requirements kubeadm join |
Conclusion
Through the practical demonstration in this article, you have mastered Quickly deploy virtual machines from content library OVF templates The complete process of:
✅ Import OVF template into content library
✅ Deploy a virtual machine from the content library
✅ Start and verify preconfiguration
✅ Modify static IP address
✅ SSH Remote Login Verification
This process allows Bulk deploying Ubuntu 22.04 nodes has become as easy as copy and paste., whether it’s K8s cluster scaling, development environment setup, or rapid Homelab rebuild, all can be done in Complete delivery within 10 minutes..
Related Reading Recommendations: