English
Complete Practical Guide to Cloning a vSphere Virtual Machine as an OVF Template: From VM to Content Library

Step-by-step demonstration of how to clone a virtual machine in vCenter as an OVF template, store it in the content library, and complete the export backup.
In daily vSphere operations, converting a configured virtual machine into a template is a frequent task. Whether you are deploying cluster nodes in bulk or keeping a clean system image for a Homelab,Clone as OVF template are all among the most standard and reliable methods.
This article will use 8 screenshots of hands-on operation, fully demonstrating the entire process from a virtual machine to an OVF template and then to export from the content library. This experiment uses k8s-infra-220 With this Ubuntu Server virtual machine as the source, ultimately generate ubuntu22.04-server-basic-template Template.
1. Operation entry point: Start from the virtual machine
First, in the "Virtual Machines and Templates" view of vSphere Client, locate the target virtual machine (here it is k8s-infra-220). Right-click it to expand clone Submenu, select Clone to library as template....
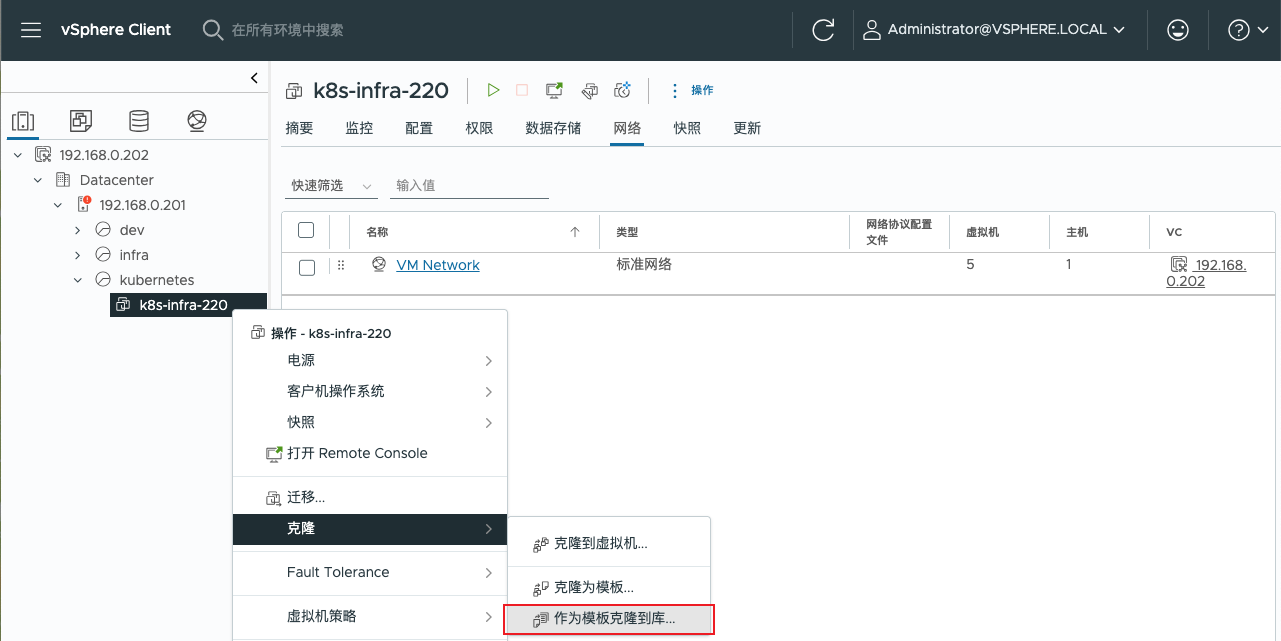
Note: There are two options here that are easily confused:
| Options | Purpose |
|---|---|
| Clone as template... | Generate a vCenter native template, stored in the Templates directory in the VMs and Templates view (local vCenter only) |
| Clone to the library as a template... | Directly take the virtual machine Clone as OVF template and store it in the content library (exportable, migratable, and batch-deployable) |
This time we choose Clone to library as template... because this option directly generates an OVF template and stores it in the content library; it can later be exported and backed up, making it suitable for cross-environment distribution.
II. Step 1: Basic Information Configuration
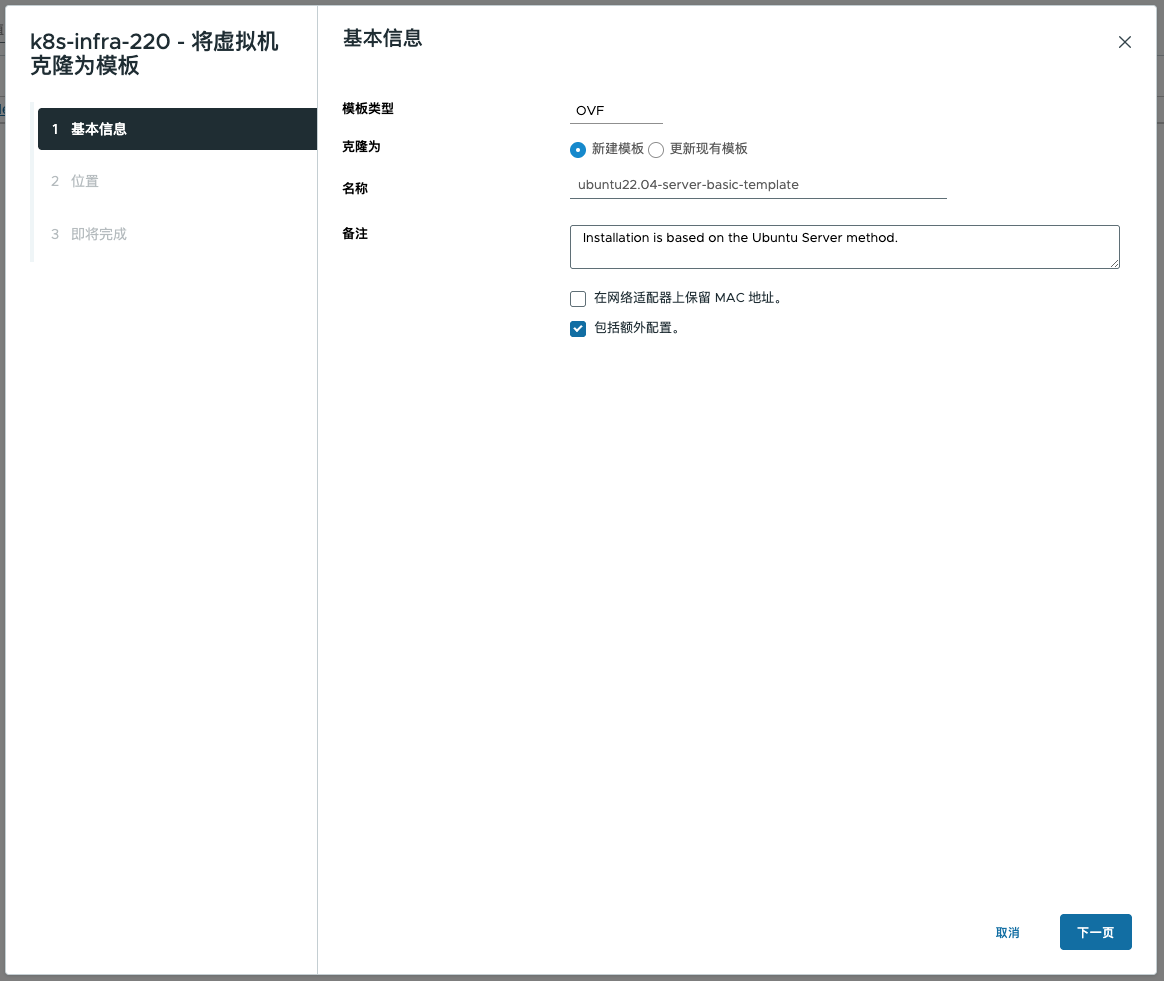
In the pop-up wizard, the key configurations are as follows:
| Configuration item | This selection | Explanation |
|---|---|---|
| Template type | OVF | Cross-platform compatible, exportable backups |
| Clone as | New Template | First created, not overwritten update |
| Name | ubuntu22.04-server-basic-template | Suggest naming conventions for easy identification. |
| Remarks | Installation is based on the Ubuntu Server method. | Record the template source and characteristics. |
| Retain MAC address | Do not check | Avoid MAC address conflicts during multi-instance deployment. |
| including additional configuration | Check | Preserve custom configurations (such as network adapter settings, advanced configuration parameters, etc.) |
💡 Note
Before creating an OVF template, it is recommended to add disk.EnableUUID = TRUE to the advanced parameters of the source virtual machine to ensure that virtual machines deployed from this template can properly use vSphere CSI storage classes. Configuration path: Edit Virtual Machine Settings → Virtual Machine Options → Advanced → Configuration Parameters → Add Parameter.
In the “Clone as Template to Library...” wizard, when “Include extra configuration” is checked, the created OVF template will automatically include this advanced parameter!
Why choose OVF instead of "virtual machine templates"?
Virtual machine template: Only for use with the current vCenter; cannot be exported or migrated.
OVF template: Standardized packaging format (.ovf + .vmdk), supports export, backup, and cross-platform distribution.
If you need to migrate this template to another data center or share it with the team in the future,OVF is the only correct choice.
III. Step 2: Select the target location (content library)
In the “Location” step, select the content library we created earlier.template(remark is vm template storage).
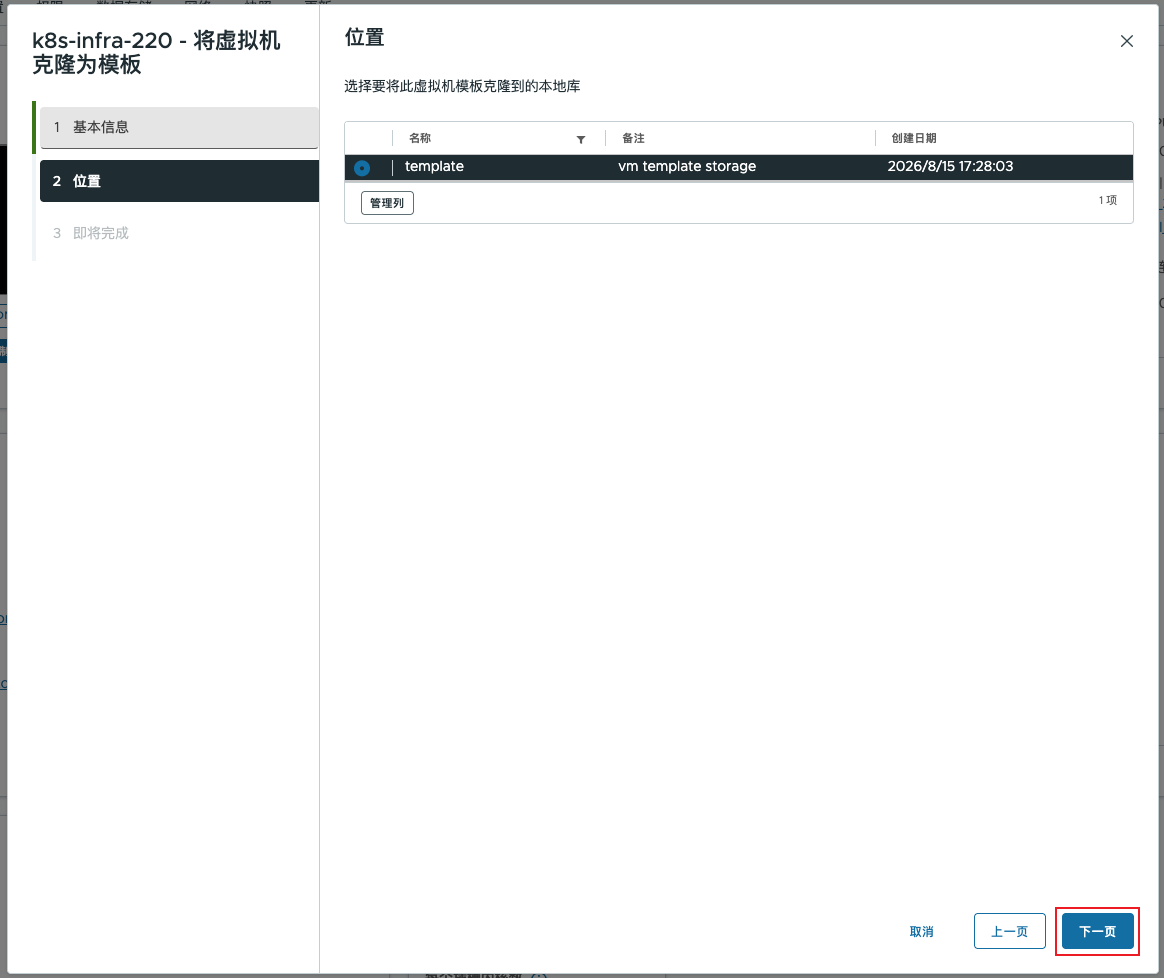
If you don't have a content library yet, you need to create one first. You can refer to what I wrote earlier.vSphere Content Library Creation Tutorial, it can be done in just a few steps.
IV. Step 3: Confirm the configuration and execute
The last step is overview confirmation, checking whether the template name, type, and target library are correct.
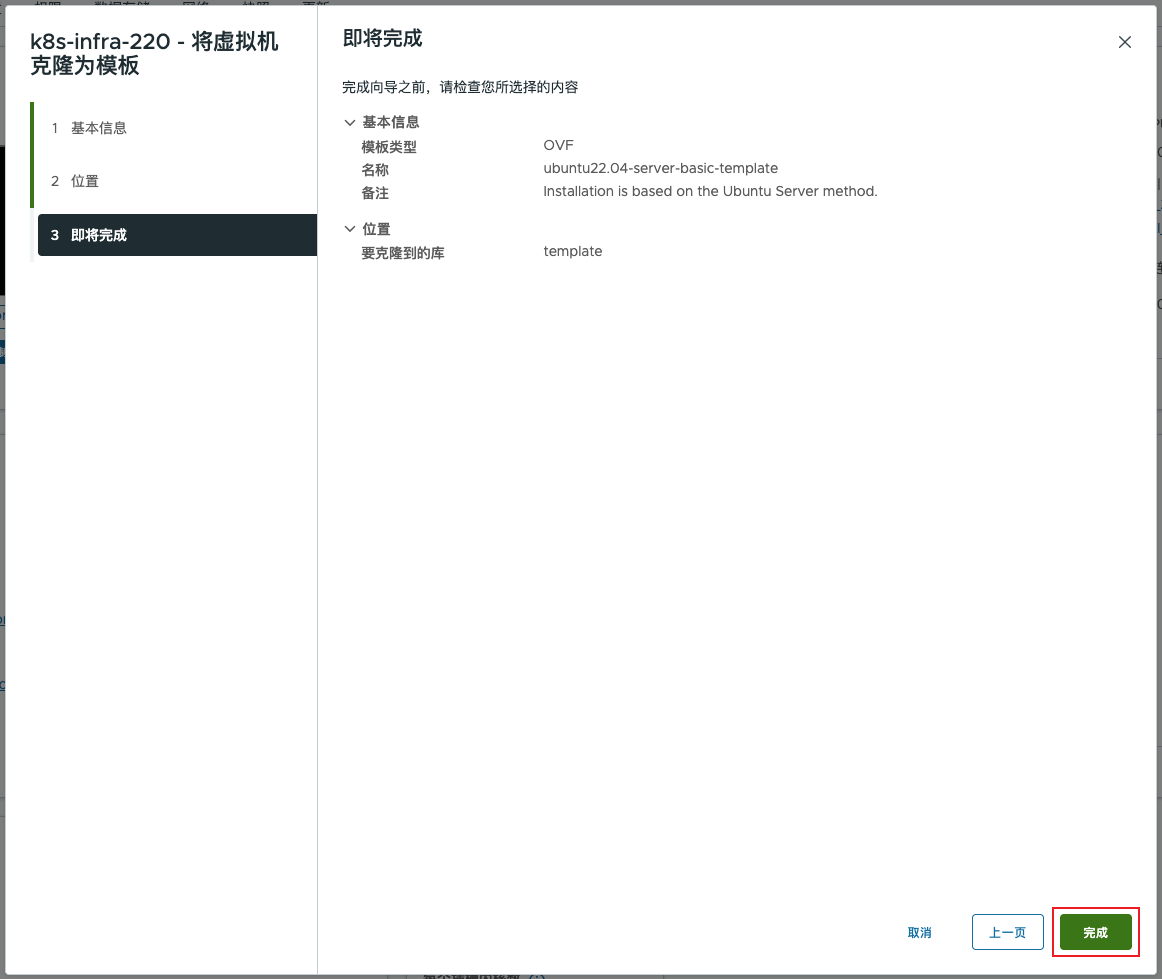
After confirming everything is correct, click Completed vCenter will begin executing the cloning task.
V. Task Execution Monitoring
After clicking "Finish", vCenter will execute a series of subtasks in the background. You can Mission Console View progress in:
| Task Name | Status | Description |
|---|---|---|
| OVF packages cloned from virtual machines or virtual appliances into the content library | Completed | Main task: convert the VM to OVF and store it in the library. |
| Create a virtual machine snapshot | Completed | Automatically create a snapshot before cloning to ensure data consistency. |
| Export OVF template | Completed | Actual export stage |
| Remove snapshot | Completed | Automatically clean up snapshots after export is complete |
The entire process takes about 4-5 minutes, depending on the virtual machine disk size.
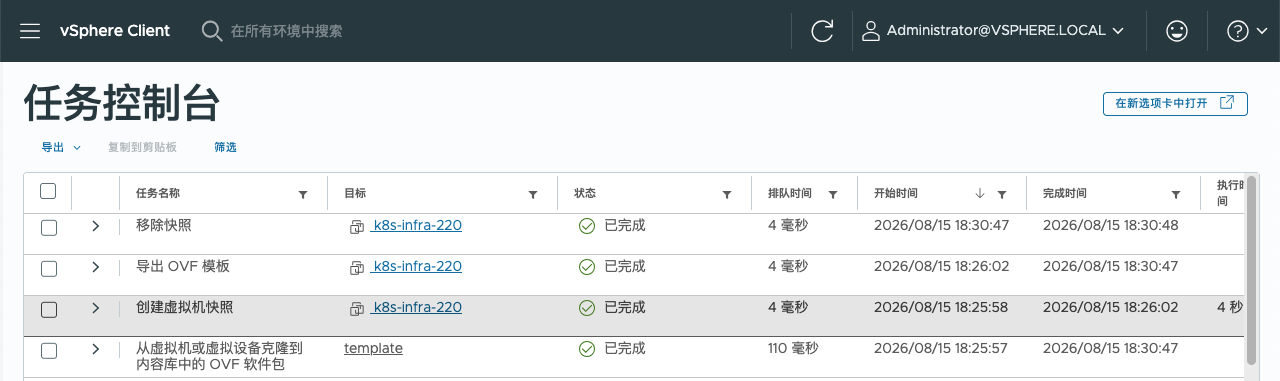
VI. Verification Result: The template is already in the content library.
After the task is completed, enter the content library.template, switch to OVF and OVA templates tab, you can see the newly generated template:
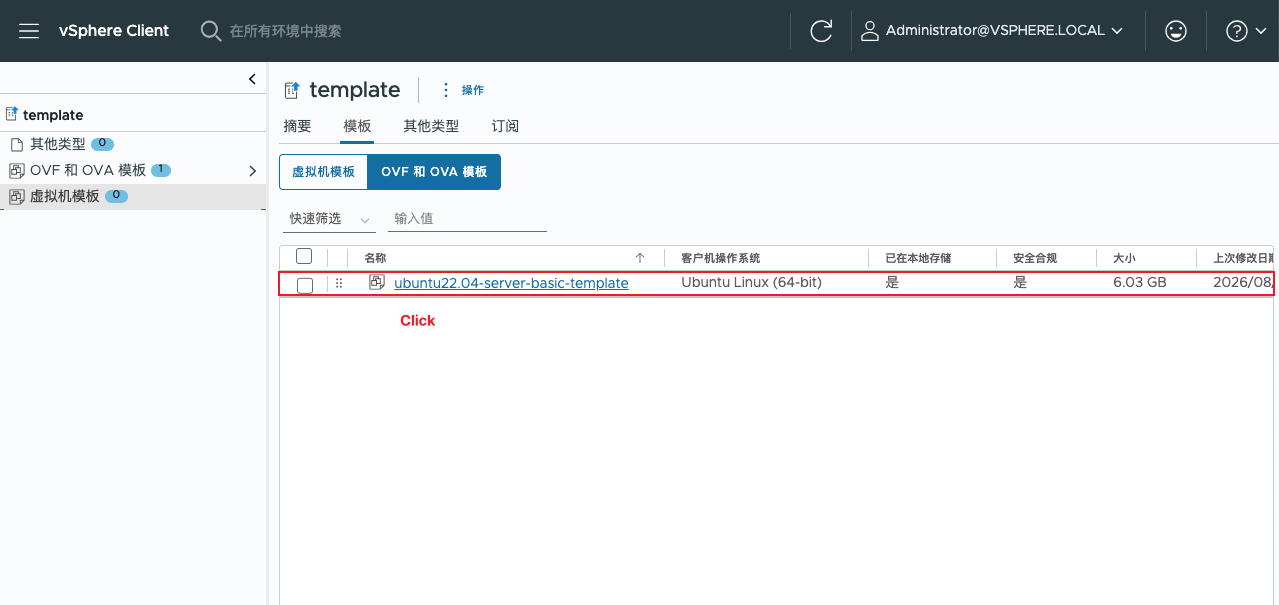
Click the template to enter the details page, where you can see:
类型 OVF template
size: 6.03 GB
Guest operating system: Ubuntu Linux (64-bit)
Operation menu: Supports creating new virtual machines from this template, updating projects, exporting projects, etc.
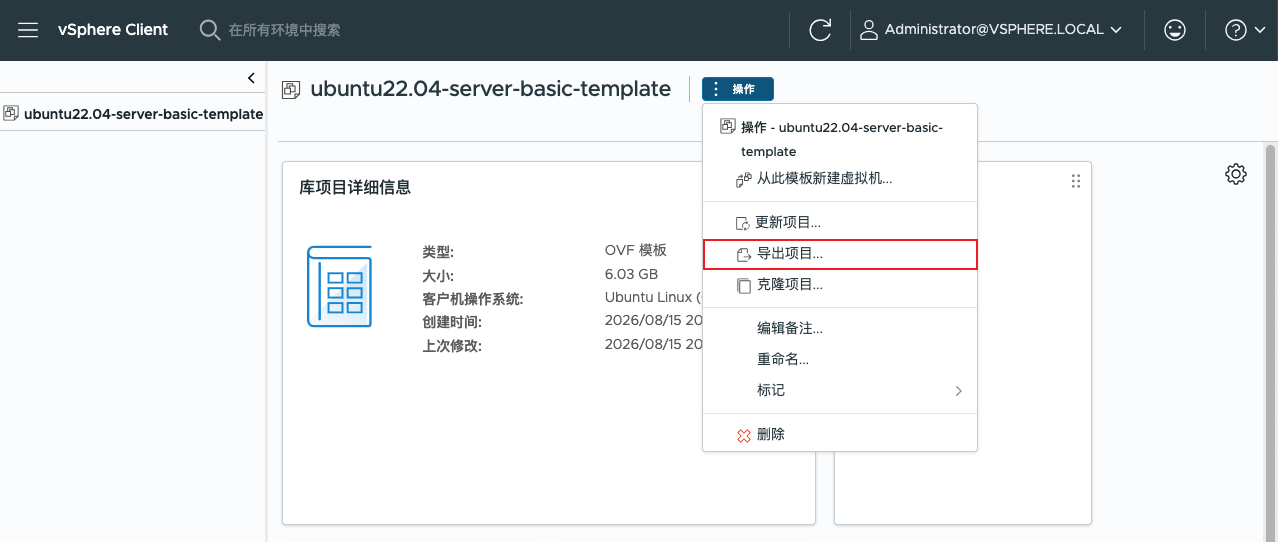
Seven. Export to Local: Final Backup
If you need to save the template to the local hard disk or migrate it to another environment, you can click Export project.... Here is a Key details:
| Export location | Result |
|---|---|
| ❌ On the content library list page, click “Export” | Download only one CSV metadata file |
| ✅Enter the template details page, in the “Operations” menu, click “Export Project...” | Download the complete OVF package (.ovf + .vmdk + .nvram) |
This export produced 3 files:
| Filename | size | Description |
|---|---|---|
ubuntu22.04-server-basic-template.ovf | 11 KB | VM hardware configuration profile |
ubuntu22.04-server-basic-template-1.vmdk | 2.36 GB | Virtual disk (actual system data) |
ubuntu22.04-server-basic-template-2.nvram | 271 KB | UEFI firmware settings |

Why are there only 3 files instead of 4?
Because in the CD/DVD drive of the source virtual machine this time No residual ISO file path, so there is no additional when exporting .iso file. If there is an extra one in the OVF package you exported .iso, indicating that an ISO image was previously mounted on the optical drive device of the source virtual machine. It is recommended to change the CD/DVD device type to “Client Device” before exporting and then export again.
8. Why does the content library show 6.03 GB, while the exported VMDK is only 2.36 GB?
This is a very common confusion—clearly, the content library shows the template size as 6.03 GB, but after exporting to local,.vmdk The file only has 2.36 GB.This is not an error, but normal behavior of the vSphere storage mechanism.
1. Root cause: thin provisioning vs thick provisioning
| Storage method | Description | Space occupied |
|---|---|---|
| Thick Provision | Allocate all disk space immediately upon creation | 60 GB (immediately occupied) |
| Thin Provisioning (Thin Provision) | Allocate according to need; occupy only as much as you use. | Only the size of the written data |
| Content library storage | When storing a template, vSphere will Convert to thin provisioning format Storage | 6.03 GB (actual amount of data written) |
| Export the VMDK of the OVF | Exported .vmdk File Contains only actual data blocks, excluding unused free space | 2.36 GB (valid data after compression) |
2. Restoration of this scene
| Stage | size | Description |
|---|---|---|
| Source virtual machine configuration | 60 GB (Thick Provisioned) | Virtual disk size allocated when the virtual machine is created |
| Actual usage of the source virtual machine | ~6 GB | Actual resource usage of Ubuntu Server + basic software packages |
| Content library storage template | 6.03 GB | Storage usage after conversion to thin-provisioned format |
| Export the VMDK of OVF | 2.36 GB | File size after further compression/deduplication during export |
3. Why is it even smaller after exporting?
When exporting an OVF, vSphere does two things:
Void elimination: Discard unused disk blocks (such as unformatted free space and space occupied by deleted files)
Streaming compression: Compress actual data to produce a smaller volume
.vmdkFile
4. What happens after import?
When you deploy a virtual machine from an OVF:
Will by default Maintain thin provisioning, after import, disk usage remains ~2.36 GB, gradually increases with use
If thick provisioning is selected, it will be expanded to the full size (e.g., 60 GB), but the actual data is still only 2.36 GB
5. Conclusion
| Display position | Size | meaning |
|---|---|---|
| Content library template list | 6.03 GB | Storage usage of templates in the content library (thin provisioning) |
After export .vmdk | 2.36 GB | Compressed size of the actual valid data |
So, it is completely normal for the exported VMDK to be smaller than what is displayed in the content library. This is also one of the advantages of the OVF format—Only carry valid data, transmit no empty holes, making templates lighter and transmission faster..
9. Package and upload to R2 object storage
The OVF files exported locally are scattered (.ovf+.vmdk+.nvram), making them inconvenient to transmit and archive. It is recommended to package them as tar.gz compressed archive, then upload it to Cloudflare R2 (or another S3-compatible object storage), to implement Centralized storage, on-demand pull.
1. Package as tar.gz
In the terminal, navigate to the directory where the OVF file is located and run the following command:
bash
# Enter the directory where the file is located
cd ~/Downloads/

# Package and compress (it is recommended that the file name include date and version information)
tar -czvf ubuntu22.04-server-basic-template-20260816-0004.tar.gz \
    ubuntu22.04-server-basic-template.ovf \
    ubuntu22.04-server-basic-template-1.vmdk \
    ubuntu22.04-server-basic-template-2.nvram
After compression, the file size will decrease from about 2.36 GB Reduce to 1.2-1.5 GB(depending on the compression ratio of the disk data), significantly improving upload and download speeds.
2. Generate verification file
To ensure that downloaders can verify file integrity, it is necessary to generate .sha256 Verify the file.
bash
sha256sum ubuntu22.04-server-basic-template-20260816-0004.tar.gz > \
  ubuntu22.04-server-basic-template-20260816-0004.tar.gz.sha256
bash
shasum -a 256 ubuntu22.04-server-basic-template-20260816-0004.tar.gz > \
  ubuntu22.04-server-basic-template-20260816-0004.tar.gz.sha256
bash
# PowerShell
(Get-FileHash -Path "ubuntu22.04-server-basic-template-20260816-0004.tar.gz" -Algorithm SHA256).Hash + "  ubuntu22.04-server-basic-template-20260816-0004.tar.gz" | Out-File -FilePath "ubuntu22.04-server-basic-template-20260816-0004.tar.gz.sha256"
💡 Note
Regarding how to verify SHA-256 after downloading, you can refer to my other blog post, “Building a Private Software Mirror Site with R2: From Path Planning to File Upload》
2. Upload to Cloudflare R2
Install and use rclone A command-line tool that uploads compressed packages to an R2 storage bucket.
Upload package
bash
rclone copy ubuntu22.04-server-basic-template-20260816-0004.tar.gz \
  cloudflare-r2:fishfinal-dl/vmware/templates/ubuntu/22.04/server/ \
  --progress
Upload sha256
bash
rclone copy ubuntu22.04-server-basic-template-20260816-0004.tar.gz.sha256 \
  cloudflare-r2:fishfinal-dl/vmware/templates/ubuntu/22.04/server/ \
  --progress
3. Organize the template directory structure in R2
It is recommended to organize templates in the bucket according to the following structure to facilitate management and retrieval:
cloudflare-r2:fishfinal-dl/
├── vmware/
    ├── esxi/
    │   └── 8.0/
    │       └── VMware-VMvisor-Installer-8.0U3e-*.iso
    ├── vsphere/
    │   └── vcsa/
    │       └── 8.0/
    │           └── VMware-VCSA-all-8.0.3-*.iso
    └── templates/
        └── ubuntu/
        │   └── 22.04/
        │       └── server/
        │           └── ubuntu22.04-server-basic-template-*.tar.gz
        └── rocky/
            └── 9/
                └── minimal/
                    └── rocky9-minimal-template-*.tar.gz
10. Template Configuration Instructions (Ubuntu 22.04)
This template is built on a basic Ubuntu 22.04 Server and has completed the following pre-configurations:Available immediately after import, only the static IP address needs to be modified to put it into production.
System Basic Information
| configuration item | Details |
|---|---|
| operating system | Ubuntu 22.04.5 LTS (Jammy) Server |
| Kernel version | 5.15.0-119-generic |
| root password | fishfinal |
| Network configuration | Static IP (needs to be adjusted based on the environment) |
Enabled core services and configurations
1. The root user has been enabled and configured for SSH remote login.
bash
# Key configurations in /etc/ssh/sshd_config
PermitRootLogin yes          # Allow root remote login
PasswordAuthentication yes   # Allow password authentication
PubkeyAuthentication yes # Also supports key authentication (recommended for production environments).⚠️Safety reminder: In production environments, it is recommended to switch to PermitRootLogin prohibit-password+ Key authentication; this template retains password login by default only for the convenience of rapid deployment.
2. Installed basic software packages
bash
# System update (the Ubuntu equivalent command of yum upgrade -y)
sudo apt update && sudo apt upgrade -y

# Commonly used tools installed
sudo apt install -y \
    vim \           # text editor
    curl \          # HTTP request tool
    wget \          # Download tool
    net-tools \     # Network tools such as ifconfig and netstat
    git \           # Version control
    htop \          # Interactive process viewer
    tree \          # Directory tree display
    unzip \         # Decompression tool
    software-properties-common  # Manage PPA sources
3. Shell Environment Optimization (~/.bashrc)
Enabled colored prompt and configured common aliases:
bash
# Enable colored prompt (uncomment force_color_prompt=yes)
# uncomment for a colored prompt, if the terminal has the capability;
# turned off by default to not distract the user: the focus in a terminal window
# should be on the output of commands, not on the prompt
force_color_prompt=yes

# Configured aliases
alias ll='ls -lh'    # Display a detailed list in human-readable format
4. Network Configuration (Static IP Example)
The template uses a static IP configuration, and the default IP is 192.168.0.220/24(Source VM IP). After importing, please modify it according to the actual network environment.
yaml
# /etc/netplan/00-installer-config.yaml
network:
  ethernets:
    ens160:
      dhcp4: false
      addresses:
        - 192.168.0.220/24      # Modify this line after import
      routes:
        - to: default
          via: 192.168.0.1      # Modify according to the actual gateway
      nameservers:
        addresses:
          - 8.8.8.8
          - 114.114.114.114
  version: 2
11. Quickly Create a Virtual Machine from a Template (Only the IP Needs to Be Modified)
With the OVF archive in R2, you can pull the template at any time and quickly deploy new virtual machines. The typical process is as follows:
Rapid deployment workflow
Specific operation steps
| Steps | Operation | Time-consuming |
|---|---|---|
| 1 | Download the archive from R2:rclone copy r2:my-vm-templates/ubuntu22.04-server-basic-template-20260815.tar.gz ./ | ~2-5 minutes (depending on bandwidth) |
| 2 | Decompress:tar -xzvf ubuntu22.04-server-basic-template-20260815.tar.gz | ~10 seconds |
| 3 | Import OVF in vSphere: right-click the cluster →Deploy OVF Template Choose .ovf file | ~2 minutes (wizard operation) |
| 4 | Wait for OVF deployment to complete (disk cloning) | ~1-3 minutes |
| 5 | 修改静态 IP(Key step):vim /etc/netplan/00-installer-config.yaml→ Change IP →netplan apply | ~1 minute |
| 6 | Optional: change the root password (passwd root) or add a new user | ~1 minute |
| 7 | Create a snapshot as the new "golden image" baseline | ~10 seconds |
Total time: about 6-12 minutes(Deploying a fully configured Ubuntu server from zero saves compared with installing from scratch 40-60 minutes)
Shortcut command to modify the IP
bash
# Login template (default root/fishfinal)
ssh root@<template current IP>

# Modify the IP address (assuming the new IP is 192.168.0.101)
sed -i 's/192.168.0.220/192.168.0.101/g' /etc/netplan/00-installer-config.yaml

# Apply network configuration
netplan apply

# Verify new IP
ip a | grep ens160
XII. Summary and Guide to Avoiding Pitfalls
Core Operational Workflow
| Steps | Operation |
|---|---|
| 1 | Right-click the virtual machine → Clone →Clone to library as template... |
| 2 | Template type selection OVF Naming conventions |
| 3 | Target location selection Content Library |
| 4 | Confirm the configuration and click Finish. |
| 5 | Verify the template in the content library. |
| 6 | Enter template details page → Actions →Export project... |
| 7 | Package as tar.gz→ Upload to R2 object storage |
Three reminders about common mistakes
| Common mistakes | Correct approach |
|---|---|
| Export location error | Must enter Template details page Export, rather than exporting on the library list page. |
| MAC address reservation | During multi-instance deployment Do not check, otherwise network conflict |
| CD/DVD leftover ISO | Before export, check the optical drive device; if any ISO path remains, change it to "Client Device". |
Summary of Template Advantages
| Dimension | Comparison |
|---|---|
| Deployment speed | Template Deployment 6-12 minutes vs Fresh Installation 50-70 minutes |
| Configuration consistency | All VMs use the same baseline to avoid "environment inconsistency" issues. |
| Cross-environment migration | OVF + R2 storage, pull and deploy anytime, anywhere. |
| Batch deployment | Multiple VMs can be deployed in parallel; only the IP needs to be changed to put them into production. |
Conclusion
Through the above steps, you have mastered a complete set of vSphere virtual machine → OVF template → R2 storage → rapid batch deployment workflow.
This methodology applies to:
Homelab System Image Backup and Quick Restore
Standardized K8s node template creation (batch creation of 1 master + N workers in minutes)
Cross-vCenter virtual machine migration and distribution
Template sharing and version management in team collaboration
Related Reading Recommendations:
Additional
If you don't want to build the template from scratch, you can directly download the Ubuntu 22.04 template archive I have already prepared. This template includes all the preconfigurations listed in Chapter 10 of this article,After downloading and extracting, it can be deployed and used directly in vSphere..
| Project | Description |
|---|---|
| Applicable scenarios | Quick Homelab setup, batch deployment of K8s cluster nodes, and development/testing environments |
| System version | Ubuntu 22.04.5 LTS Server |
| Preconfigured content | Enable root + SSH password/key login + basic software packages (vim/curl/wget/net-tools/git/htop) + Shell alias optimization |
| Network Configuration | Static IP (default 192.168.0.220/24, modify as needed after import) |
| default password | fishfinal(Please modify promptly after import) |
| Verification method | Download .sha256 File, execute sha256sum -c *.sha256 Verify integrity |