English
vCenter Server 8.0 Complete Guide to Adding ESXi Hosts

Preface
In the previous tutorial, we completed the installation and deployment of vCenter Server 8.0. Now, vCenter Server is ready, but its management capabilities cannot yet be brought into play—because no ESXi hosts have joined it yet.
This article describes in detail how to add an ESXi host to vCenter Server 8.0 for centralized management. This is a key step in building a vSphere virtualization platform. Once completed, you can centrally manage multiple ESXi hosts and their virtual machines through vCenter.
Environment Description:
vCenter Server IP:
192.168.0.202Target ESXi host IP:
192.168.0.201ESXi version:
8.0.3 build-24677879vCenter Version:
8.0.3 build-24322831SSO domain:
vsphere.local
Prerequisite
Before you begin, please ensure the following conditions are met:
vCenter Server 8.0 has been deployed and is running normally.
The target ESXi host has been installed and the management network has been configured.
vCenter Server 与 ESXi 主机之间网络互通
Have the root account and password for the ESXi host
Have an administrator account for vCenter Server (
[email protected])vSphere license ready (if needed)
Step 1: Log in to vSphere Client
Open a browser and access the vCenter Server Web client address:
https://192.168.0.202/Log in with an SSO administrator account:
| Configuration item | Fill in the content |
|---|---|
| username | [email protected] |
| Password | SSO administrator password set during installation |
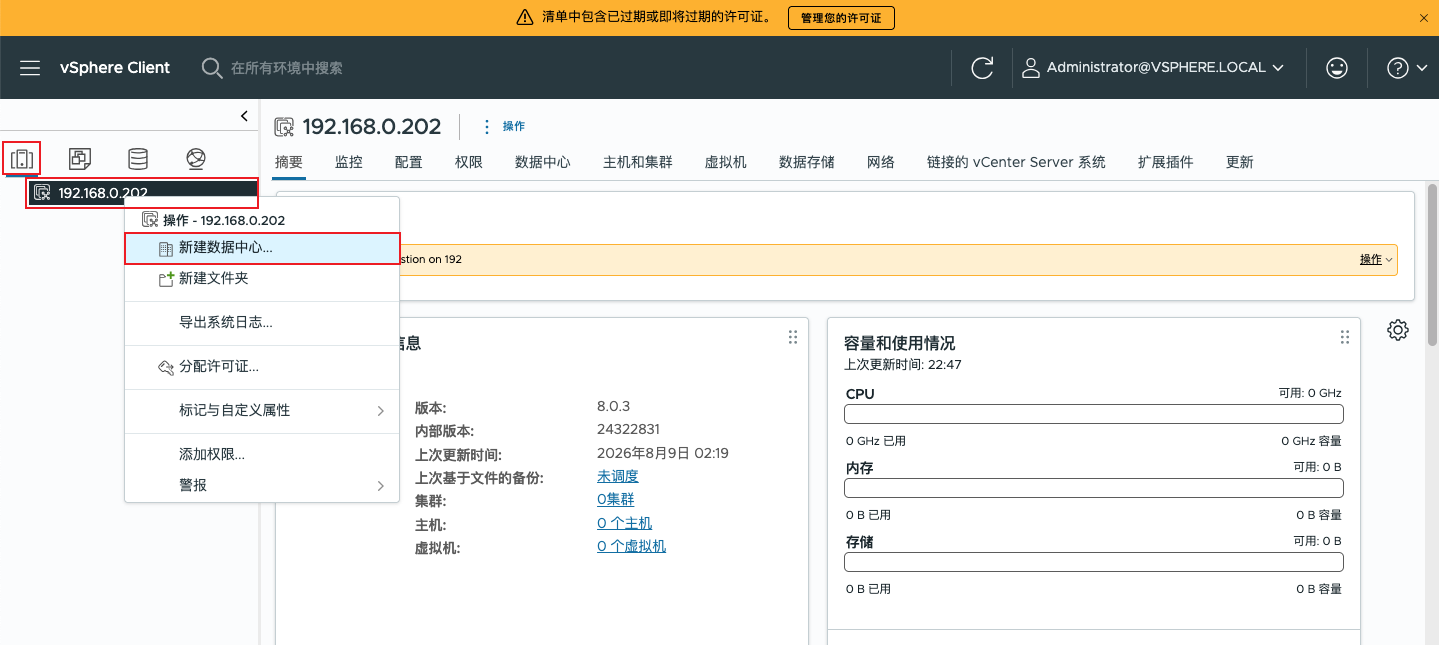
After a successful login, you will see the vCenter Server overview page. At this point, no data centers or hosts have been added yet.
Step 2: Create Data Center
Before adding an ESXi host, you must first create a datacenter. A datacenter is the top-level container in the vCenter inventory and is used to organize and manage resources such as hosts, virtual machines, and datastores.
In the left inventory tree, right-click the vCenter Server name (192.168.0.202), select New data center:
In the dialog box that pops up, enter the data center name:
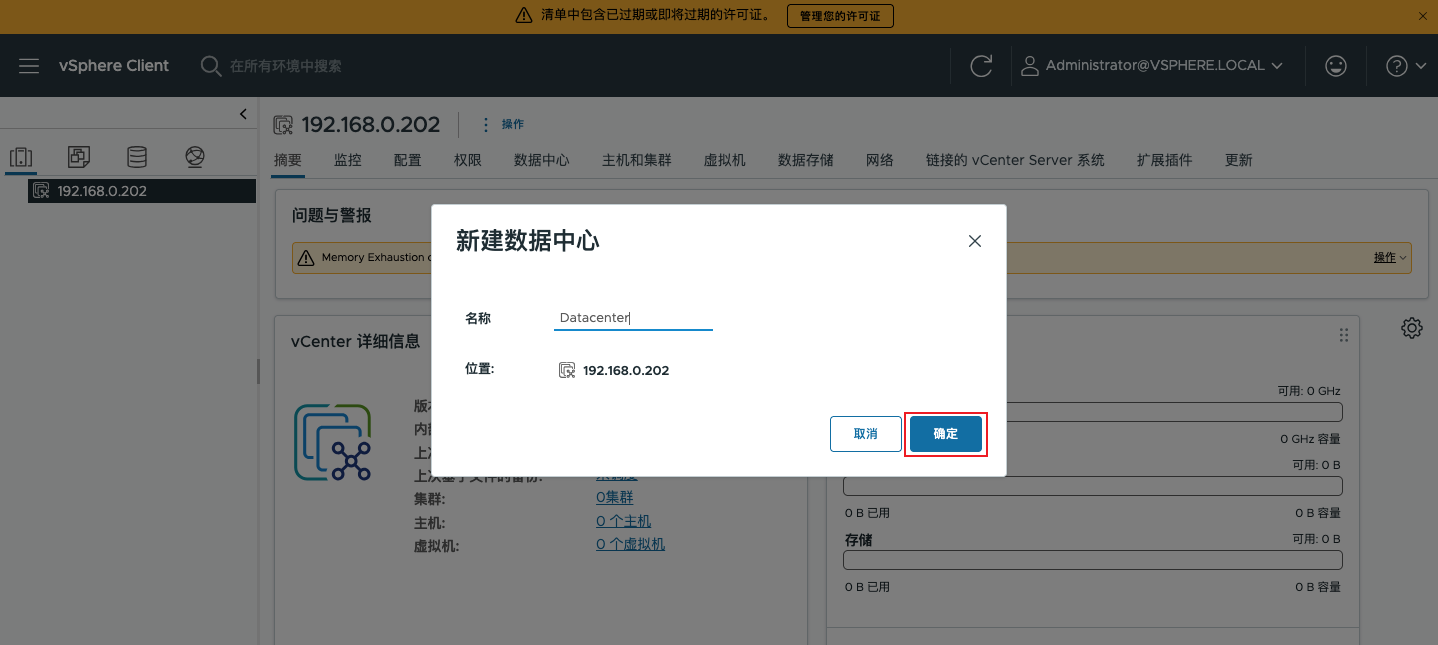
| Configuration item | Fill in the content |
|---|---|
| Name | Datacenter(Customizable) |
Click Confirm Creation completed.
Step 3: Open the Add Host wizard
In the list tree on the left, right-click the newly created Datacenter, choose Add Host:
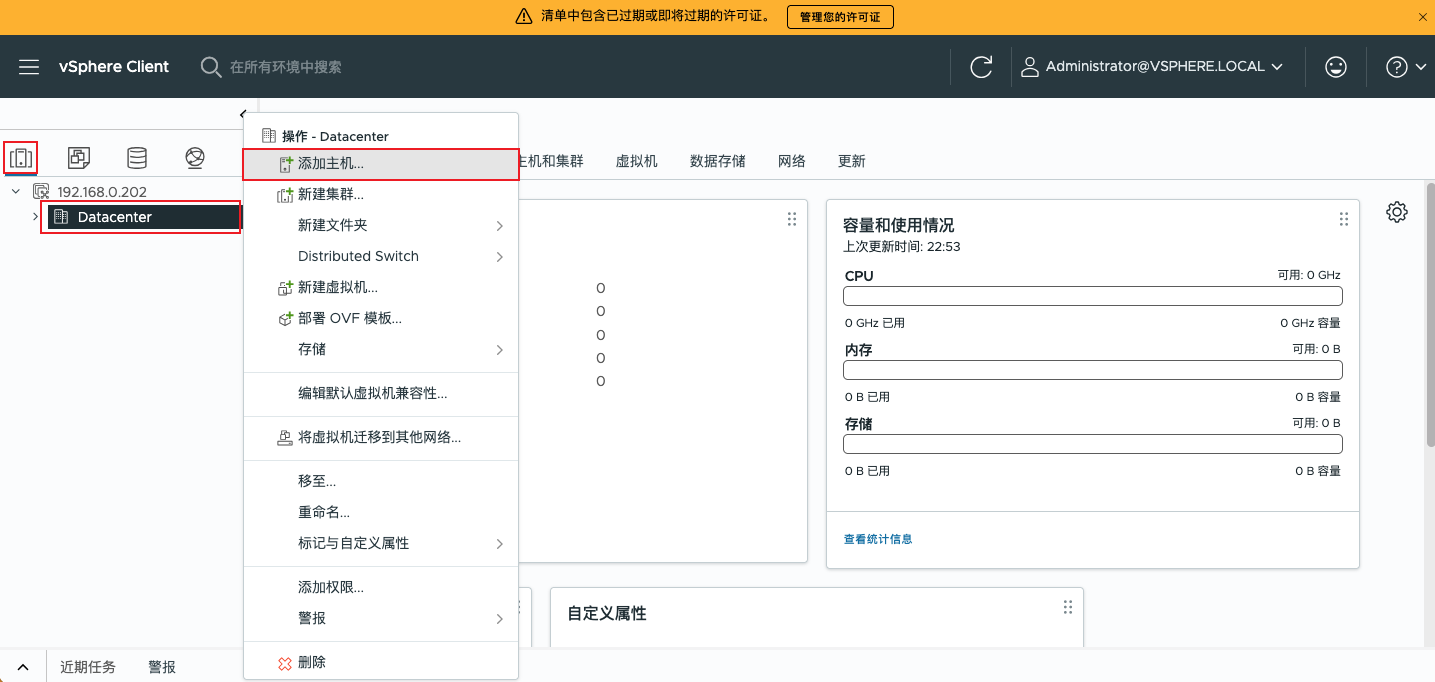
This will open the "Add Host" wizard.
Step 4: Specify the host name and location
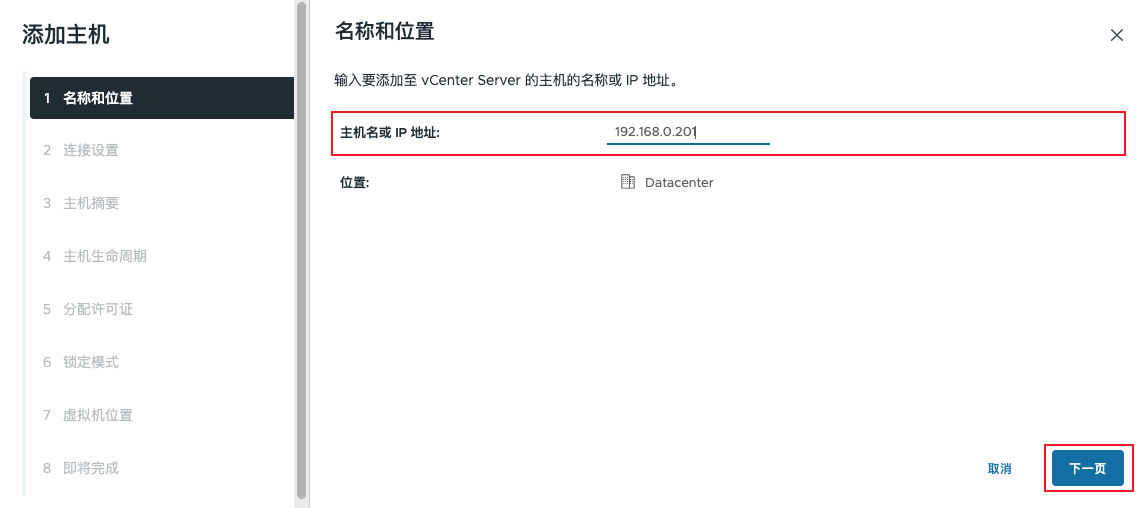
| Configuration item | Fill in the content |
|---|---|
| Hostname or IP address | 192.168.0.201 |
| Position | Datacenter(Selected by default) |
After completing the input, click Next page.
Step 5: Configure connection settings
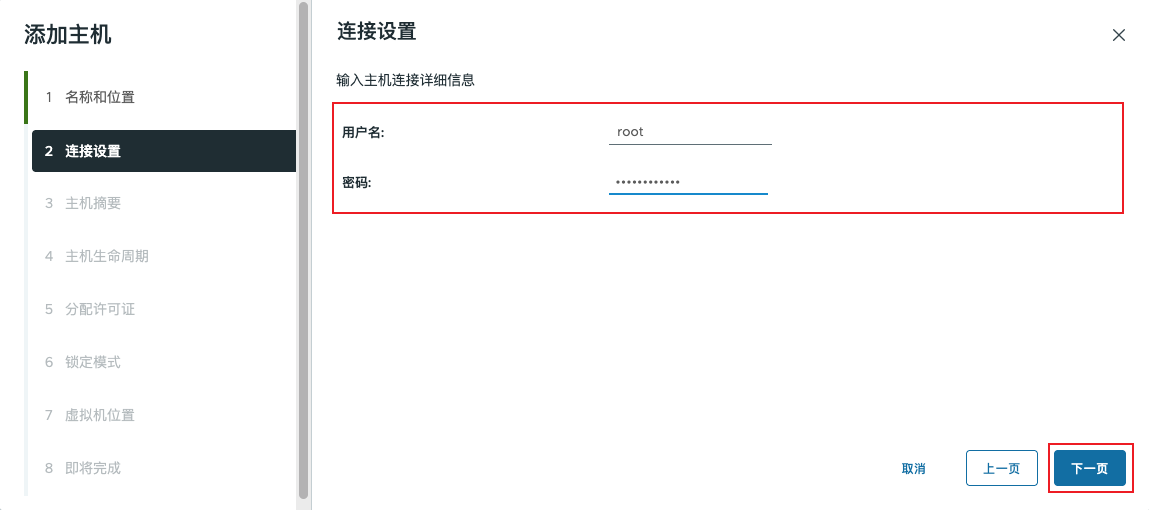
输入 ESXi 主机的管理账号信息:
| Configuration item | Fill in the content |
|---|---|
| username | root |
| password | Enter the root password for the ESXi host |
Click Next page.
Step 6: Confirm the certificate warning
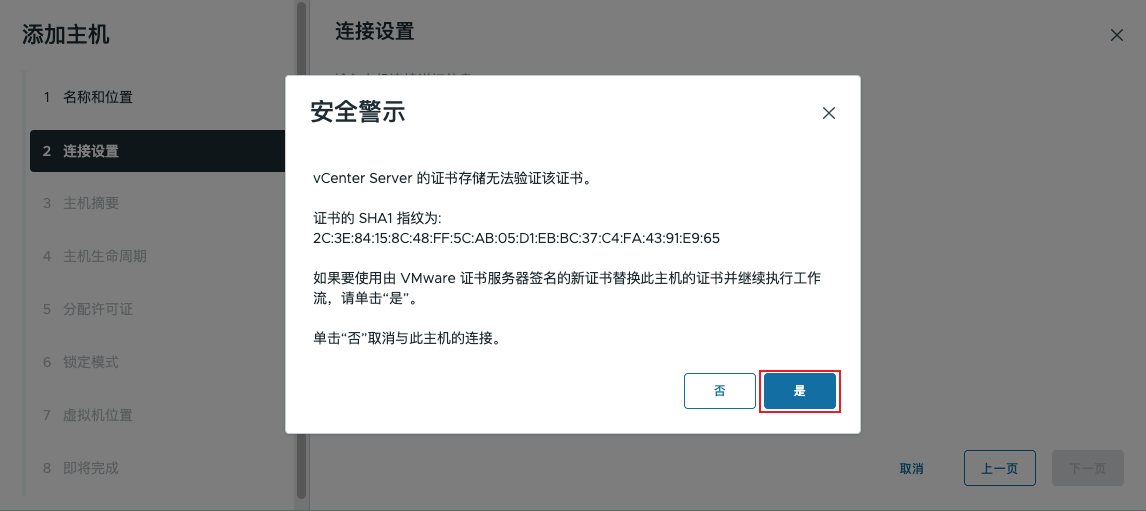
If the ESXi host uses a self-signed certificate, the system displays a security warning:
The SHA1 fingerprint of the certificate is:2C:3E:84:15:8C:48:FF:5C:AB:05:D1:EB:BC:37:C4:FA:43:91:E9:65
After confirming the fingerprint is correct, click Yes Continue.
💡 In production environments, it is recommended to replace self-signed certificates with certificates issued by a trusted CA.
Step 7: View host summary
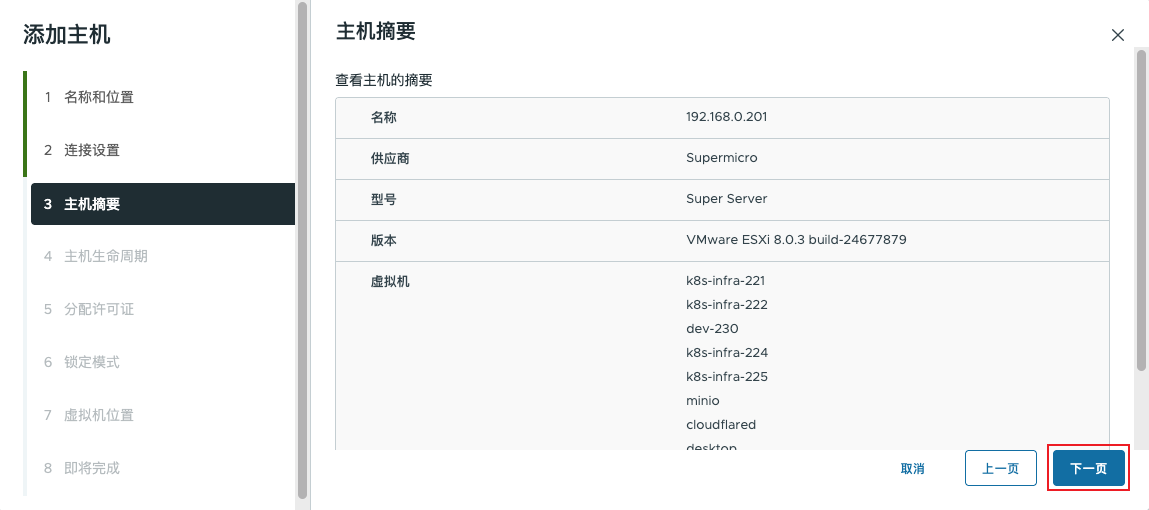
The system will display detailed information about the ESXi host. Please verify carefully:
| 项目 | information |
|---|---|
| Name | 192.168.0.201 |
| Supplier | Supermicro |
| Model | Super Server |
| version | VMware ESXi 8.0.3 build-24677879 |
| Virtual machine list | k8s-infra-221,dev-230,minio etc. |
After confirming the information is correct, click next page.
Step 8: Configure host lifecycle management
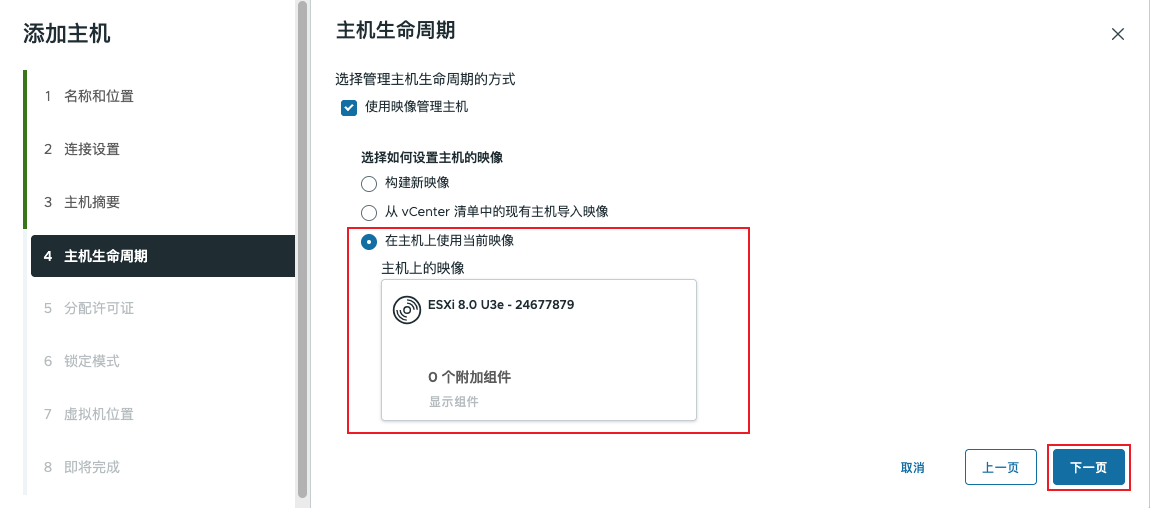
In this step, select how to manage the host lifecycle:
| Options | Description | Recommend |
|---|---|---|
| Use Image Management Host | Centrally manage ESXi version updates through vCenter | ✅ Recommended |
| Use the current image on the host. | Keep the host's existing ESXi version | Applicable to existing hosts |
For newly added hosts, it is recommended to select Use the image management host+Use the current image on the host, keep the existing ESXi version unchanged.
💡 Image management is a core feature of vSphere Lifecycle Manager, enabling unified management of ESXi versions and patches for all hosts in a cluster.
Click Next page.
Step 9: Assign licenses
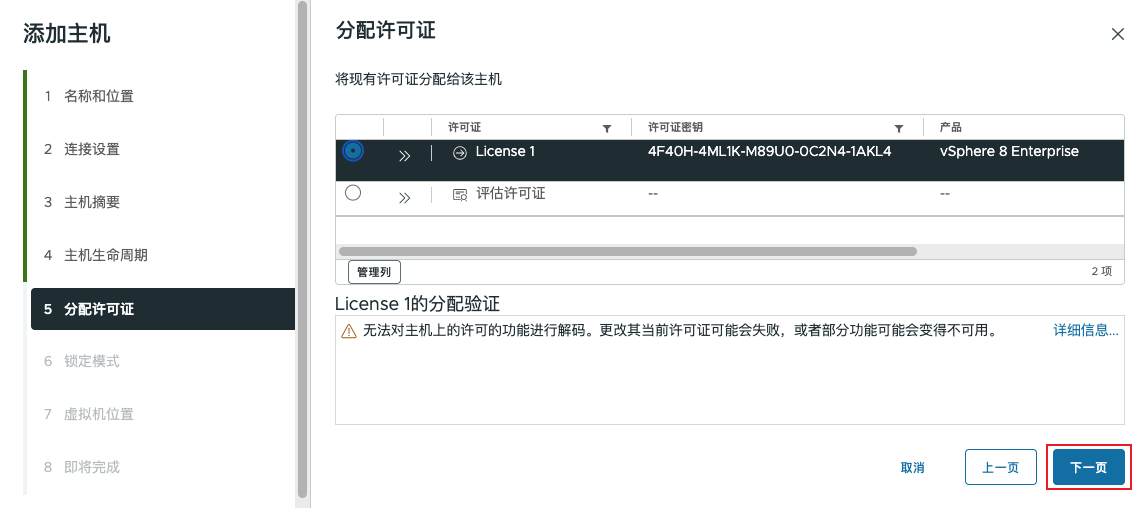
Assign a valid vSphere license to the ESXi host:
| Option | Description |
|---|---|
| Evaluation License | 60-day trial period, full functionality |
| Existing license | Select the official license that has been imported into vCenter. |
If you already have an official license key, you can select and assign it from the drop-down menu. In this example, the imported License 1(vSphere 8 Enterprise).
⚠️Attention: If no official license is assigned, some features of the host will be restricted after the 60-day evaluation period ends.
Click Next page.
Step 10: Configure lock mode
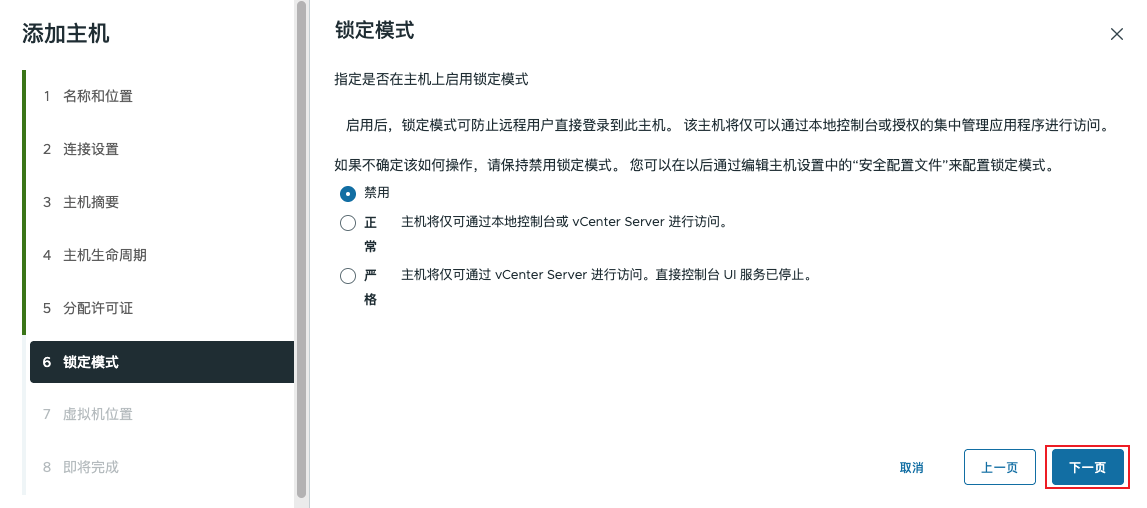
Lockdown mode is used to control access permissions to ESXi hosts:
| Mode | Description | Applicable scenarios |
|---|---|---|
| Disable(This selection) | Allow local and remote login management | Experimental environment, daily operations and maintenance |
| normal | Accessible only via vCenter; local console login is available. | production environment |
| Strict | Accessible only through vCenter; local console service stopped. | High-security-requirement environment |
For a Homelab environment, it is recommended to choose Disabled so as to facilitate flexible management.
Click Next page.
Step 11: Select the virtual machine location
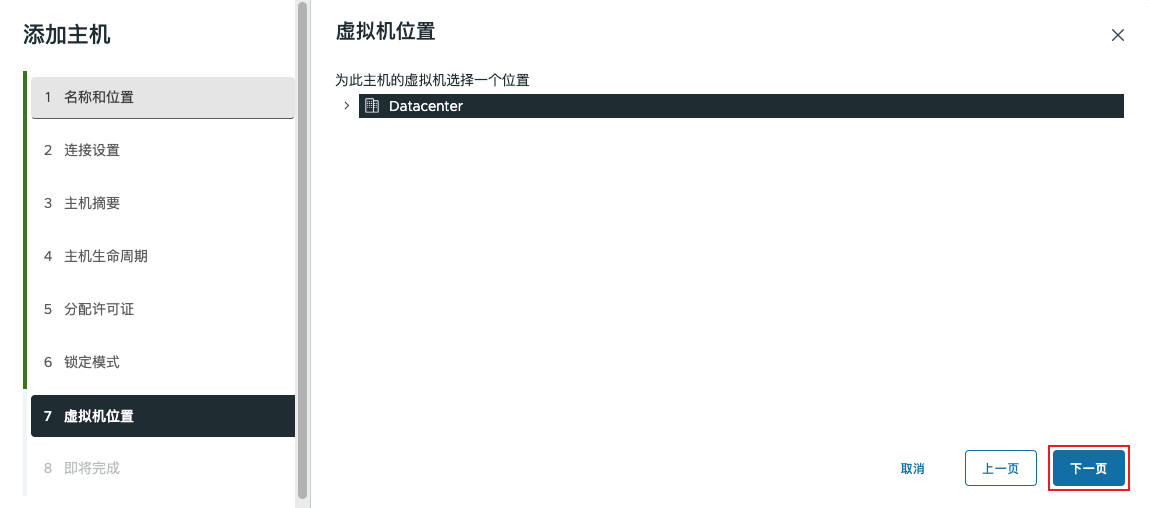
Select the storage location for existing virtual machines on this host:
Selected by default
DatacenterAfter a host is added, its virtual machines will appear under the data center hierarchy.
Click Next page.
Step 12: Confirm the configuration and finish
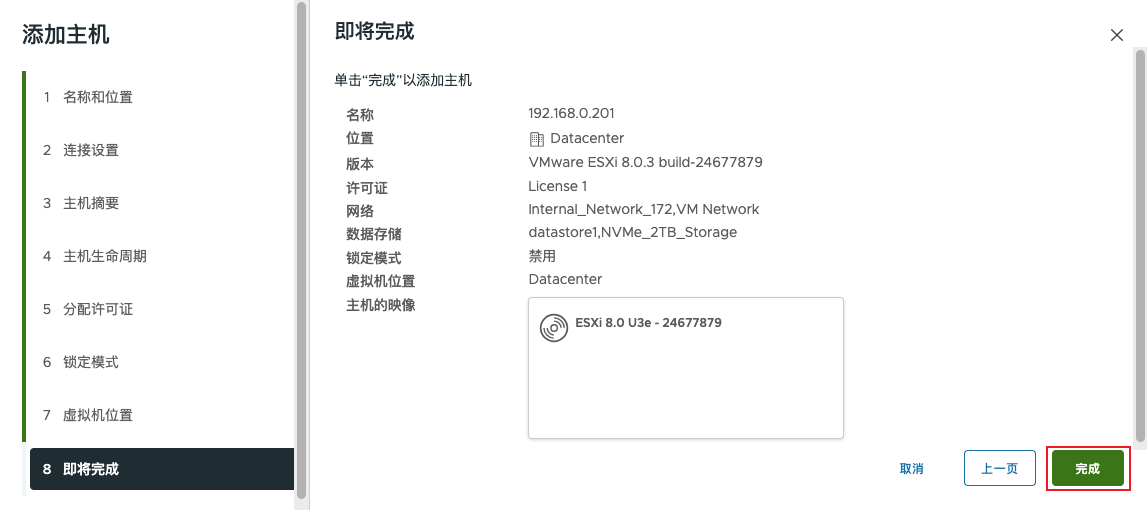
The system will summarize and display all configuration information. Please check carefully:
| Project | value |
|---|---|
| Name | 192.168.0.201 |
| Location | Datacenter |
| version | VMware ESXi 8.0.3 build-24677879 |
| License | License 1 |
| Network | Internal_Network_172, VM Network |
| data storage | datastore1, NVMe_2TB_Storage |
| Lock mode | 禁用 |
After confirming it is correct, click Completed Start adding hosts.
Step 13: View task progress
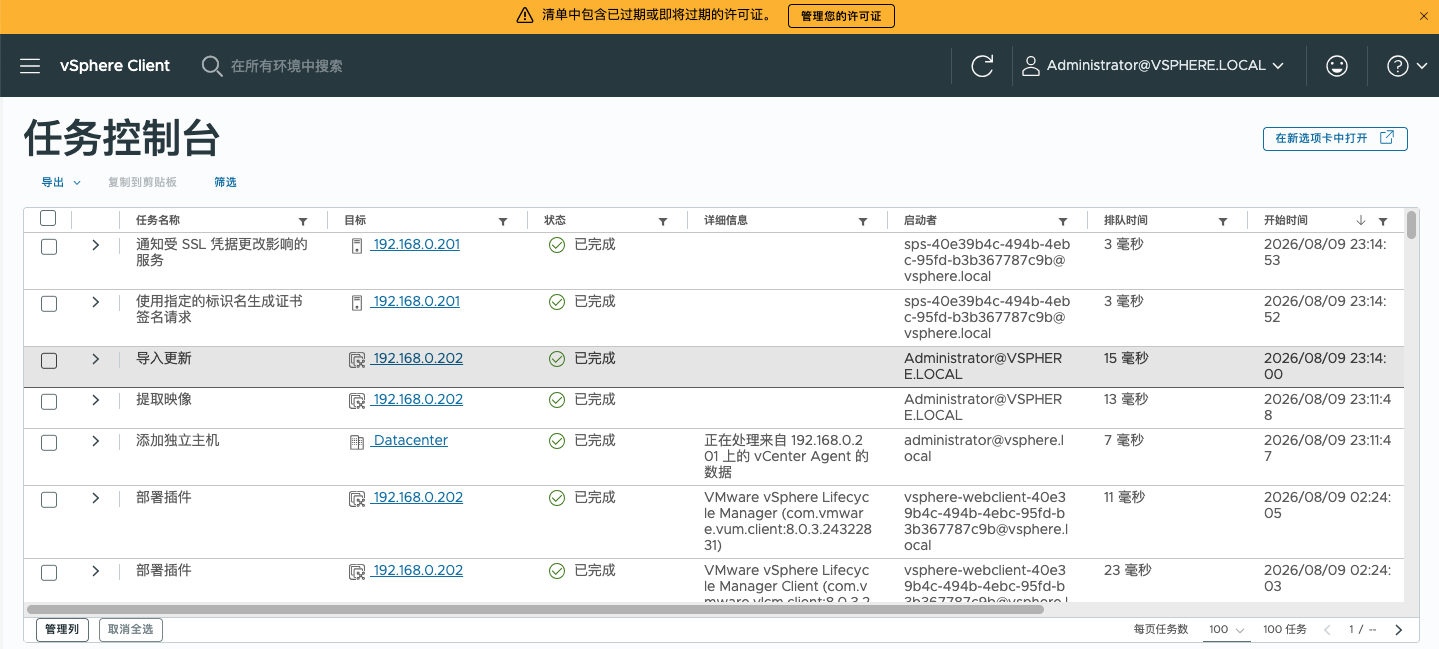
The addition process will be executed asynchronously in the background, and can be Task Console View progress:
Task name:
添加独立主机Goal:
DatacenterStatus:
已完成
After the task is completed, the ESXi host is successfully added to vCenter.
Step 14: Verify the addition result
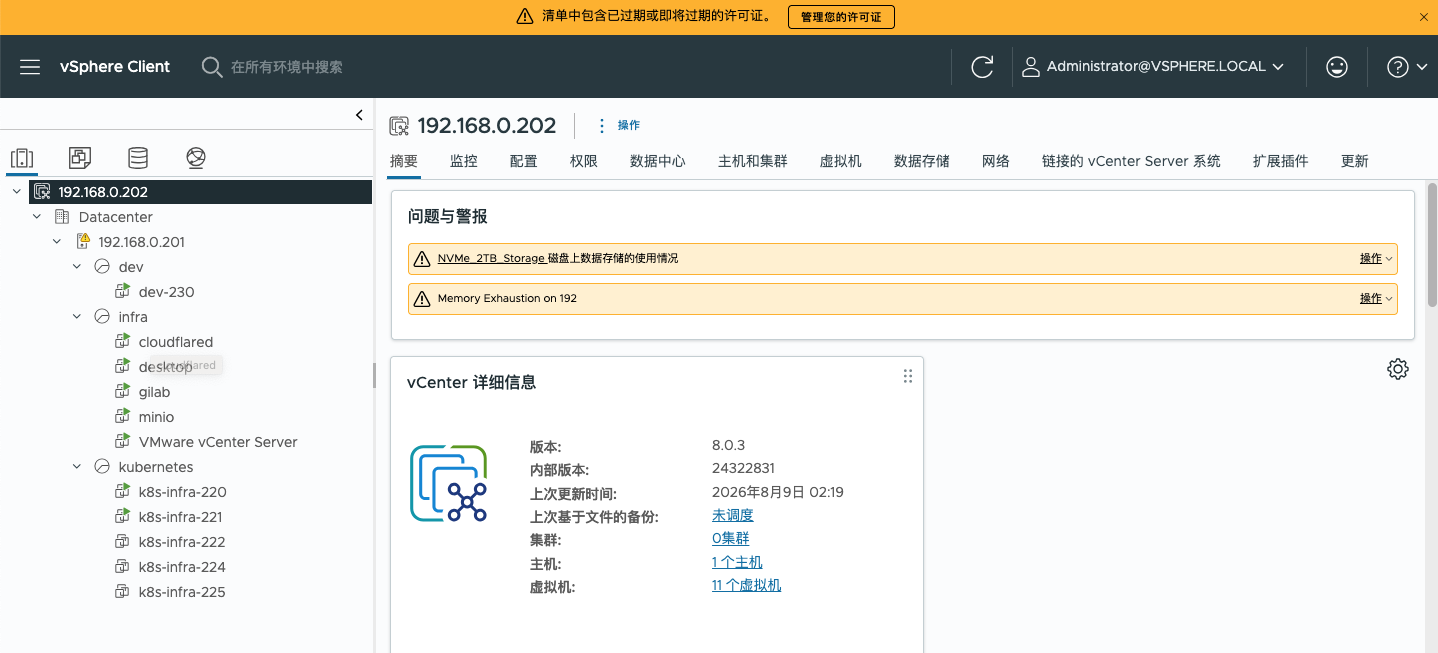
After successful addition, you can see the following in the inventory tree on the left side of the vSphere Client:
Datacenterappeared below192.168.0.201HostThe host's original virtual machine (
dev-230,cloudflared,minio,k8s-infra-*etc.) are all displayed below the main unitNumber of hosts:
1 个主机Number of virtual machines:
11 个虚拟机
At this point, the ESXi host has been successfully added to vCenter Server, and all virtual machine resources are visible and manageable in vCenter.
✅Added successfully! This ESXi host and all its virtual machines can now be centrally managed through vCenter.
Recommended follow-up actions
After an ESXi host is successfully added to vCenter, it is recommended to perform the following subsequent configurations:
| Operation | Description | priority |
|---|---|---|
| Create cluster | Add multiple ESXi hosts to a cluster to enable unified resource scheduling. | High |
| Configure HA | Enable vSphere HA to automatically restart virtual machines when a host fails. | High |
| Configure DRS | Enable vSphere DRS to achieve intelligent load balancing for virtual machines | middle |
| Configure shared storage | Add an NFS or iSCSI datastore to enable storage sharing | middle |
| Update certificate | Replace default certificates to ensure the security of management communications. | middle |
| Configuration backup | Configure scheduled backups for vCenter Server | middle |
Troubleshooting common issues
1. Unable to connect to the ESXi host
Check whether the ESXi host IP address is correct
Confirm whether the ESXi host management network is reachable (
ping 192.168.0.201)Check whether the ESXi host's firewall allows vCenter access.
2. Certificate warning is unacceptable
Confirm that the ESXi host time is synchronized with the vCenter time (time offset will cause certificate verification to fail)
Check whether the SSL certificate of the ESXi host has expired
3. License allocation failed
Confirm that the license key is valid and does not exceed the host limit.
Check whether the license version matches the ESXi version (e.g., vSphere 8 Enterprise)
4. After adding, the host status shows "Disconnected".
Check whether the ESXi host network connection is normal
Check whether the network routing between vCenter Server and ESXi hosts is normal.
Verify whether the management agent (hostd) on the ESXi host is running properly
Conclusion
At this point, we have successfully added the ESXi host to vCenter Server 8.0. Now you can centrally manage this ESXi host and all its virtual machines through vCenter.
📌This article is based on vCenter Server 8.0.3 (build 24322831) and ESXi 8.0.3 (build 24677879). The interface may vary slightly between minor versions, but the operation procedure is basically the same.
Previous article: vCenter Server 8.0 Complete Installation and Deployment Guide | Building a vSphere Management Platform from Scratch
Next post preview: The homelab's single-machine configuration is limited, so for now I won't be messing with a vSphere cluster. In the future, I may explore practical operations such as vCenter backup and recovery, NFS shared storage mounting, or VM template management. Stay tuned! 🚀