English
ESXi 8.0 Complete Guide to Adding a New Hard Disk and Creating a VMFS Datastore

Adding a new hard disk to an ESXi 8.0 host and creating a VMFS datastore is a common operation in virtualization operations and maintenance. Based on actual operation screenshots, this article will walk you through the entire process from hardware identification to datastore creation, step by step.
Preliminary preparation
The ESXi 8.0 host has started normally.
The physical hard drive has been correctly installed and connected (the example in this article is a 4TB SATA mechanical hard drive).
Have administrator access to the ESXi Host Client
Statement
Whether you add a hard disk using ESXi or using vCenter Server (vSphere Client), as long as the ESXi physical server has already been added to vCenter Server, you can see it after adding the hard disk!
Step 1: Log in to the ESXi Host Client
Enter the ESXi host IP address in a browser and log in with the root account to see the ESXi host management interface.
If you have vCenter Server, you can also manage it centrally from vCenter, but this article performs the operations directly using the Host Client built into ESXi.
Step 2: Go to Storage Management
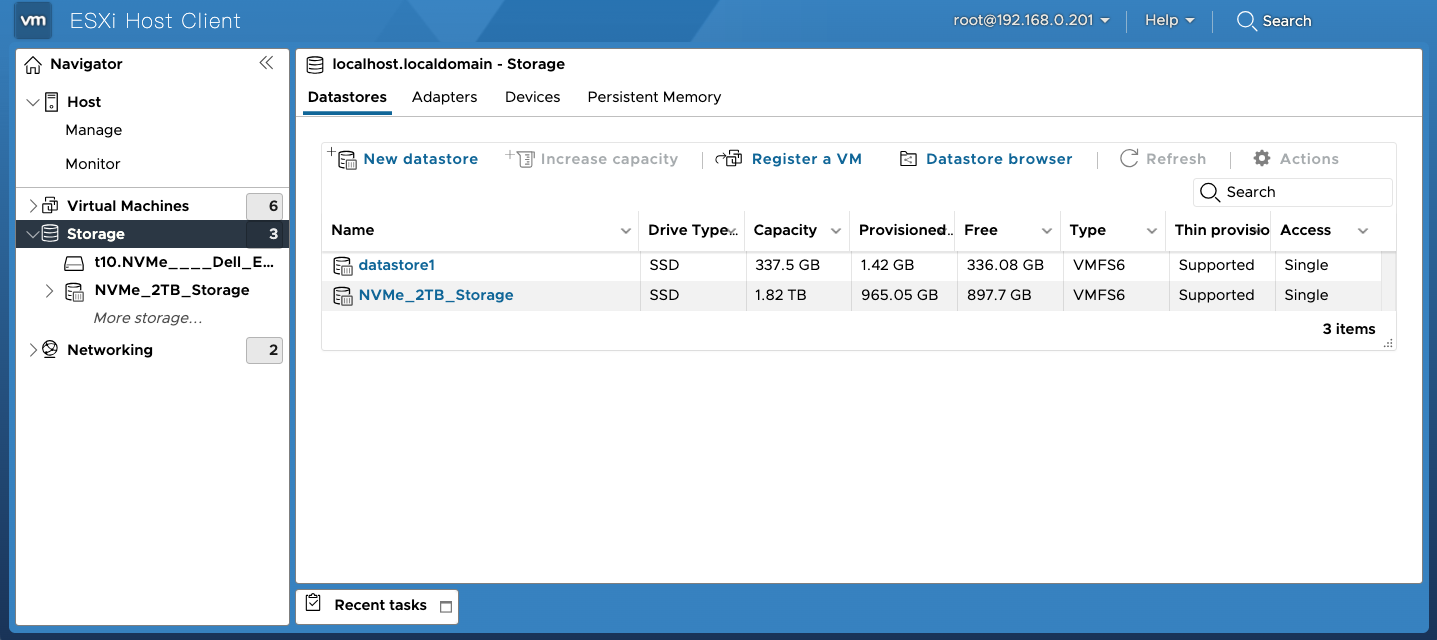
In the left navigation bar, expand storage View, confirm the list of currently recognized storage devices and datastores (datastore) to help identify new hard drives.
Step 3: Start creating a new data store
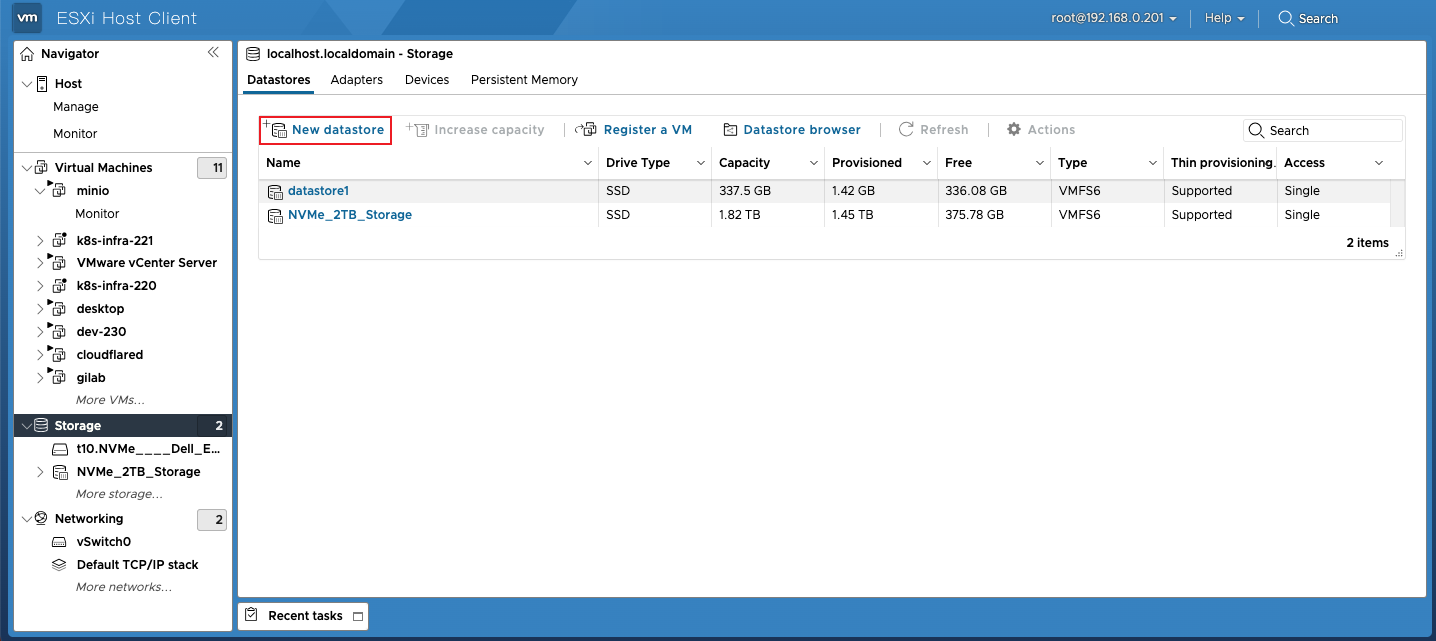
Click storage in the view New Data Storage Button (usually above the storage list or in the Actions menu).
Step 4: Select creation type
Pop up New datastore Guide, the first step is Select creation type:
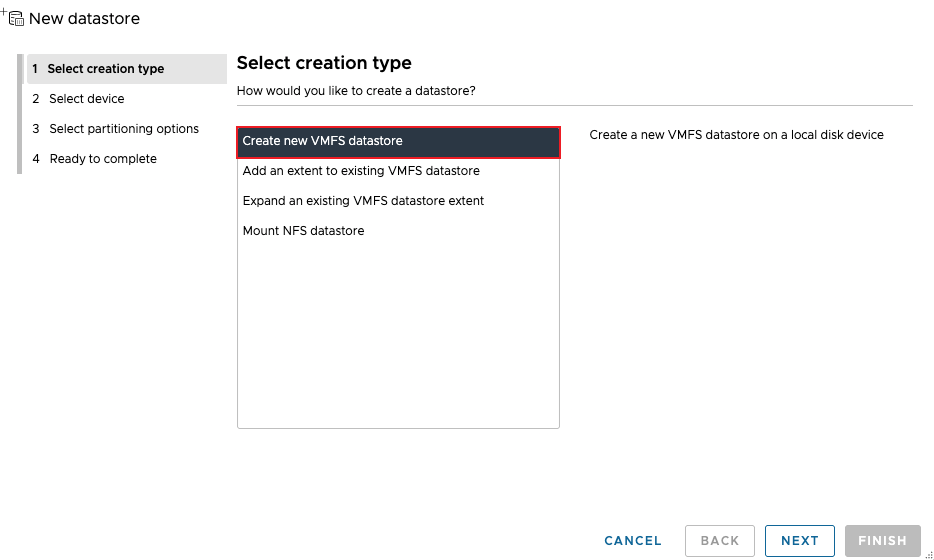
✅Create new VMFS datastore—— Create a brand-new VMFS datastore on the local disk (we choose this option)
Add an extent to existing VMFS datastore —— Expand the capacity of an existing VMFS datastore
Expand an existing VMFS datastore extent —— Expand an existing extent
Mount NFS datastore —— Mount NFS network storage
Choose Create new VMFS datastore, click NEXT.
Step 5: Select the target device (critical)
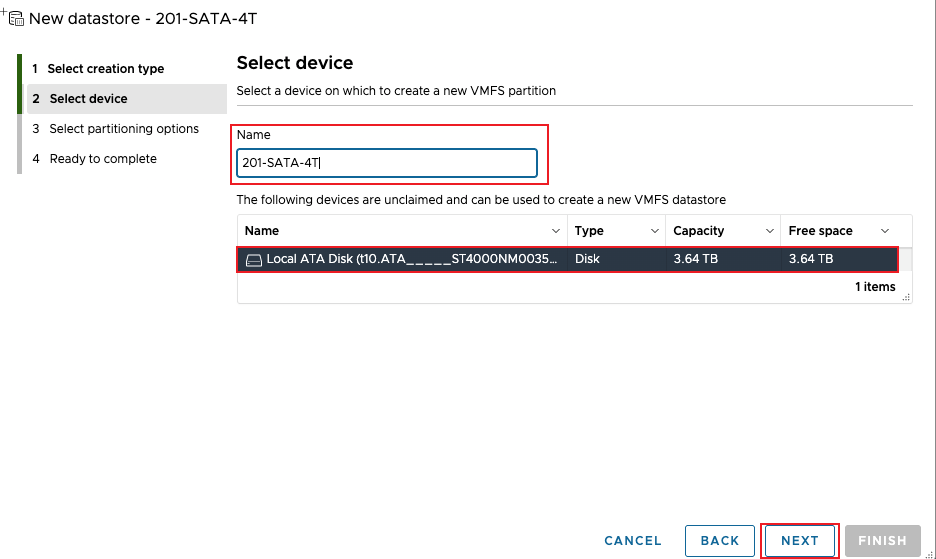
At Select device In the interface, the system will list all unused (unclaimed) disk devices.
Shown in this example:
| Name | Type | capacity | free space |
|---|---|---|---|
| Local ATA Disk (t10.ATA______ST4000NM0035...) | Disk | 3.64 TB | 3.64 TB |
This is a newly detected 4TB SATA hard drive (model: ST4000NM0035), and it has not been allocated yet.
Name The field can be customized and is used to identify this datastore in ESXi (for example, named in this example as
201-SATA-4T)Check the corresponding disk and click NEXT
Step 6: Select partition options
Enter Select partitioning options:
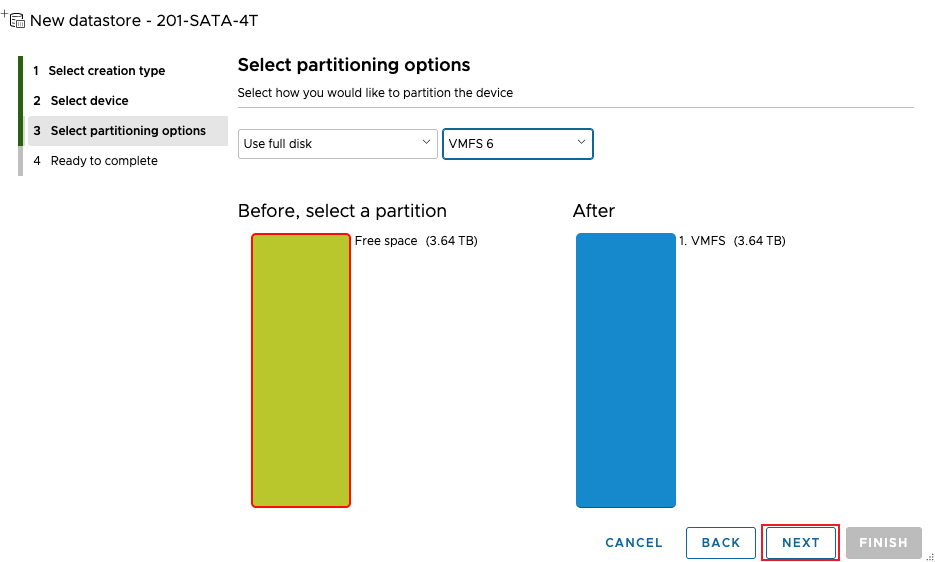
Use full disk— Use the entire disk to create a single partition (recommended)
VMFS version selection VMFS 6(ESXi 8.0 recommends using VMFS 6, which supports larger capacity and better performance)
Preview partition layout:
Before: Entire disk free (3.64 TB)
After: A VMFS partition occupies the entire capacity
After confirming it is correct, click NEXT.
Step 7: Confirm configuration (Ready to complete)
This step summarizes all configuration information:
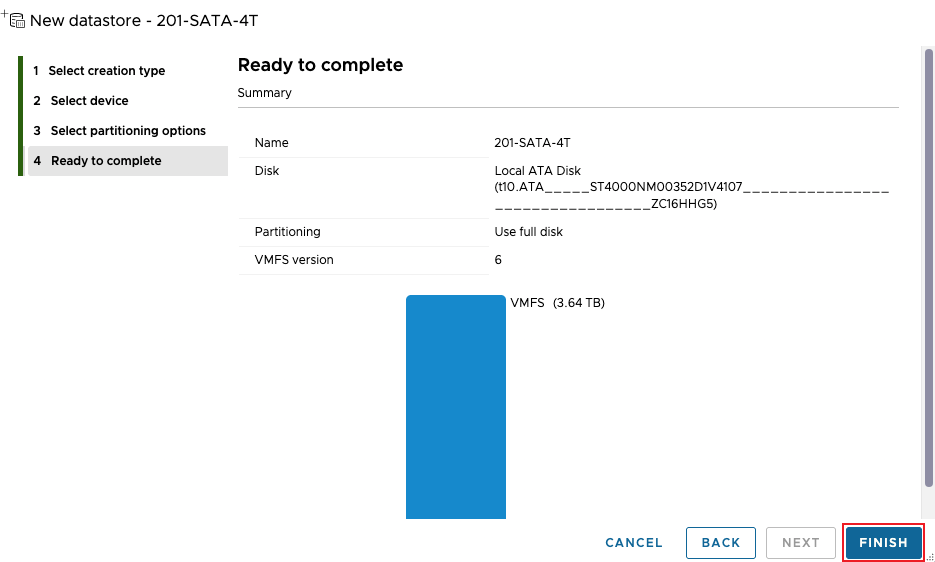
| Configuration item | value |
|---|---|
| Data storage name | 201-SATA-4T |
| Disk device | Local ATA Disk (t10.ATA______ST4000NM0035...) |
| Partitioning method | Use full disk |
| VMFS version | 6 |
| Final capacity | 3.64 TB |
Please check carefully and confirm.Name, disk, capacity, VMFS version All are correct and error-free.
Click FINISH, ESXi will begin formatting and creating a datastore.
Step 8: Verify the creation result
After creation is complete, return Storage Main view, new data storage 201-SATA-4T will appear in the list.
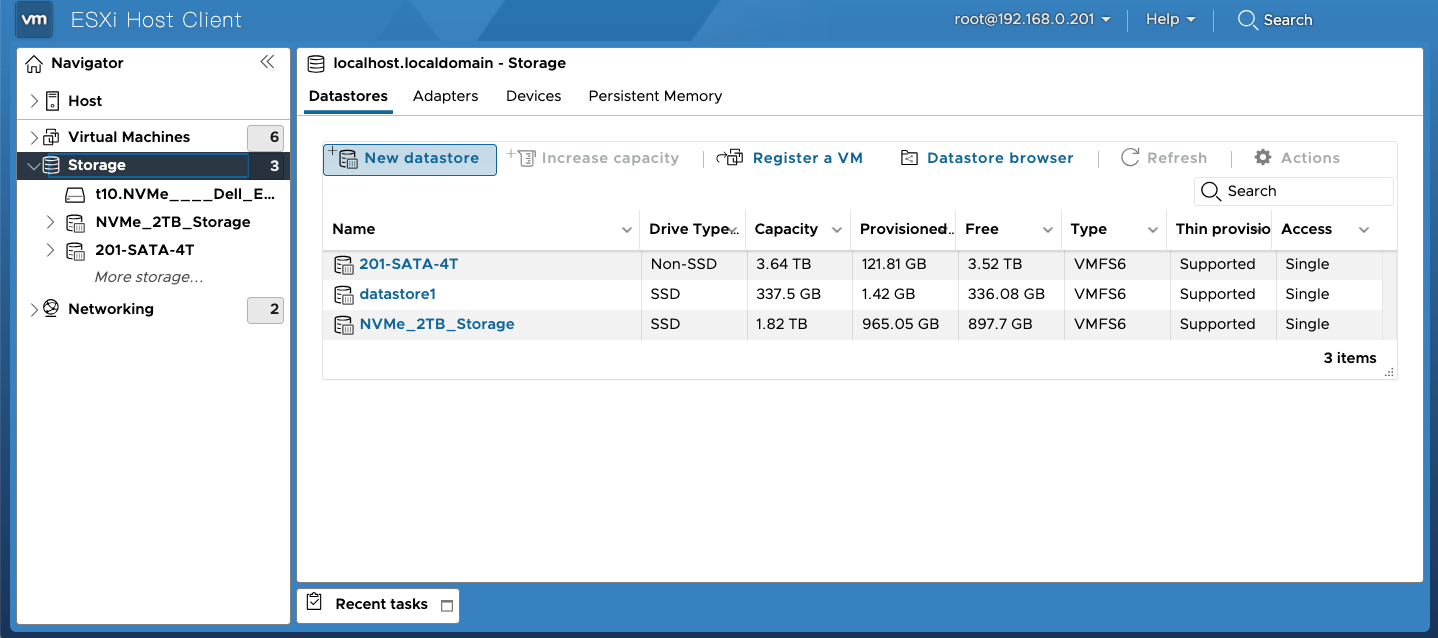
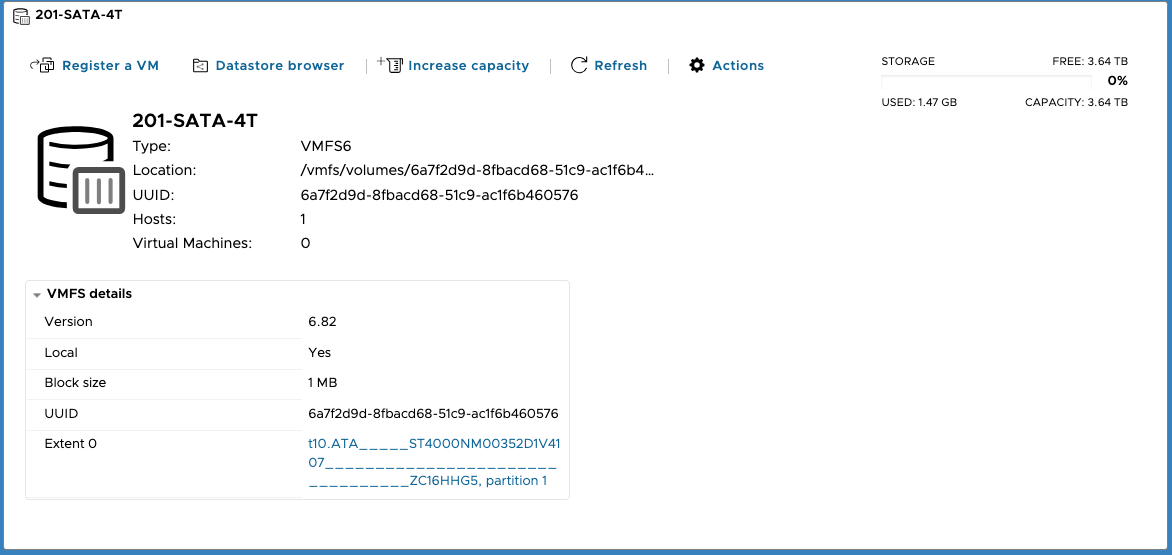
Click this data store to view detailed information:
Type: VMFS6
Location: /vmfs/volumes/6a7f2d9d-...
UUID: 6a7f2d9d-8fbacd68-51c9-ac16b460576
Hosts: 1
Virtual Machines: 0 (new storage temporarily has no virtual machines)
Storage capacity status:
FREE: 3.64 TB
USED: 1.47 GB (VMFS metadata overhead)
CAPACITY: 3.64 TB
Usage rate 0%
Additionally, in VMFS details It can also be seen in:
Version: 6.82
Block size: 1 MB
Extent information: device name + partition number (partition 1)
Operation completed
At this point, you have successfully added a new hard disk in ESXi 8.0 and created a VMFS 6 datastore. You can now:
Create a new virtual machine on this storage
Migrate existing virtual machine disks (Storage vMotion)
Store ISO images or other files
Precautions
Disk capacity unit: Hard drive manufacturers use 1TB = 10¹² B, while the system uses 1TB = 2⁴⁰ B, so a 4TB drive actually shows as about 3.64TB; this is normal.
VMFS Version Selection: ESXi 8.0 recommends using VMFS 6, which not only supports larger volumes (a single volume can reach 64TB+) but also supports more efficient metadata management.
Data security: Creating a datastore will format the disk. Please ensure that the disk does not contain important data.
RAID scenario: If using a hardware RAID card, it is recommended to first configure the logical disk in the RAID management interface, and then create a datastore in ESXi.
Naming conventions: It is recommended to use meaningful and easily recognizable names for data storage (e.g.
201-SATA-4T), facilitating subsequent operations and maintenance.