Appearance
VitePress 博客 SEO 实战:从配置到验证的完整指南

前言
搭建完 VitePress 博客后,下一个重要任务就是做好 SEO。本文记录了我为博客配置完整 SEO 方案的全过程,包括:
- 基础 meta 标签(description、keywords、author)
- Open Graph 标签(社交媒体分享)
- Twitter Cards
- 文章结构化数据(发布时间、标签)
- 页面级覆盖逻辑
- 使用调试工具验证配置
第一步:基础 SEO 配置
在 .vitepress/config.mts 中,首先配置站点的基础信息:
typescript
// .vitepress/config.mts
import { defineConfig } from 'vitepress'

export default defineConfig({
  title: '鱼尾未央的博客',
  description: '一份源于一线开发的 Golang 工程实践笔记',

  head: [
    // 全局关键词
    ['meta', { name: 'keywords', content: 'Golang, Kubernetes, PostgreSQL, Redis, 后端架构, 数据库调优, 自动化运维, DevOps, Linux, GitHub Actions, VitePress, 技术博客' }],
    // 全局作者
    ['meta', { name: 'author', content: '鱼尾未央' }],
  ]
})
第二步:配置 Open Graph(社交分享)
Open Graph 标签决定了你的文章在 Facebook、微信、LinkedIn 等平台被分享时的展示效果。
typescript
head: [
  // ... 已有配置

  // Open Graph 基础标签
  ['meta', { property: 'og:type', content: 'website' }],
  ['meta', { property: 'og:site_name', content: '鱼尾未央的博客' }],
  ['meta', { property: 'og:image', content: 'https://image.fishfinal.com/hero/default-social-share.jpg' }],

  // Twitter Cards
  ['meta', { name: 'twitter:card', content: 'summary_large_image' }],
]
第三步:实现页面级覆盖
不同文章需要不同的 keywords 和分享图,需要使用 transformHead 实现动态覆盖:
typescript
transformHead({ pageData }) {
  const { title, description, frontmatter, relativePath } = pageData
  const metas = []

  // 页面级 author 覆盖
  if (frontmatter.author) {
    metas.push(['meta', { name: 'author', content: frontmatter.author }])
  }

  // 页面级 keywords 覆盖
  if (frontmatter.keywords) {
    metas.push(['meta', { name: 'keywords', content: frontmatter.keywords }])
  }

  // 动态生成页面 URL
  const pageUrl = `https://fishfinal.com/${relativePath.replace(/\.md$/, '.html')}`

  // Open Graph 动态标签
  const ogTitle = frontmatter.title || title || '鱼尾未央的博客'
  metas.push(['meta', { property: 'og:title', content: ogTitle }])
  metas.push(['meta', { property: 'og:url', content: pageUrl }])

  const ogDescription = frontmatter.description || description || '一份源于一线开发的 Golang 工程实践笔记'
  metas.push(['meta', { property: 'og:description', content: ogDescription }])

  // 文章页使用 article 类型
  if (relativePath !== 'index.md') {
    metas.push(['meta', { property: 'og:type', content: 'article' }])
  }

  // 文章配图作为分享图
  if (frontmatter.image) {
    metas.push(['meta', { property: 'og:image', content: frontmatter.image }])
    metas.push(['meta', { name: 'twitter:image', content: frontmatter.image }])
  }

  // 文章发布时间
  if (frontmatter.createdAt) {
    metas.push(['meta', { property: 'article:published_time', content: frontmatter.createdAt }])
  }

  // 文章标签
  if (frontmatter.tags && frontmatter.tags.length) {
    metas.push(['meta', { property: 'article:tag', content: frontmatter.tags.join(', ') }])
  }

  return metas
}
第四步:在文章中配置 Frontmatter
每篇文章可以通过 frontmatter 自定义 SEO 信息:
yaml
---
layout: blog-post
title: npm audit fix --force 死循环陷阱:一个让我差点放弃 VitePress 2.x 的故事
description: 从 npm audit 报警告,到执行 --force 降级 VitePress 导致项目崩溃,再到发现死循环的真相。
tags: [npm, audit, vitepress, troubleshooting]
keywords: npm audit, npm audit fix --force, VitePress 降级, npm 安全漏洞
createdAt: 2026-06-14T11:26:00+08:00
image: https://image.fishfinal.com/hero/0cc175b9c0f1b6a831c399e269772661.jpg
---
第五步:验证配置是否生效
方法一:浏览器开发者工具
按 F12 打开开发者工具,在 Console 中运行:
javascript
// 查看所有 meta 标签
[...document.querySelectorAll('meta')].forEach(m => {
  const name = m.getAttribute('name') || m.getAttribute('property')
  if (name) console.log(`${name}: ${m.getAttribute('content')}`)
})
方法二:Facebook Debugger(推荐)
访问 Facebook Sharing Debugger,输入文章链接,可以:
- 查看 Open Graph 标签是否正确解析
- 预览分享卡片效果
- 清除 Facebook 缓存,强制重新抓取
方法三:Twitter Card Validator
使用 Twitter Card Validator 验证 Twitter 分享效果。
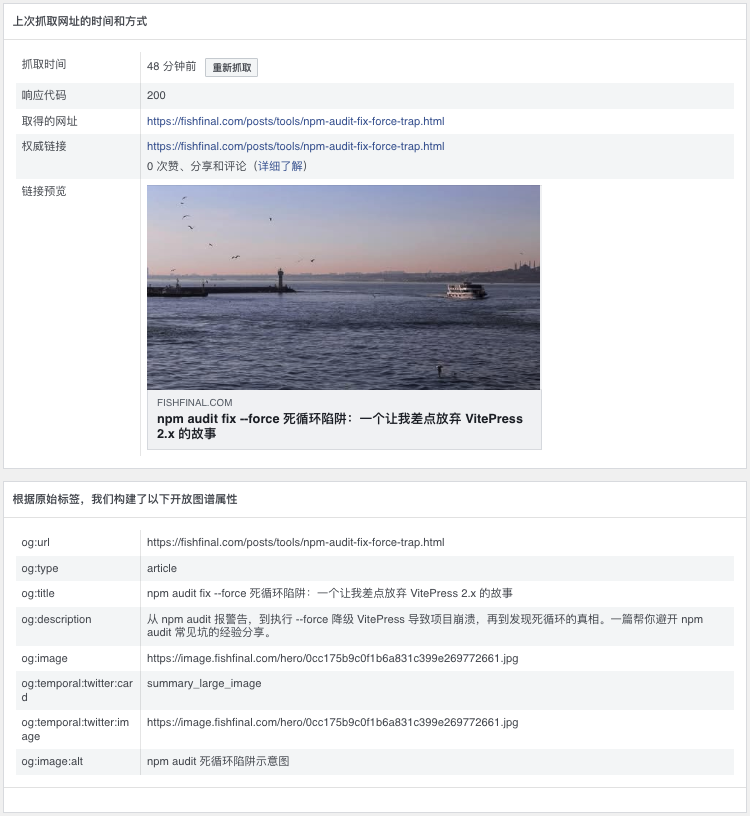
验证结果示例
配置完成后,Facebook Debugger 显示的抓取结果:
| 属性 | 值 | 状态 |
|---|---|---|
| og:title | 文章标题 | ✅ |
| og:type | article | ✅ |
| og:image | 配图 URL | ✅ |
| og:description | 文章描述 | ✅ |
| 响应代码 | 200 | ✅ |
常见问题
Q1: 配置后不生效怎么办?
检查以下几点:
- 重新构建项目:
npm run docs:build - 清除 CDN 缓存(如果有)
- 使用 Facebook Debugger 点击「重新抓取」
Q2: og:image 图片不显示?
- 确保图片 URL 可公开访问
- 建议图片尺寸 1200×630 像素
- 图片大小控制在 5MB 以内
Q3: 首页和文章页需要区分类型吗?
建议区分:
- 首页使用
og:type: website - 文章页使用
og:type: article
这样社交媒体会以更适合的方式展示内容。
总结
完整的 SEO 配置包含三个层面:
| 层面 | 内容 | 作用 |
|---|---|---|
| 基础层 | title、description、keywords、author | 搜索引擎优化 |
| 社交层 | Open Graph、Twitter Cards | 社交媒体分享效果 |
| 结构层 | article:published_time、article:tag | 内容结构化 |
配置完成后,你的博客将具备:
- ✅ 更好的搜索引擎可见性
- ✅ 精美的社交媒体分享卡片
- ✅ 规范的内容结构化数据