
English
Complete Guide to Windows 11 Remote Desktop Configuration and macOS Client Connection

This article is based on actual operation screenshots and provides a step-by-step guide, from enabling Remote Desktop on Windows 11 to successfully connecting using the Microsoft Remote Desktop client on macOS.
Preparatory work
Before you begin, please ensure you have the following prerequisites:
✅ One machine running Windows 11 Pro/Enterprise/Education the computer (Home edition does not support Remote Desktop server by default)
✅ One unit macOS Device (for remote connection)
✅ Two devices are in the same LAN(or can be accessed via VPN/port mapping)
✅ Know Windows devices'Local account username and password
💡Prompt: Windows 11 Home can enable the RDP server via third-party tools or crack patches, but this article does not recommend doing so and suggests upgrading to the Pro edition.
Enable remote login on Windows 11
⚠️Core Principles: No need to disable the firewall! Just in the firewall Allow Remote Desktop Service That’s all, and it is both safe and efficient.
Step 1: Enable Remote Desktop
Click Start→ "? Wait the message content includes "Translate the following text into en. IMPORTANT: ... Output ONLY the translated text, no quotes, no explanations. → " There is no source text after arrow? It appears arrow and blank. Need output only translated text. Since no text to translate? Need likely output exactly nothing? But must output translated text. There is no Chinese. The instruction itself is English. They say if text already in en, output exactly as it is. But "following text" maybe is " → "? Hmm.
The user provided only instructions and an arrow with no text. We need output ONLY translated text. Since no source text, output empty? But final should be maybe nothing. Need comply no explanations. Could output "→"? The text to translate is after "Output ONLY the translated text, no quotes, no explanations." There is " → " maybe arrow. It is not Chinese and already en? Actually arrow symbol. Output exactly as is: " → "? Need decide. The prompt: "Translate the following text into en. ... Output ONLY the translated text, no quotes, no explanations. →Settings(gear icon), or enter in the search box 设置 and press Enter.
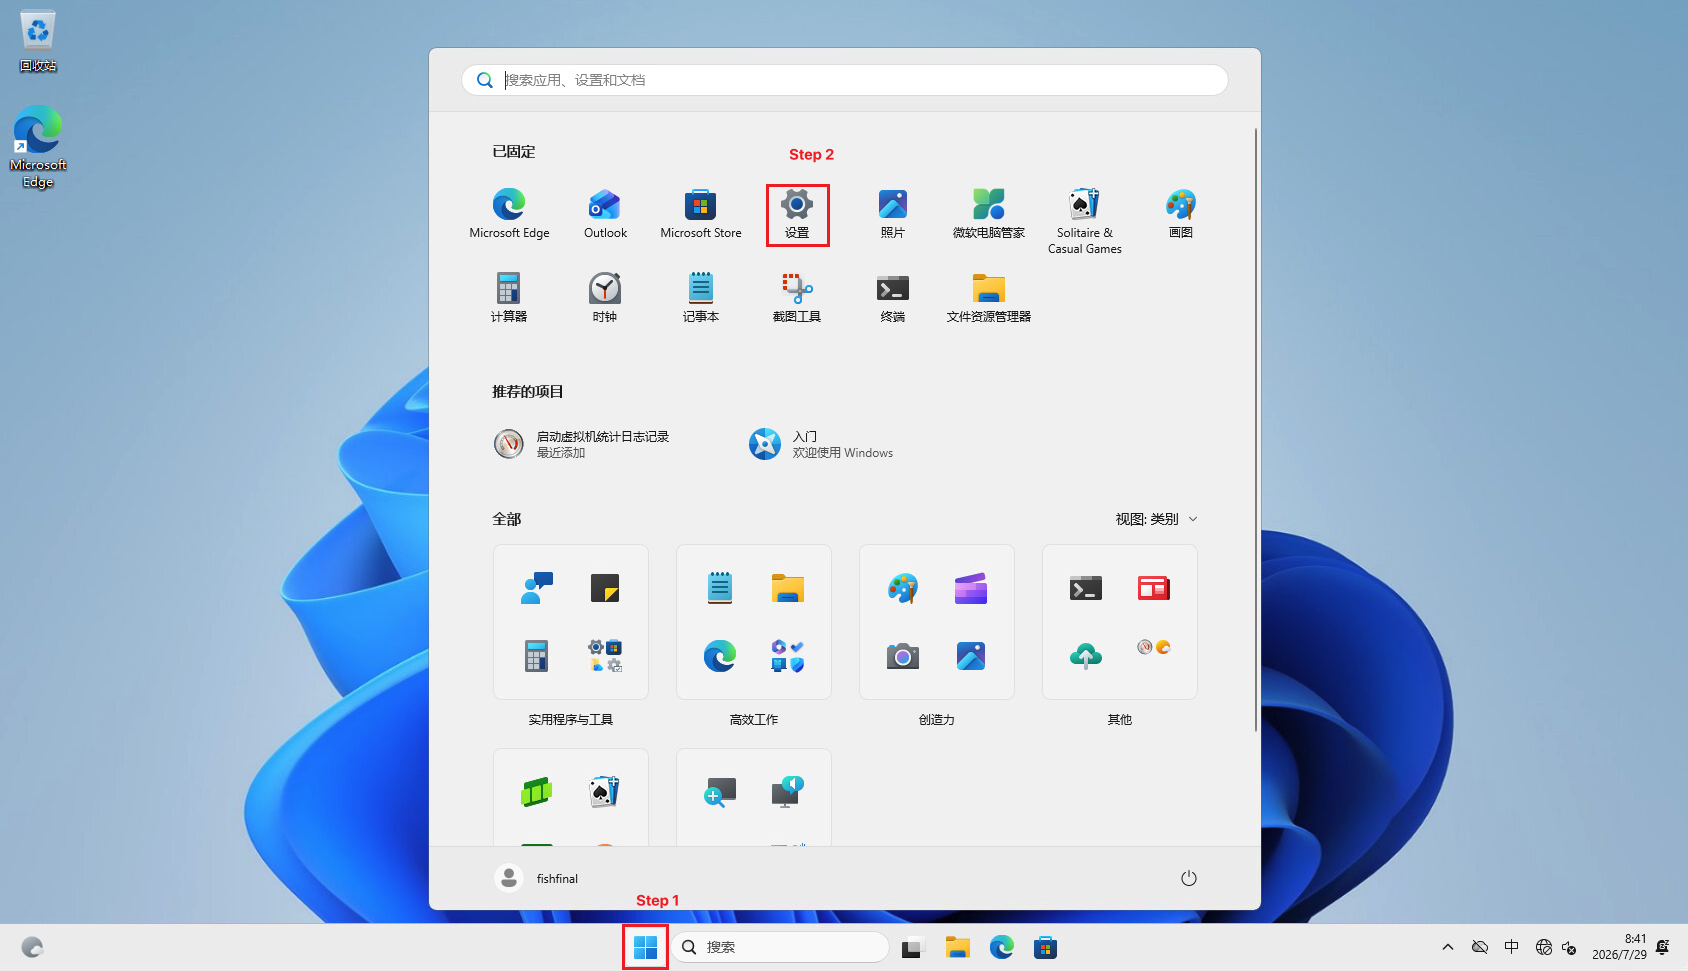
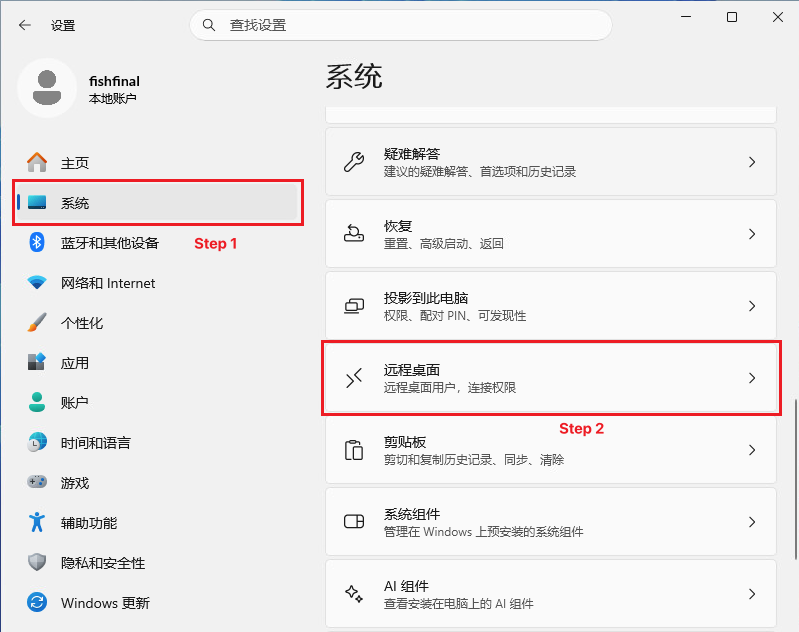
Click in the left navigation bar system, then scroll on the right side to find and click Remote Desktop:
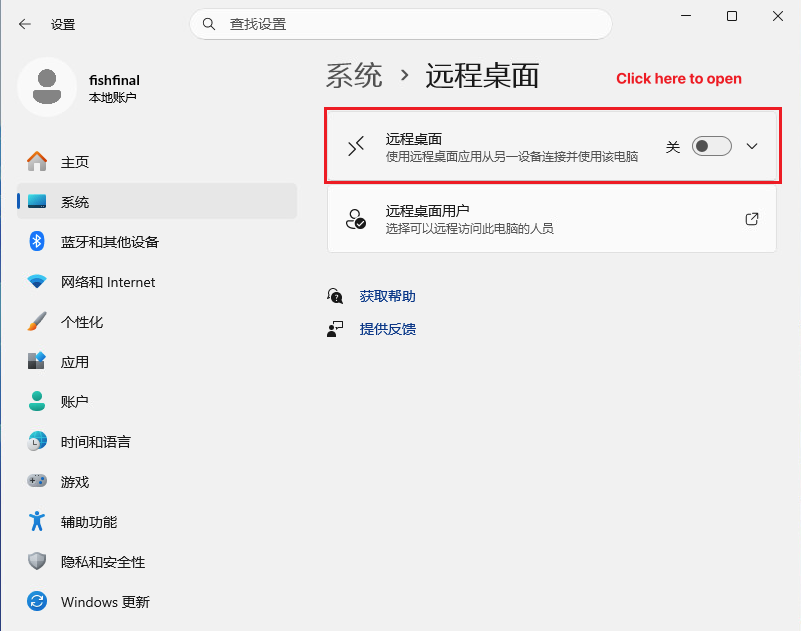
Click Remote Desktop switch, toggle it to open:
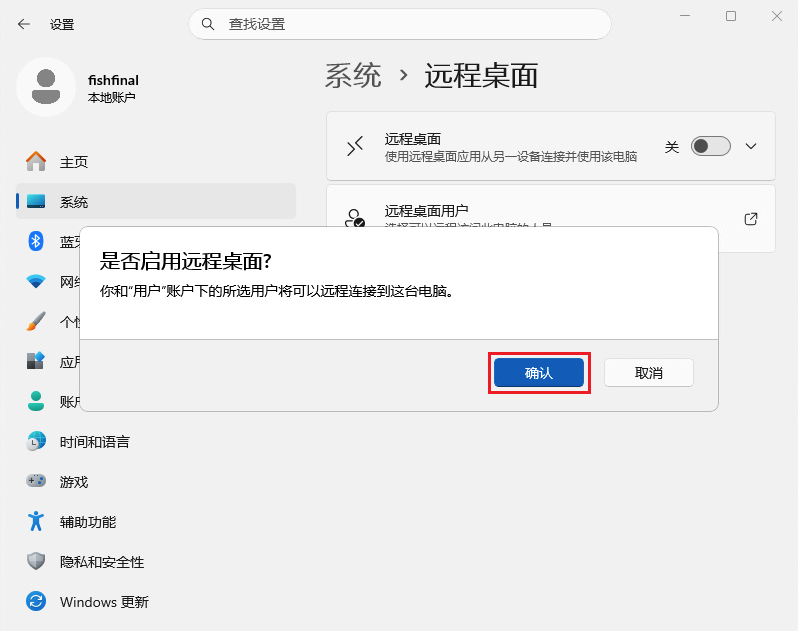
The system pops up a confirmation dialog box, click Confirm:
Once enabled, the page will show this computer's Name(e.g.DESKTOP-3VCMB9T), please note it down for future use:
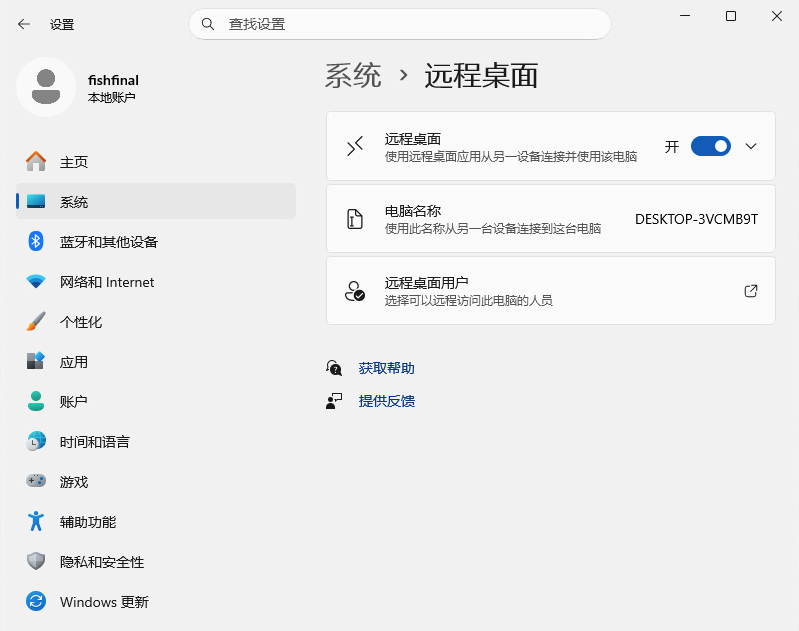
Step 2: Configure the firewall to allow Remote Desktop
💡 When you turn on the Remote Desktop toggle, Windows usually automatically pops up a prompt asking whether to allow Remote Desktop through the firewall. Click Allow That's all. If it does not pop up automatically, follow the steps below to configure it manually.
2.1 Access firewall settings
Click Start→Settings Translate the following text into en. IMPORTANT: Translate ALL Chinese characters to English. If the text contains Chinese, you MUST translate it. If the text is already in en, output it EXACTLY as it is. Output ONLY the translated text, no quotes, no explanations.Privacy and Security→Windows Security Center:
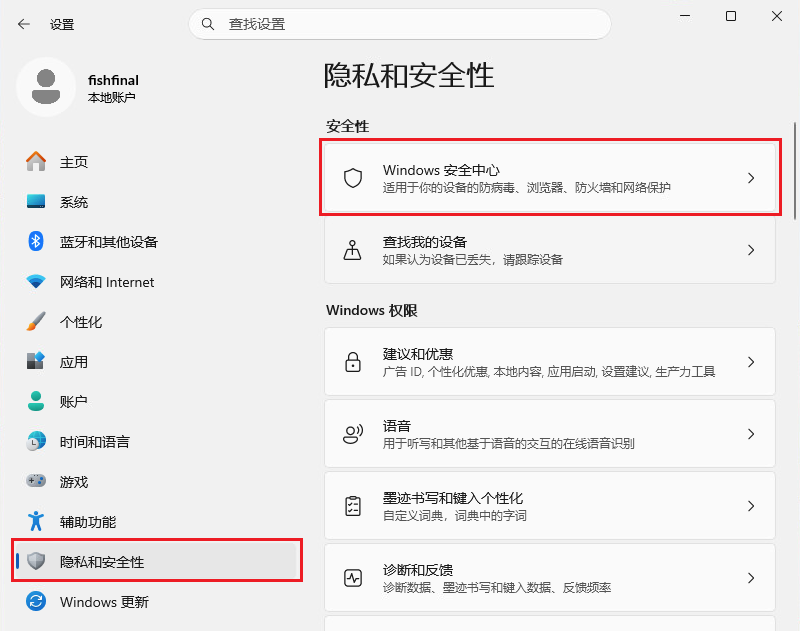
In Windows Security Center, click Firewall and network protection:
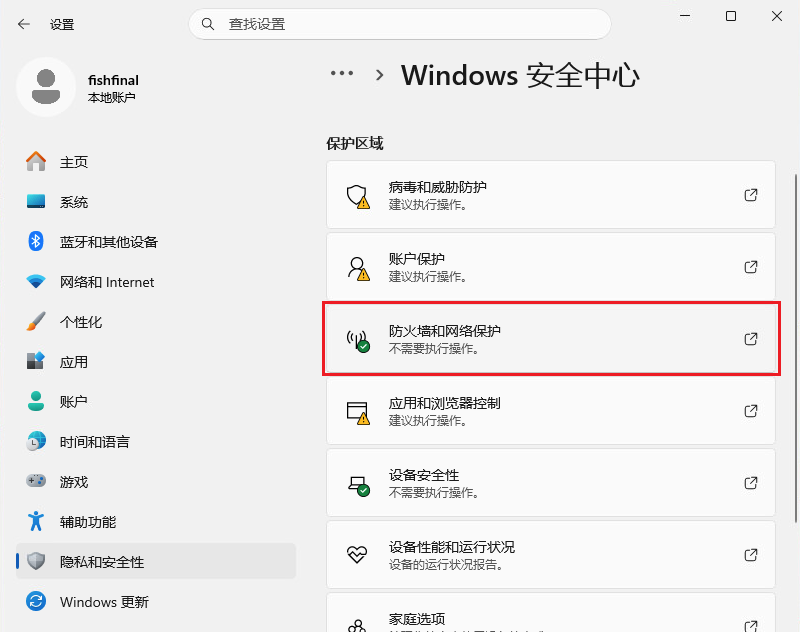
2.2 Allow Remote Desktop through the firewall
click Allow an app through the firewall:
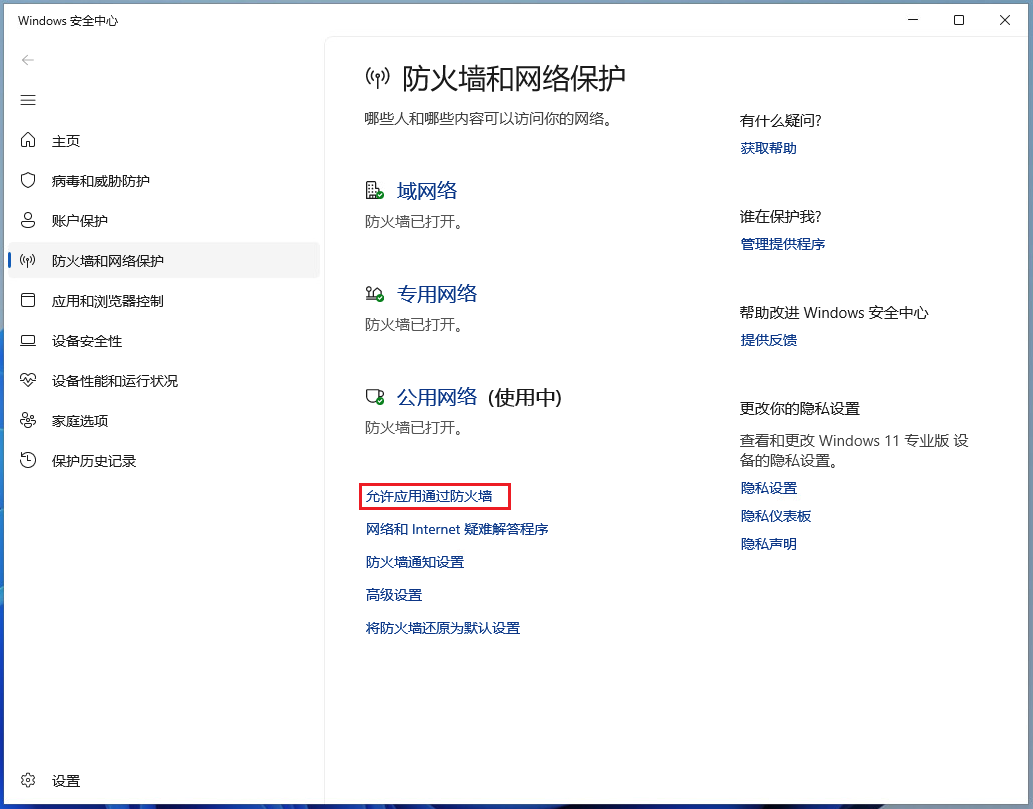
Find in the list Remote Desktop, ensuring that it is in Dedicated and Public Both columns have already Check:
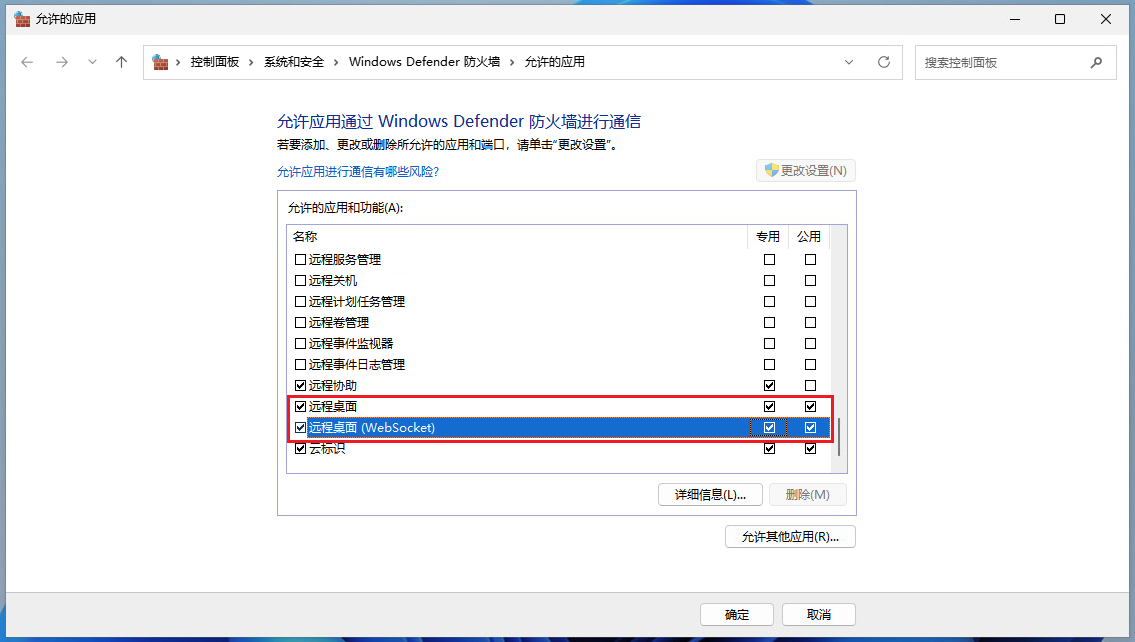
💡Prompt: If you only use it on a home/office network, you can check only the "Private" network; if you need to access it in different network environments, it is recommended to also check "Public".
If Remote Desktop is not in the list, click Change settings→Allow other apps,Browse, manually add:
- Path:
C:\Windows\System32\mstsc.exe
2.3 Confirm firewall status
Ensure that the firewall under all three network profiles is in Open Status (this is the default state in Windows; no additional action required):
✅domain network: Firewall is enabled
✅Private network: Firewall is enabled
✅Public network: Firewall is enabled
💡Current status: 🟢 Firewall fully enabled | ✅ Remote Desktop allowed
Step 3: (Optional) Configure Remote Desktop users
By default, only the currently logged-in account (administrator) has permission to connect remotely.
If you need to add other users, click Remote Desktop Users below Choose who can remotely access this computer, in the pop-up window, click Add, just enter your username.
Step 4: Get IP Address
Press Win + R, input cmd, press Enter to open Command Prompt:
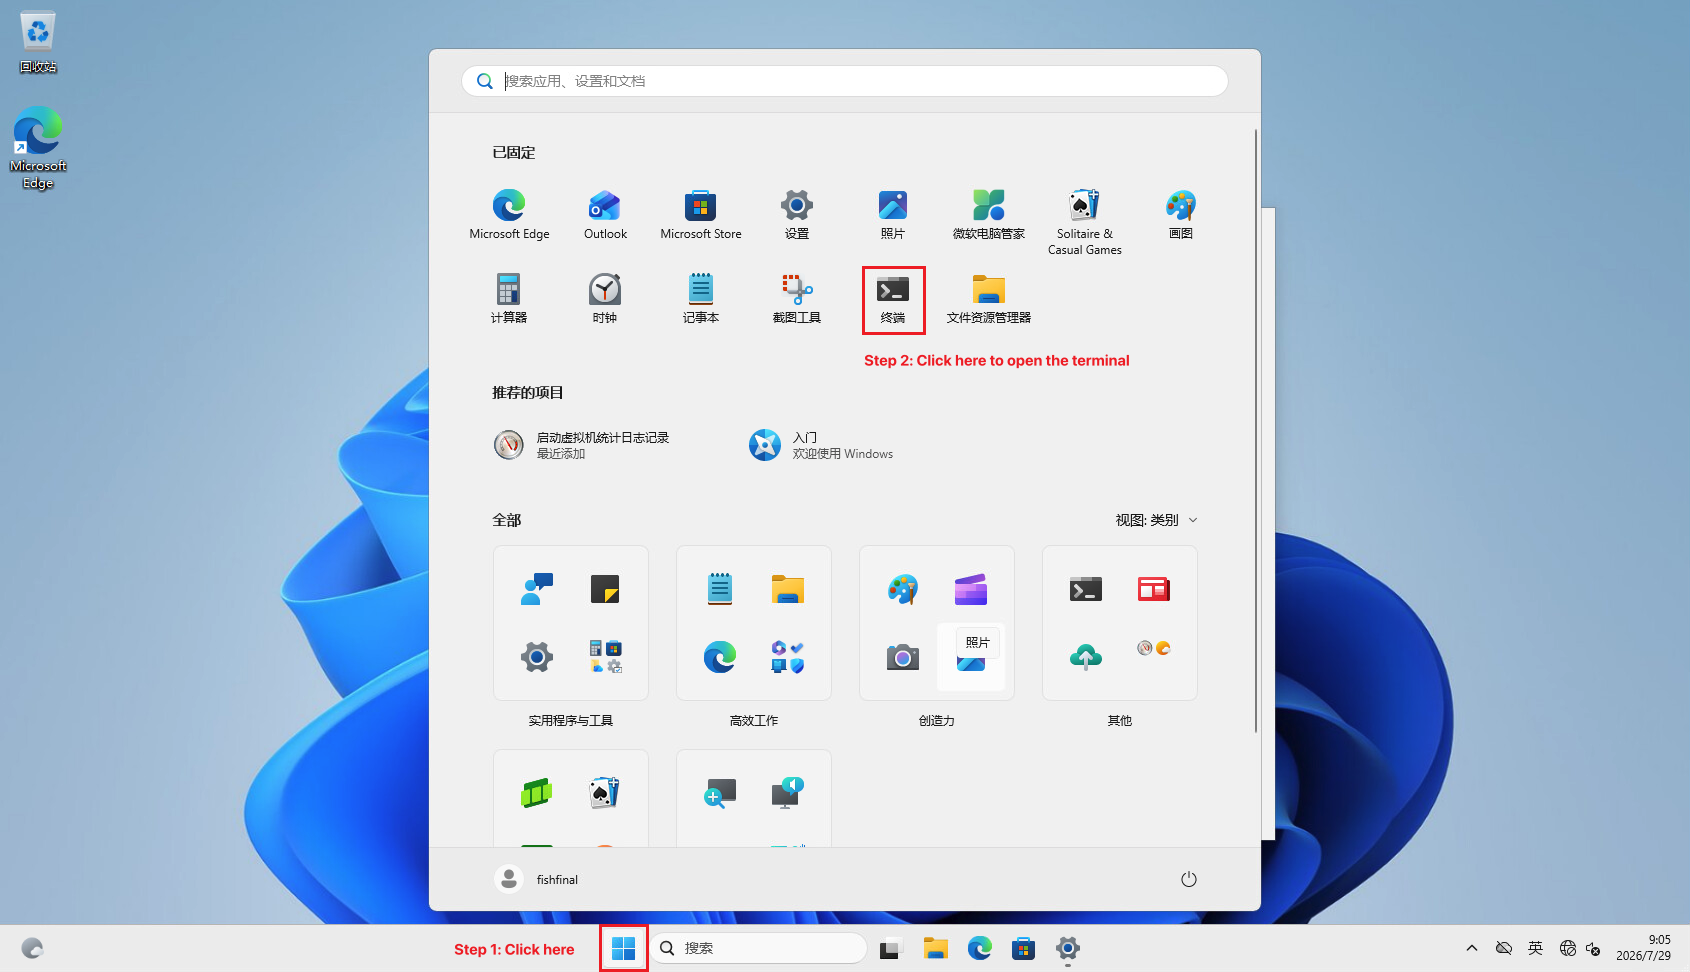
Execute in Command Prompt ipconfig Command:
powershell
ipconfigFind Ethernet adapter or Wireless LAN adapter under IPv4 address:
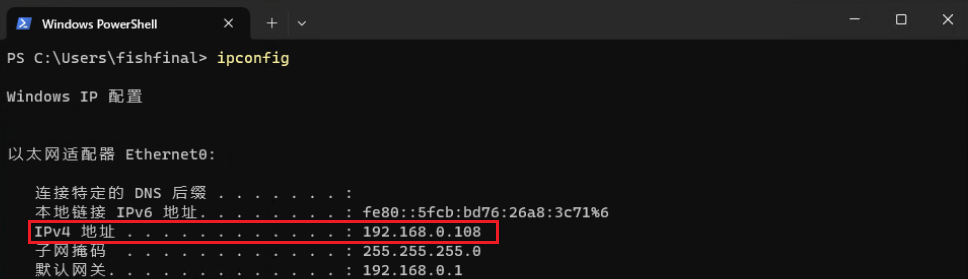
Record this IP address, for example 192.168.0.108. The macOS client will use this address to connect.
Summary of the Windows-side configuration process
| Steps | Operation | Firewall status |
|---|---|---|
| 1 | Enable Remote Desktop | 🟢 Keep open |
| 2 | Add Remote Desktop to the firewall whitelist | 🟢 Keep open |
| 3 | (Optional) Add remote desktop users | 🟢 Keep open |
| 4 | Get IP address | 🟢 Keep open |
💡Core principles:No need to disable the firewall., you only need to allow the Remote Desktop app through the firewall. This completes the configuration while also ensuring system security.
Connect to a remote desktop on macOS via RDP
Step 1: Install Microsoft Remote Desktop
Search the Mac App Store Microsoft Remote Desktop and install (free).
🔗Quick Links:Microsoft Remote Desktop - Mac App Store
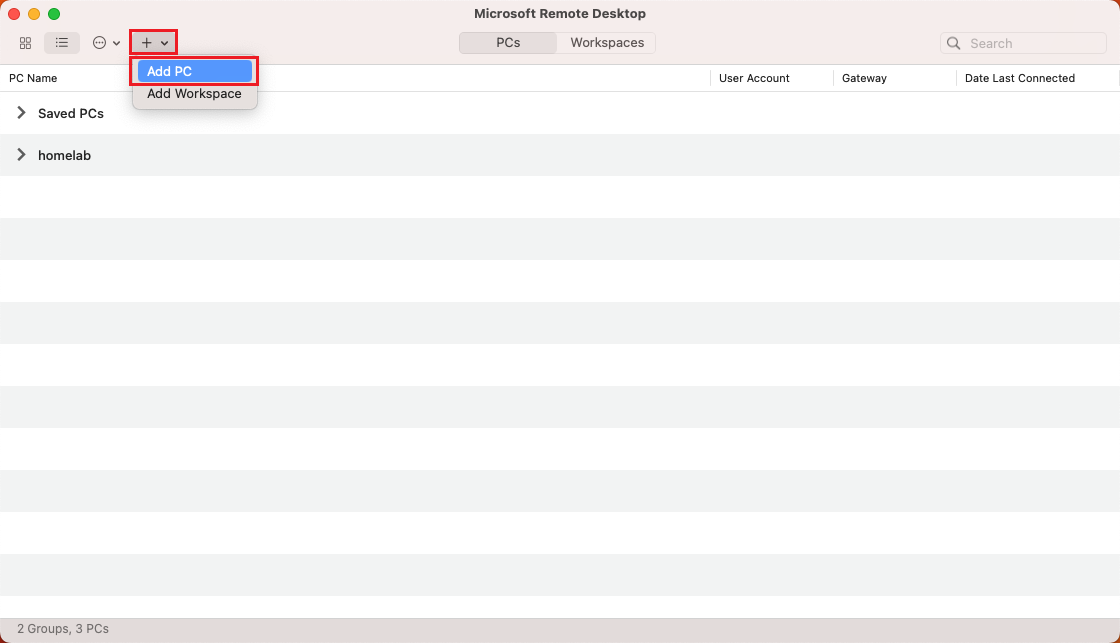
After installation is complete, open the app, and you will see the following interface:
Step 2: Add PC
Click the top Add PC Button (plus icon), pops up the configuration panel:
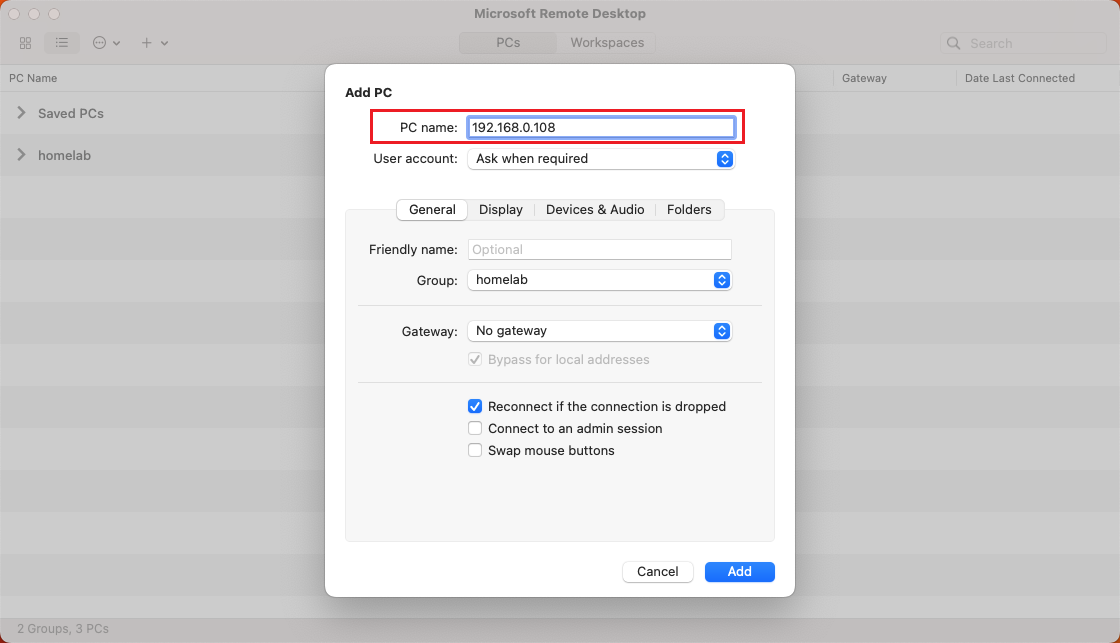
Fill in the key information:
PC name: Enter the IP address of the Windows computer (e.g.
192.168.0.108) or hostnameUser account: Select Ask when required(Ask when connecting), or add the account in advance
Step 3: Add user account (pre-configuration recommended)
If you want to save account information in advance for quick connection, click 「User account」 Drop-down box, select Add User Account...:
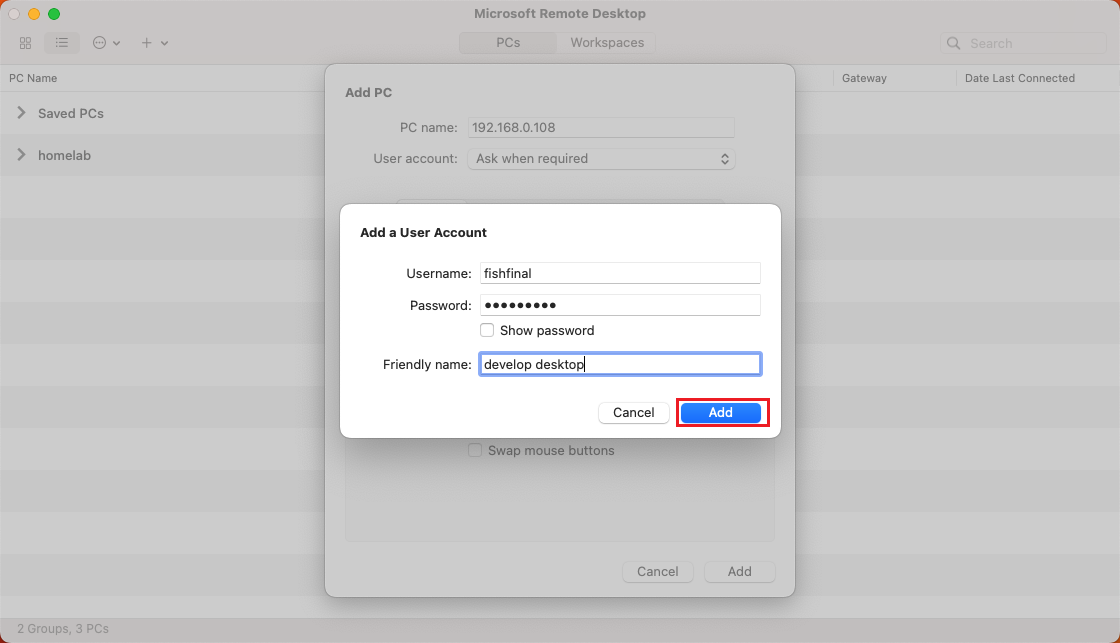
Fill in the following information:
Username: Windows local account name (e.g.
fishfinal)Password: Corresponding login password
💡Attention:
If you sign in to Windows with a Microsoft account, use your full email address as the username (e.g.
[email protected])If you are using a local account, simply enter the account name.
Click Add Save.
After saving, in the User account drop-down box, select the account you just added:
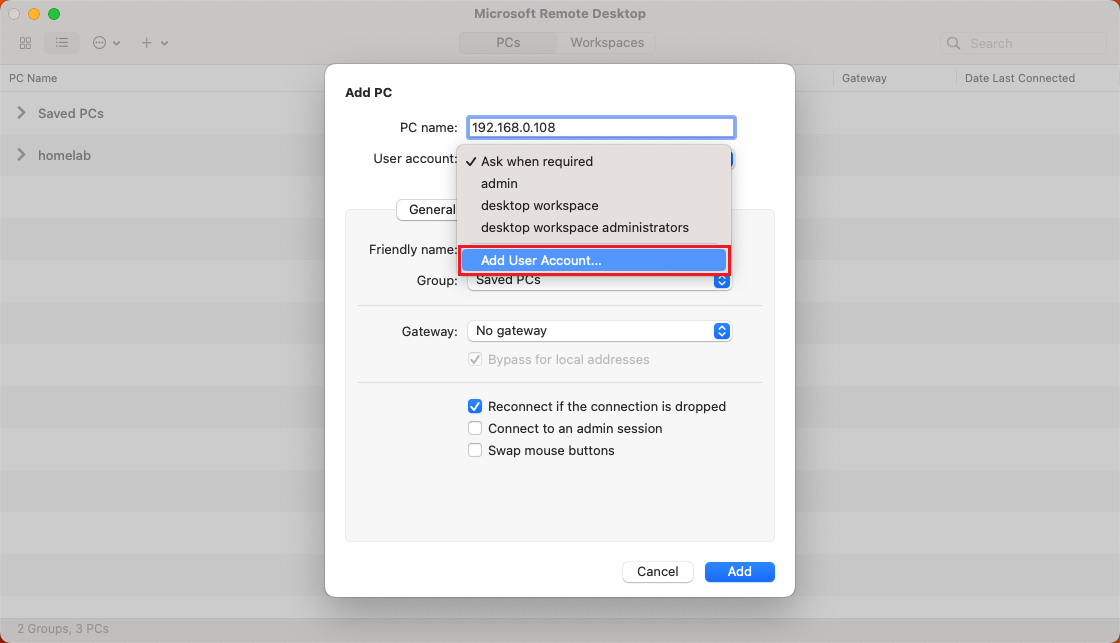
Step 4: Set group and friendly name (optional)
You can set a friendlier identifier for this remote PC:
Friendly name: Friendly name, such as
develop desktop, for easy identificationGroup: Group management, making it easy to categorize multiple devices
Click 「Group」 other Add Group..., enter a group name such as develop workstations:
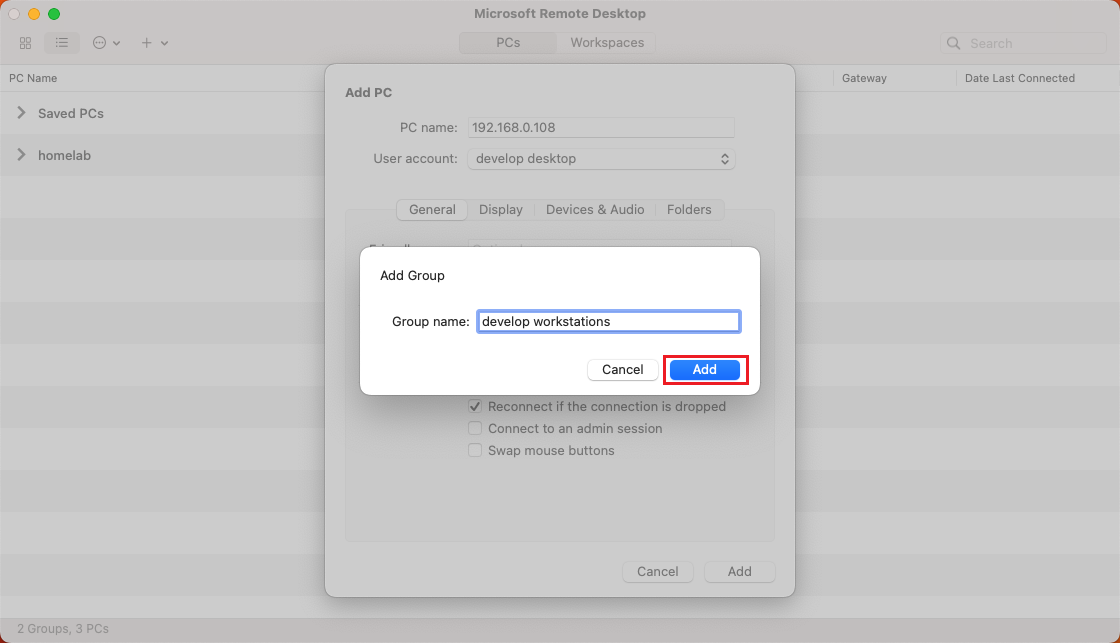
After configuration is complete, select the group you just created:
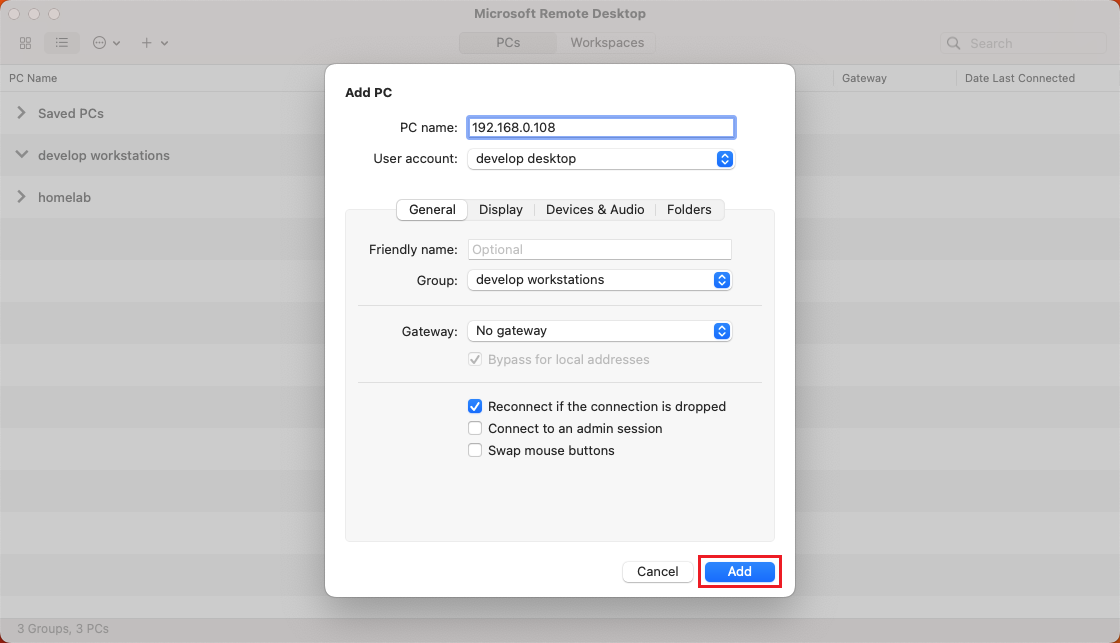
Step 5: Connect to remote desktop
After all configurations are complete, click 「Add」 Save. At this point, the newly added PC entry will appear in the main interface:
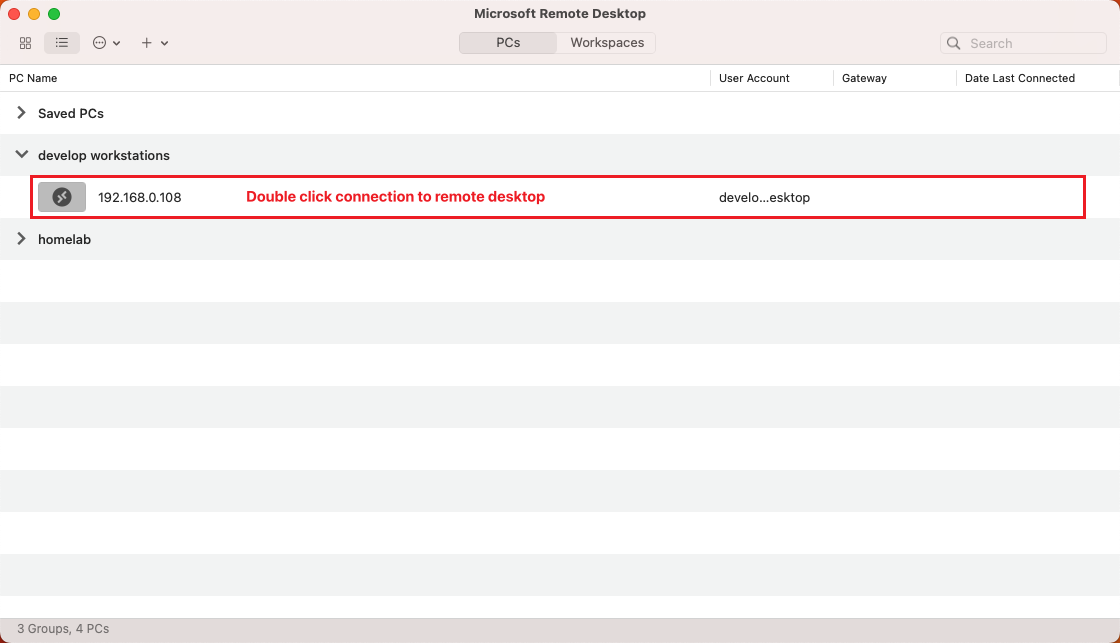
双击该条目, and then you can initiate a remote desktop connection.
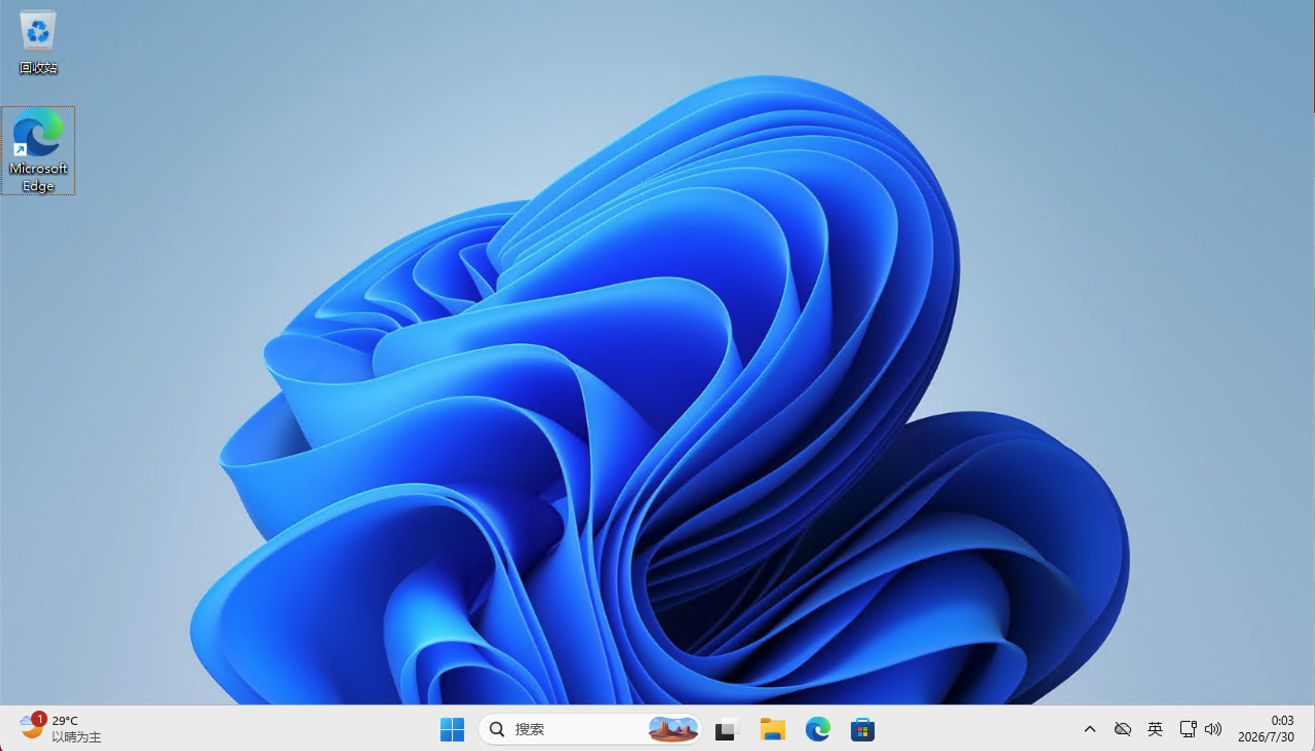
If the connection is successful, you will see the Windows 11 sign-in screen. After entering your password, you can access the desktop.
Common Issues and Troubleshooting
Problem 1: Connection failed, with the message "Remote Desktop cannot connect to the remote computer"
Possible causes:
Remote Desktop is not enabled on the Windows side.
Windows Firewall is not allowing Remote Desktop (port 3389)
The two devices are not on the same subnet.
Incorrect IP address entered
Solution:
Confirm that the "Remote Desktop" toggle on the Windows side is turned on.
Confirm that "Remote Desktop" is checked and allowed in the firewall (Private/Public).
Execute on the Windows side
ipconfigConfirm the IP address is correctExecute on the macOS side
ping 192.168.0.108Test network connectivity
Issue 2: Black screen or crash after connecting
Solution:
Restart on the Windows side
Remote Desktop ServicesService:Press
Win + R, inputservices.mscFound 「Remote Desktop Services」
Right-click to select Restart
Check whether the graphics card driver is the latest version.
Lower the display quality in MRD's Display settings.
Issue 3: "Account not authorized" or "Login failed" is displayed
Solution:
Ensure the account used has remote login permission (the default administrator account is fine).
If you sign in to Windows with a Microsoft account, use your full email address as the username.
Check Group Policy:
Press
Win + R, inputgpedit.msc计算机配置 → Windows 设置 → 安全设置 → 本地策略 → 用户权限分配
Found Allow log on through Remote Desktop Services
Ensure your account is on the list.
Issue 4: UAC confirmation frequently pops up when connecting
This is a normal security mechanism. If you find the pop-up every time you connect too troublesome, you can:
On Windows, will User Account Control Lower the level (not recommended)
Use Network Level Authentication (NLA), identity authentication can be completed before connecting
Safety recommendations
Remote desktop involves network security, so please be sure to pay attention to the following points:
1. Use a strong password
Ensure that Windows account passwords are sufficiently complex (including uppercase and lowercase letters, numbers, and special characters).
2. Enable Network Level Authentication (NLA)
In the "Remote Desktop Settings" on the Windows side, check Allow connections only from computers running Remote Desktop with Network Level Authentication. This allows identity authentication to be completed before the connection is established, making it more secure.
3. Restrict Remote Desktop users
Grant permissions only to users who need remote access, and do not use the default Administrator account (or rename it).
4. Change the default RDP port (optional)
Changing the default port 3389 to another port can reduce the risk of being scanned and attacked:
Open Registry Editor (
regedit)Navigate to:
HKEY_LOCAL_MACHINE\System\CurrentControlSet\Control\Terminal Server\WinStations\RDP-TcpModify PortNumber value (decimal)
Restart the computer for it to take effect.
⚠️Note: After modifying the port, when the client connects, you need to add the port number after the IP address, such as 192.168.0.108:33890
5. Use a VPN for external network access.
If you need to access it from an external network, it is recommended to use a VPN (such as Tailscale, ZeroTier, WireGuard) rather than directly exposing port 3389 to the public internet.
Summary
Through the complete steps above, you have successfully:
Enable Remote Desktop on Windows 11
Allow Remote Desktop Service through the firewall (No need to disable the firewall.)
Successfully connected to a Windows desktop using the Microsoft Remote Desktop client on macOS
This plan is very suitable Hybrid work environment,Home Lab (Homelab) or Cross-platform development Scenario, allowing you to securely access a Windows host from any device.
Quick Reference Card
| Project | value |
|---|---|
| Windows Remote Desktop Port | 3389 |
| Firewall configuration methods | Allow the application rather than disabling the firewall |
| macOS client | Microsoft Remote Desktop(Mac App Store) |
| Key inspection items | Remote Desktop is enabled / Firewall is allowed / IP address is correct |
📝Version information: This article is based on Windows 11 22H2/23H2 and Microsoft Remote Desktop for Mac version 10.9.x; the specific interface may vary slightly due to version updates.