
English
Vultr Cloud Server + PostgreSQL + Redis Complete Deployment Guide
This document records the complete process from scratch of purchasing a Vultr VPS, deploying Ubuntu 22.04, installing and configuring PostgreSQL and Redis, and resolving practical issues such as firewalls and remote connections.
Table of Contents
1. Vultr Account Registration and Payment Setup
1.1 Register an Account
Visit Vultr Official Website, click the upper right corner Sign Up.
Sign up with email, or log in directly with a Google/GitHub account.
Verify email
1.2 Add payment method
After logging in, enter Billing→Make a Payment → Add Payment Method.
Vultr Support:
Credit card (Visa / Mastercard / Discover): select "I just want to link my credit card - $0.00 deposit", only link the card without adding funds, billed hourly with charges deducted at the end of the month.
PayPal: Similar to a credit card; can be linked for pay-as-you-go billing.
Alipay (AliPay): You must first top up at least $10; the funds are added to your balance and deducted from it when you create a server.
Recommended
If you have an international credit card, choosing the $0.00 card binding option is the most flexible—you pay only for what you use.
2. Create a cloud server instance
2.1 Enter the deployment page
Left menu →Products→ top right corner Deploy Server
2.2 Select Configuration
| Options | Recommended choice | Explanation |
|---|---|---|
| Type | Cloud Compute / Shared CPU | High cost-performance ratio |
| Server room location | Tokyo, Japan | Lowest latency for Chinese users |
| operating system | Ubuntu 22.04 LTS | Stable Long-Term Support Edition |
| Configuration specifications | 2 vCPU / 4GB RAM | Suitable for running PostgreSQL + Redis + backend |
| Monthly fee | $20-24 | Billed hourly, can be destroyed at any time |
2.3 Add SSH Key (Optional)
If you have an SSH public key, you can paste it in; if not, the system will generate a root password, which you can view in the console after deployment.
2.4 Deployment
Click Deploy Now, wait 1-2 minutes until the server is created.
You will see:
IPv4 Address: Public IP (for example
167.179.73.225)Username:
rootPassword: system-generated password (Be sure to copy and save)
3. Initialize Ubuntu environment
3.1 Connecting to the Server
bash
ssh root@your server IP
# Enter password (not displayed after pasting; press Enter directly)
3.2 Change root password
bash
passwd
# Enter the new password twice
3.3 Installing Common Tools
bash
apt update && apt upgrade -y
apt install -y net-tools curl wget vim git
net-tools Provide netstat,ifconfig and other commands, making it easier to troubleshoot network issues.
3.4 View port listening status
bash
netstat -tlnp4. Vultr Firewall Configuration (Cloud-Level Firewall)
Vultr has its own cloud infrastructure firewall, which needs to be configured in the console.
4.1 Create a Firewall Group
Left menu →Network → Firewall Groups→Create Firewall Group
Name as you like, such as my-server-fw
4.2 Add Inbound Rule (IPv4)
Within the firewall group, click Add IPv4 Rule:
| Rules | Agreement | port | Source | Description |
|---|---|---|---|---|
| SSH | TCP | 22 | 0.0.0.0/0 | Remote connection |
| PostgreSQL | TCP | 5432 | 0.0.0.0/0 | Database (recommended to change to a specific IP later) |
| Redis | TCP | 6379 | 0.0.0.0/0 | Cache (recommended to change to a specific IP later) |
There is one at the end.drop any 0-65535 the default rules, no modification needed.
4.3 Associated Servers
On the Firewall Groups page, find Linked Instances → Add Instance, check your server.
Verify whether the association is successful.: On the server details page's Settings In it, the Firewall column should display your firewall group name.
5. Ubuntu UFW Firewall Configuration (System-Level Firewall)
This is the most easily overlooked layer! Ubuntu has UFW enabled by default, with only port 22 open.
5.1 Check UFW status
bash
ufw statusIf displayed Status: active, and only 22/tcp ALLOW Anywhere, indicating that the port needs to be opened manually.
5.2 Open the necessary ports
bash
ufw allow 5432/tcp    # PostgreSQL
ufw allow 6379/tcp    # Redis
5.3 Validation Rules
bash
ufw statusOutput should be similar to:
Status: active

To         Action      From
22/tcp     ALLOW       Anywhere
5432/tcp   ALLOW       Anywhere
6379/tcp   ALLOW       Anywhere
5.4 Note: Both layers of firewalls must be configured!
| Firewall hierarchy | Configuration location | effect |
|---|---|---|
| Vultr Cloud Firewall | Web Console | Cloud infrastructure layer, before the system firewall |
| Ubuntu UFW | Server command line | Operating system layer, the last line of defense |
Both layers must allow the corresponding ports for external access.
6. Install PostgreSQL
6.1 Installation
bash
apt install -y postgresql postgresql-contrib6.2 Configure to allow remote connections
Edit configuration file:
bash
vim /etc/postgresql/*/main/postgresql.confFind #listen_addresses = 'localhost', modified to:
listen_addresses = '*'Edit access control file:
bash
vim /etc/postgresql/*/main/pg_hba.confAdd at the end of the file:
host all all 0.0.0.0/0 md56.3 Set the postgres user password
bash
sudo -u postgres psql -c "ALTER USER postgres WITH PASSWORD 'your_strong_password';"6.4 Restart Service
bash
systemctl restart postgresql6.5 Verify Monitoring
bash
netstat -tlnp | grep 5432Should display 0.0.0.0:5432 rather than 127.0.0.1:5432.
6.6 Test local connection
bash
sudo -u postgres psql -c "SELECT version();"7. Install Redis
7.1 Installation (Latest Version)
Ubuntu's default repository version is older (6.x), so it is recommended to add the official repository to install the latest version (8.x):
bash
# Add official repository
curl -fsSL https://packages.redis.io/gpg | gpg --dearmor -o /usr/share/keyrings/redis-archive-keyring.gpg
echo "deb [signed-by=/usr/share/keyrings/redis-archive-keyring.gpg] https://packages.redis.io/deb $(lsb_release -cs) main" | tee /etc/apt/sources.list.d/redis.list

# Update and install
apt update
apt install -y redis
7.2 Configure to Allow Remote Connections
Edit configuration file:
bash
vim /etc/redis/redis.confFind and modify:
# Comment out bind 127.0.0.1, or change it to bind 0.0.0.0
# bind 127.0.0.1

# Set password (find requirepass)
requirepass your strong password
7.3 Restart Service
bash
systemctl restart redis7.4 Verification
bash
redis-cli ping
# If a password is set, use redis-cli -a 'password' ping
Return PONG That is normal.
8. Client Connections (TablePlus / other database terminal management tools)
8.1 Connecting to PostgreSQL with TablePlus
Click New Connection→ Select PostgreSQL:
| field | value |
|---|---|
| Host | Your server's public IP |
| Port | 5432 |
| User | postgres |
| Password | The password you set |
| Database | postgres (or another database name) |
Click Test, display Connected That is success.
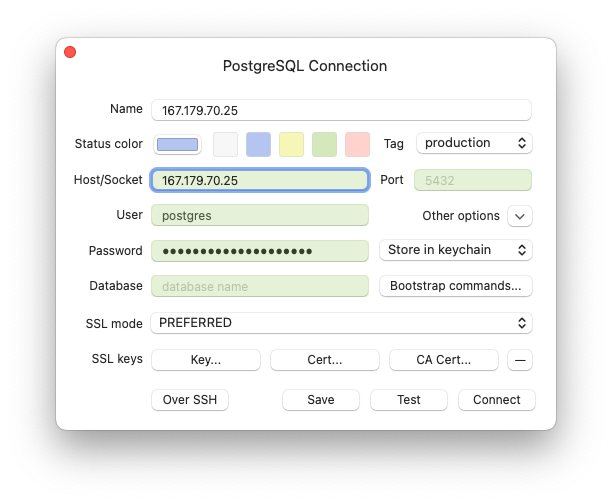
Caution
Do not attempt to access or use the IP service shown in the above figure, because it is a Fake Value.
8.2 Connecting to Redis with TablePlus
Click New Connection→ Select Redis:
| field | value |
|---|---|
| Host | Your server's public IP |
| Port | 6379 |
| Password | The password you set |
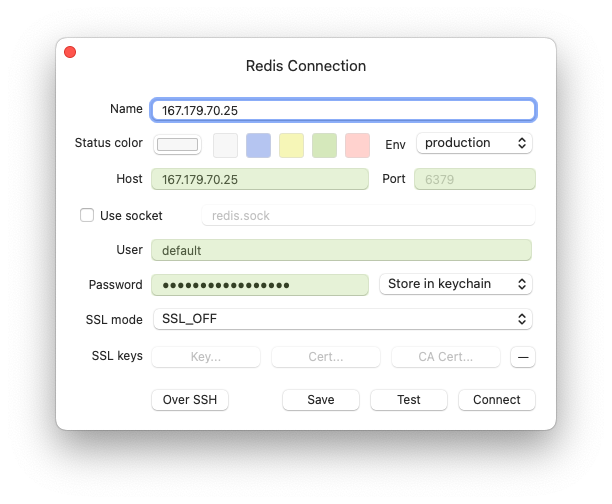
Caution
Do not attempt to access or use the IP service shown in the image above, because it is a Fake Value.
8.3 Troubleshooting Connection Failures
Confirm that the corresponding port rules have been added to the Vultr firewall group.
Confirm that Ubuntu UFW has opened ports:
ufw statusConfirm PostgreSQL/Redis listening
0.0.0.0:netstat -tlnp | grep 端口Confirm
pg_hba.confAllow remote access (PostgreSQL)Confirm the password is correct
9. Safety Recommendations
9.1 Do not directly expose the database to the public internet
Suggest switching to SSH tunnel Connection:
bash
# Run on the local computer
ssh -L 5432:localhost:5432 root@your_server_IP -N
ssh -L 6379:localhost:6379 root@your_server_IP -N
Then connect on the client side.localhost Corresponding port; traffic is encrypted and transmitted via SSH.
9.2 If public network access is absolutely necessary, restrict the source IPs
In the Vultr firewall, change Source from 0.0.0.0/0 Change it to the public IP of your local computer (e.g.123.456.789.0/32).
9.3 Use strong passwords
PostgreSQL and Redis have both been configured with strong passwords; avoid using 123456 and other weak passwords.
10. Common Troubleshooting
| Question | Possible causes | Solution |
|---|---|---|
Connection refused | The port is not open or the service is not started. | Check netstat and ufw status |
Connection timeout | Firewall blocked | Check whether the Vultr firewall group is associated and whether the rules have been added. |
Password authentication failed | Incorrect password | Reset password |
telnet 能通但客户端连不上 | Authentication configuration issue | Check pg_hba.conf/requirepass |
PostgreSQL 只监听 127.0.0.1 | listen_addresses Not changed to * | Modify postgresql.conf and restart |
Redis 只监听 127.0.0.1 | bind Not commented out or changed to 0.0.0.0 | Modify redis.conf and restart |
Afterword
After configuration is complete, your server will have:
✅ Stable runtime environment with 2 cores and 4GB
✅ PostgreSQL 15+ (can be upgraded to 16/17)
✅ Redis 8.x latest version
✅ Firewall dual-layer protection
Next, you can deploy your backend service.
This article is compiled based on real experiences of stumbling into pitfalls, in the hope of helping those who come later avoid unnecessary detours.